Brazing copper to stainless steel can seem like a daunting task, but with the right approach and tools, you can achieve strong, reliable joints suitable for various applications. Whether you’re a seasoned professional or an intermediate enthusiast looking to refine your skills, this step-by-step guide will walk you through the entire process. From selecting the appropriate materials and tools to mastering advanced techniques for complex joints, you’ll learn how to prepare the metals, apply flux, use a propane torch, and ensure proper joint formation. What are the essential steps to brazing copper to stainless steel effectively? Dive in to discover practical tips and expert advice that will elevate your brazing projects to the next level.
To successfully braze copper to stainless steel, specific materials are essential to ensure a strong and reliable joint. These materials include:
Copper and stainless steel are the primary metals to be joined. Copper is known for its excellent conductivity and ductility, while stainless steel offers robustness and resistance to corrosion. Selecting high-quality parts is essential for ensuring the brazed joint’s integrity.
Selecting the right brazing alloy is critical. High-silver alloys, such as BAg-24 or SilverBraze 55T, are ideal for this purpose. These alloys offer the strength, corrosion resistance, and fluidity needed for a durable bond between copper and stainless steel.
Flux plays a vital role in the brazing process by removing oxide layers from the metal surfaces and promoting adhesion. Stainless steel-specific fluxes are particularly effective. Flux can be purchased as a paste or integrated into flux-coated alloys, depending on your needs.
Thorough cleaning is crucial to remove oils, grease, and other contaminants from the metal surfaces. Non-oil-based degreasants and solvents are recommended for this task, ensuring the surfaces are thoroughly clean before brazing.
The tools required for brazing copper to stainless steel are designed to facilitate the process and ensure safety. The key tools include:
These tools are used to clean and remove oxidation from the metal surfaces; a wire brush is effective for larger areas, while sandpaper is useful for finer details.
A Dremel tool can be beneficial for detailed cleaning or shaping of the metal parts. While not essential, it can enhance the precision of the preparation process.
A propane or MAPP gas torch is commonly employed to heat the metals during brazing. Propane torches are widely available and suitable for DIY projects, providing the necessary heat to melt the brazing alloy and form the joint.
Protective gear is critical to ensure safety during the brazing process. Heat-resistant gloves protect the hands from burns, while safety glasses shield the eyes from sparks and debris.
To achieve proper alignment and clearance between the parts, fixtures or weights can be used to hold the metals in place during brazing. This ensures that the brazing alloy flows correctly into the joint.
Maintaining the correct clearance and alignment is vital for a successful brazing operation.
A clearance of 0.001 to 0.005 inches between the copper and stainless steel parts is recommended. This gap allows the brazing alloy to flow into the joint and create a strong bond.
Proper alignment ensures that the parts are held securely and in the correct position. Fixtures or weights can be used to maintain this alignment without disrupting the clearance.
By using the appropriate materials and tools, and ensuring proper clearance and alignment, you can achieve a strong and reliable brazed joint between copper and stainless steel.
Cleaning the metal surfaces thoroughly is crucial before brazing copper and stainless steel. Any contaminants like oil, grease, dirt, or oxides can interfere with the brazing process, leading to weak joints.
Mechanical cleaning involves using tools like wire brushes or fine-grit sandpaper to remove contaminants, but avoid non-metallic abrasives like aluminum oxide or glass beads, as they can create wetting issues.
Use chemical cleaning with solvents like acetone or isopropyl alcohol to remove oils and grease.
Flux is essential in the brazing process as it helps remove oxides and promotes the wetting of the filler metal on the base metals.
Choose a high-temperature flux designed for stainless steel when brazing copper to stainless steel.
Proper alignment and clearance between the copper and stainless steel parts are crucial for successful brazing.
Maintain a clearance of 0.001 to 0.005 inches between parts using feeler gauges. Use clamps or weights to hold the metals securely in place during brazing, ensuring the gap remains consistent.
Paste flux is popular because it’s easy to apply and works well. It can be applied directly to the metal surfaces with a brush, ensuring that the flux covers the entire joint area. This type of flux is particularly useful for larger joints where thorough coverage is necessary.
Liquid flux provides excellent coverage and can penetrate small gaps, making it ideal for intricate joints or where detailed work is required. Handle liquid flux carefully to prevent spills and ensure even coverage.
Flux-coated rods simplify the brazing process by combining the flux and the brazing alloy in one product. These rods are great for beginners or quick repairs since they don’t require separate flux application.
Silver brazing alloys with high silver content, such as SSQ-6 (56% silver) or SilverBraze 55T (55% silver), are preferred for brazing copper to stainless steel. These alloys provide excellent strength, resist corrosion, and flow well, making them ideal for strong, reliable joints.
For applications where cost is a concern, low-silver content alloys can be used. While they may not offer the same level of performance as high-silver alloys, they can still provide adequate strength and corrosion resistance for less demanding applications.
Silver brazing alloys are the most versatile and widely used for joining copper and stainless steel. They provide strong, corrosion-resistant joints and are suitable for a wide range of applications, including plumbing, automotive, and medical equipment.
Copper-phosphorus alloys are typically used for brazing copper to copper, but they can also be used for copper to stainless steel in certain situations. These alloys cost less than silver brazing alloys but aren’t as strong or corrosion-resistant.
Nickel-based alloys are used for high-temperature applications or where the joint will be exposed to harsh environments. These alloys offer excellent strength and corrosion resistance but are more challenging to work with due to their higher melting points.
Before beginning the brazing process, it is essential to set up your workspace properly. Make sure all necessary tools and materials are within reach, then follow these steps:
Flux is crucial in the brazing process as it cleans the metal surfaces and promotes the flow of the brazing alloy. Follow these steps to apply flux correctly:
Proper heating is essential for achieving a strong brazed joint. Follow these steps to heat the metals correctly:
Once the metals are heated, apply the brazing alloy to form the joint. Follow these steps:
Proper joint formation is crucial for a strong and reliable brazed connection. Follow these steps to ensure the joint is correctly formed:
Precision and control are essential when brazing complex, multi-angle joints. To achieve a strong and reliable bond, follow these advanced techniques:
Brazing copper to stainless steel requires special techniques due to their different melting points and thermal expansion rates. Follow these steps to ensure a durable bond:
For high-stress joints that must withstand pressure and mechanical forces, follow these reliable brazing techniques:
For successful brazing of intricate shapes, careful handling and precision are key. Follow these tips:
A common issue when brazing copper to stainless steel is insufficient bonding. Insufficient bonding can result from poor surface preparation, incorrect clearance, or inadequate flux application, with contaminants like oils, grease, and oxidation being major culprits.
Thermal shock, caused by rapid heating or cooling, can lead to cracks in the joint. This issue is particularly prevalent when there is a significant difference in the thermal expansion rates of copper and stainless steel.
Gas entrapment, often caused by incorrect flux or improper heating, can weaken the brazed joint.
Movement during the solidification of the brazing alloy can disturb the joint, leading to weak or incomplete bonding.
Using an inappropriate braze alloy or flux can cause bonding issues and weaken the joint.
Corrosion can occur if residual flux is not removed after brazing, especially when copper is involved.
Flux can become saturated with oxides due to overheating, preventing proper alloy flow.
When encountering issues during brazing, follow these common troubleshooting steps:
Brazing creates strong joints without melting the base metals, which keeps their properties intact. It uses lower temperatures, reducing distortion risk and making it ideal for joining materials like copper and stainless steel that expand differently. Plus, brazing results in smoother, more attractive joints compared to welding.
Ensure your workspace is well-ventilated to prevent inhalation of harmful fumes released from fluxes and metals during the brazing process, especially when working with materials that may produce toxic fumes like zinc or cadmium.
Always wear appropriate PPE, including heat-resistant gloves to protect your hands from burns, shaded goggles to shield your eyes from intense light and flying debris, and a face shield for additional protection.
Keep a suitable fire extinguisher nearby and clear the workspace of flammable materials to reduce the risk of accidental fires.
Handle fluxes carefully as they can release harmful fumes during heating; follow the manufacturer’s safety data sheets for proper usage and storage.
Clean the base metals thoroughly to avoid contaminants. Contaminants like oil, grease, and oxides can interfere with the bonding process and produce dangerous fumes when heated. Use appropriate cleaning agents and tools to ensure the surfaces are clean before brazing.
Ensure all materials meet industry standards. Filler metals and fluxes should comply with relevant regulations such as OSHA guidelines and EU RoHS compliance. This ensures safety and reliability in the brazed joints.
Follow a qualified Brazing Procedure Specification (BPS). A BPS outlines the specific requirements for the brazing process, including base metal type, thickness, joint design, and heating methods. Adhering to these specifications ensures consistent and high-quality results.
Inspect brazed joints for strength and integrity, looking for defects such as cracks or excessive oxidation to ensure consistent and high-quality results.
Dispose of waste materials properly. Used fluxes, metals, and other waste products should be disposed of in accordance with local environmental regulations. Improper disposal can harm the environment and pose health risks.
Monitor exposure to hazardous substances. Keep track of the exposure levels to harmful fumes and metals, ensuring they do not exceed the permissible limits set by health and safety authorities. Use appropriate monitoring equipment if necessary.
Maintain accurate records of brazing operations. Document the materials used, the brazing conditions, and any issues encountered during the process. This information is valuable for future reference and compliance verification.
Provide adequate training for personnel involved in brazing. Ensure that all workers are familiar with the safety protocols, proper handling of materials, and the correct use of equipment. Regular training sessions can help in updating the knowledge and skills required for safe brazing operations.
Below are answers to some frequently asked questions:
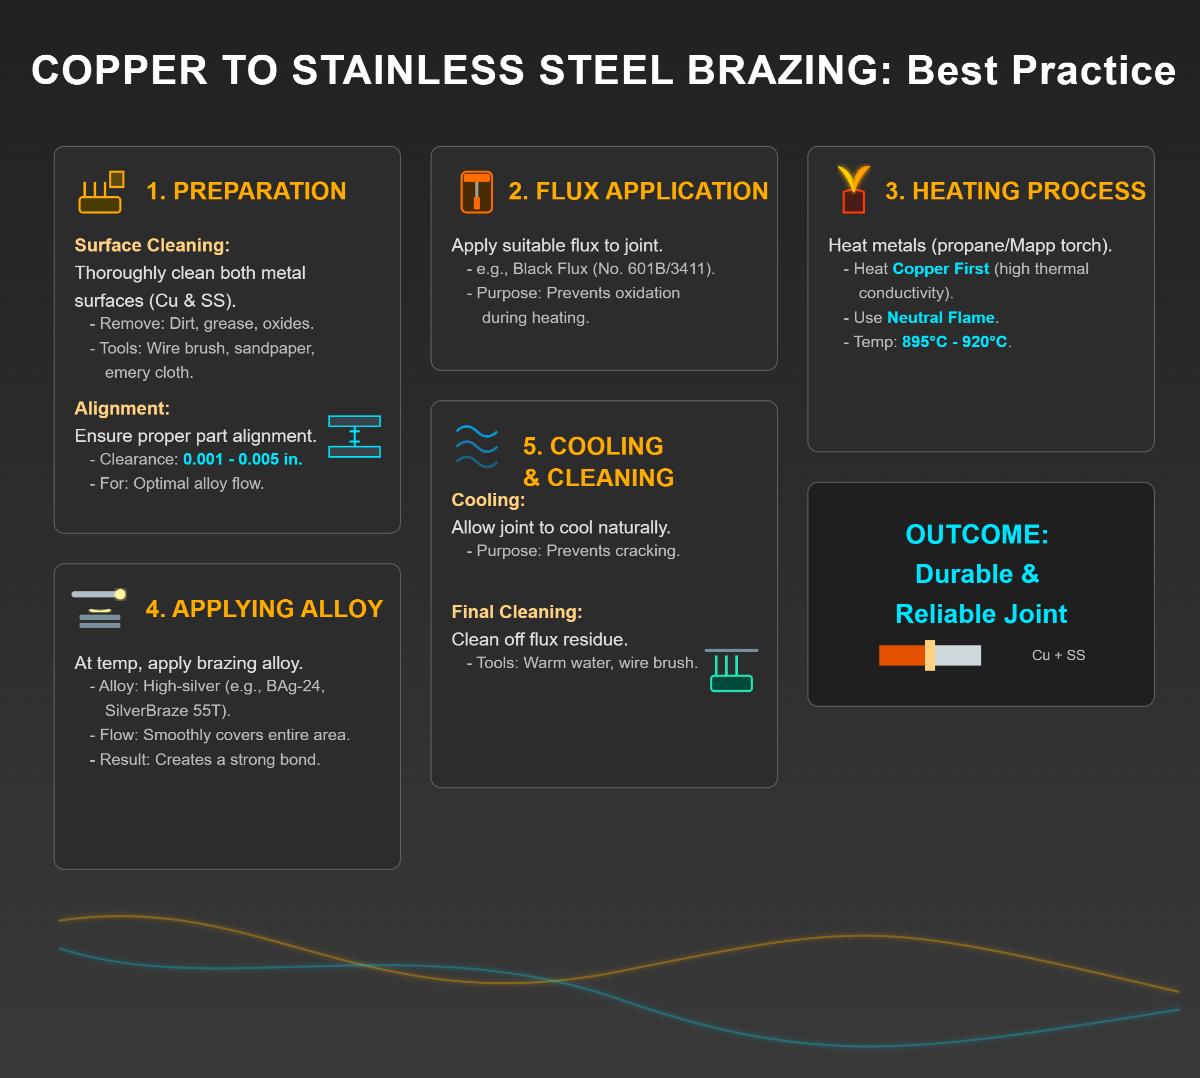
The best method for brazing copper to stainless steel involves a meticulous step-by-step process. Start by thoroughly cleaning the surfaces of both metals to remove any dirt, grease, or oxidation. This can be done using a wire brush, sandpaper, or emery cloth. Ensure the parts are properly aligned with a joint clearance of 0.001 to 0.005 inches for optimal brazing alloy flow.
Next, apply a suitable flux, such as Black Flux (No. 601B/3411), which prevents oxidation during the heating process. Heat both metals using a propane or Mapp gas torch, focusing on the copper first due to its higher thermal conductivity. Maintain a neutral flame and aim for a temperature range of 895°C to 920°C.
Once the metals reach the correct temperature, apply a high-silver brazing alloy like BAg-24 or SilverBraze 55T to the joint. The alloy should flow smoothly into the joint, covering the entire area for a strong bond. Allow the joint to cool naturally to prevent cracking, and clean off any flux residue with warm water and a wire brush. This method ensures a durable and reliable brazed joint between copper and stainless steel.
To prepare copper and stainless steel for brazing, start by ensuring both metals are clean and free of contaminants such as oil, grease, rust, and dirt. This can be achieved through chemical cleaning using solvents and acids or mechanical cleaning with wire brushes or media blasting. Once clean, select an appropriate flux that prevents oxidation during the heating process and apply it to the surfaces. Properly align the metals to ensure a good fit, maintaining a precise clearance typically between 0.0015 and 0.003 inches to facilitate capillary action.
To braze copper to stainless steel, you will need several essential tools and materials. Firstly, the metals themselves, copper and stainless steel, are required for the process. For the brazing operation, silver brazing rods are used as the filler material due to their high strength and fluidity at brazing temperatures. Additionally, flux is necessary to clean the metal surfaces and facilitate the flow of the brazing alloy by preventing oxidation during heating.
A propane torch is needed to provide the heat required to melt the silver brazing rods and achieve the working temperature of the metals. Cleaning materials such as emery cloth, wire brushes, or solvents are crucial for preparing the metal surfaces by removing oxides and contaminants. By using these tools and materials, you can effectively braze copper to stainless steel, ensuring a strong and reliable joint.
Ensuring a strong joint when brazing copper to stainless steel involves several critical steps. First, proper joint design is essential; lap joints are preferred due to their larger surface area, providing greater strength. Maintaining an optimal clearance of 0.001 to 0.005 inches ensures effective capillary action of the filler metal.
Cleanliness is crucial; all surfaces must be free of contaminants. Apply the correct flux to prevent oxidation and improve filler metal flow. During assembly, ensure proper alignment using jigs or fixtures as necessary.
Heat the metals evenly with a propane torch, ensuring the temperature is sufficient to melt the silver brazing rods without overheating. Apply the filler metal evenly and allow the joint to cool slowly to prevent stress and distortion.
When brazing copper to stainless steel, avoiding common mistakes is essential for achieving strong and reliable joints. One common error is insufficient clearance between the parts, which can prevent the filler metal from flowing properly. Ensure that the parts have adequate space for the brazing alloy to fill the gap. Another mistake is having dirty or contaminated surfaces; clean the surfaces thoroughly to remove dirt, oil, and oxidation, as these can impede the bonding process.
Additionally, inadequate or missing flux can be problematic since flux protects the metals from oxidation and aids in the flow of the brazing alloy. Apply a thin layer of flux uniformly. Uneven heating can lead to incomplete penetration of the filler metal; heat both parts of the joint evenly. Leaving flux residue can weaken the joint and cause corrosion, so clean the joint immediately after brazing.
Using the wrong braze alloy can result in weak joints; select an appropriate alloy, such as those containing silver and nickel for copper and stainless steel. Lastly, brazing at the incorrect temperature can cause incomplete melting or overheating; monitor the temperature carefully to ensure proper brazing. By avoiding these mistakes, you can achieve strong and durable brazed joints.
To clean and maintain brazed joints, particularly when brazing copper to stainless steel, follow these steps:
By adhering to these steps, you can ensure that your brazed joints remain clean, durable, and reliable.

