Best Practices for Oversized Hole Diameters
Imagine a skyscraper swaying gracefully in the wind, its stability and strength relying on every bolt and joint. The seemingly…
Imagine holding a blueprint for a groundbreaking piece of machinery, but without precise dimensions, it remains just a fascinating sketch. The true art of engineering drawings lies in the meticulous details that guide the manufacturing process, ensuring every component fits perfectly. This article delves into the comprehensive world of dimensioning, unraveling the best practices that transform conceptual designs into manufacturable realities. Whether you’re looking to refine your drawings to meet industry standards or optimize them for seamless production, our step-by-step guide will equip you with essential techniques and insights. Ready to elevate your engineering drawings? Let’s dive into the fundamentals and beyond.
In engineering drawings, dimensioning specifies the measurements of a part’s features, including size, location, and orientation. Accurate dimensioning is critical for clear communication between the designer and the manufacturer, reducing the risk of errors and ensuring consistency in the production process.
Dimensioning shows the designer’s intent by specifying important dimensions and tolerances. This ensures that the final product aligns with the design requirements and performs as expected, avoiding misunderstandings and potential design flaws.
Dimensioning is essential for determining how components fit together in an assembly. It specifies clearances, tolerances, and spatial relationships between parts, ensuring that components fit together without issues, maintaining the product’s functionality.
Dimensioning also serves as a reference for quality control inspections. Inspectors use the dimensions and tolerances specified in the drawings to verify that the manufactured parts meet the required standards, helping to maintain the quality and reliability of the final product.
Engineering drawings are detailed representations of parts and assemblies that provide all the necessary information for manufacturing. They include various views, dimensions, and notes that describe the geometry, material, and other specifications.
Orthographic views are 2D representations from different angles, like front, top, and side views. Isometric views are 3D representations that show the object in a three-dimensional perspective, providing a clearer understanding of its shape and features. Section views show a cut-through of the object to reveal internal features that are not visible in the external views.
Engineering drawings use a standardized set of symbols and notations to convey information clearly and unambiguously. Common symbols include:
By understanding and applying these basic concepts of dimensioning, engineers and draftspersons can create accurate and effective engineering drawings that ensure the proper manufacturing and assembly of components.
Dimensioning in engineering drawings is essential for accurately communicating the size, location, and features of a part. It ensures that the manufacturing process produces components that meet design specifications and function as intended. Understanding the core concepts of dimensioning is crucial for creating clear and precise drawings.
Dimensions must be clear and not subject to multiple interpretations, ensuring that manufacturers and inspectors can accurately understand and execute the design intent. Each dimension should be presented once to avoid confusion, and it should relate directly to the functional surfaces or mating parts. This clarity ensures that manufacturers and inspectors can accurately understand and execute the design intent.
A drawing should fully define the part without requiring any additional calculations or assumptions. This means that all necessary dimensions for manufacturing and inspection must be included. Providing a complete definition prevents errors and omissions that could lead to production issues.
Dimensions should be shown in views where the feature appears in its true shape, making the drawing easier to interpret. This practice ensures that the dimensions relate directly to the visible outlines rather than hidden lines, making the drawing easier to interpret and use.
Different types of dimensions are used in engineering drawings to describe various aspects of a part. Each type has specific applications that help convey the necessary information accurately.
Linear dimensioning measures straight distances between two points. It is commonly used for defining the length, width, and height of a part.
Angular dimensioning measures the angles between two lines or planes. This type of dimensioning is used for features such as chamfers and angled cuts.
Radial dimensioning specifies the radius of circular features, such as fillets or rounded edges. It is essential for defining curves and arcs accurately.
Diametral dimensioning measures the diameter of circular or cylindrical features. This type of dimensioning is crucial for parts like shafts and holes.
Ordinate dimensioning specifies the distance of a point from a reference line or plane. It is useful for defining the location of multiple features in a coordinate system.
Engineering drawings use standardized symbols and notations to convey dimensions and related information. Understanding these symbols is vital for interpreting and creating accurate drawings.
Dimension lines are thin lines with arrowheads that indicate the extent of a dimension. Extension lines extend from the feature to the dimension line, clearly showing which feature the dimension refers to.
Leader lines connect notes or dimensions to specific features, clarifying which part of the drawing the note or dimension applies to.
Center lines indicate the center of circles or symmetrical features. They are used to define the axis of cylindrical parts or the center of holes.
Tolerances indicate the allowable variations in dimensions. They ensure that parts will fit and function correctly even if there are minor deviations from the specified dimensions. Tolerances are typically represented as plus-minus values or by directly specifying the limits.
The arrangement of dimensions on a drawing is crucial for readability and accuracy. Proper arrangement helps prevent misunderstandings and errors during manufacturing.
Chain dimensioning involves a series of connected dimensions. It is used when the accumulation of tolerances is not critical, allowing for easier measurement of distances between features.
Parallel dimensioning consists of multiple dimensions that are parallel to each other and share a common datum. This method is often used when several features have a common reference point.
Combined dimensioning uses both chain and parallel methods for convenience and clarity. This approach ensures that all necessary dimensions are included without redundancy.
By adhering to these fundamental dimensioning principles, engineers and draftspersons can create precise and effective engineering drawings that facilitate accurate manufacturing and inspection.
To ensure accurate and effective engineering drawings, follow these key guidelines set by ASME and ISO standards.
Using standard symbols for dimensions and tolerances is crucial for creating drawings that are easy to read and interpret.
Consistent units and tolerances are crucial to avoid confusion and ensure accuracy.
Proper placement of dimensions on a drawing enhances readability and prevents errors.
While ASME and ISO standards share many similarities, there are key differences that engineers should be aware of.
Some symbols used in ASME and ISO standards differ, which can lead to confusion if not properly understood.
The terminology used in ASME and ISO standards can vary, even when referring to similar concepts.
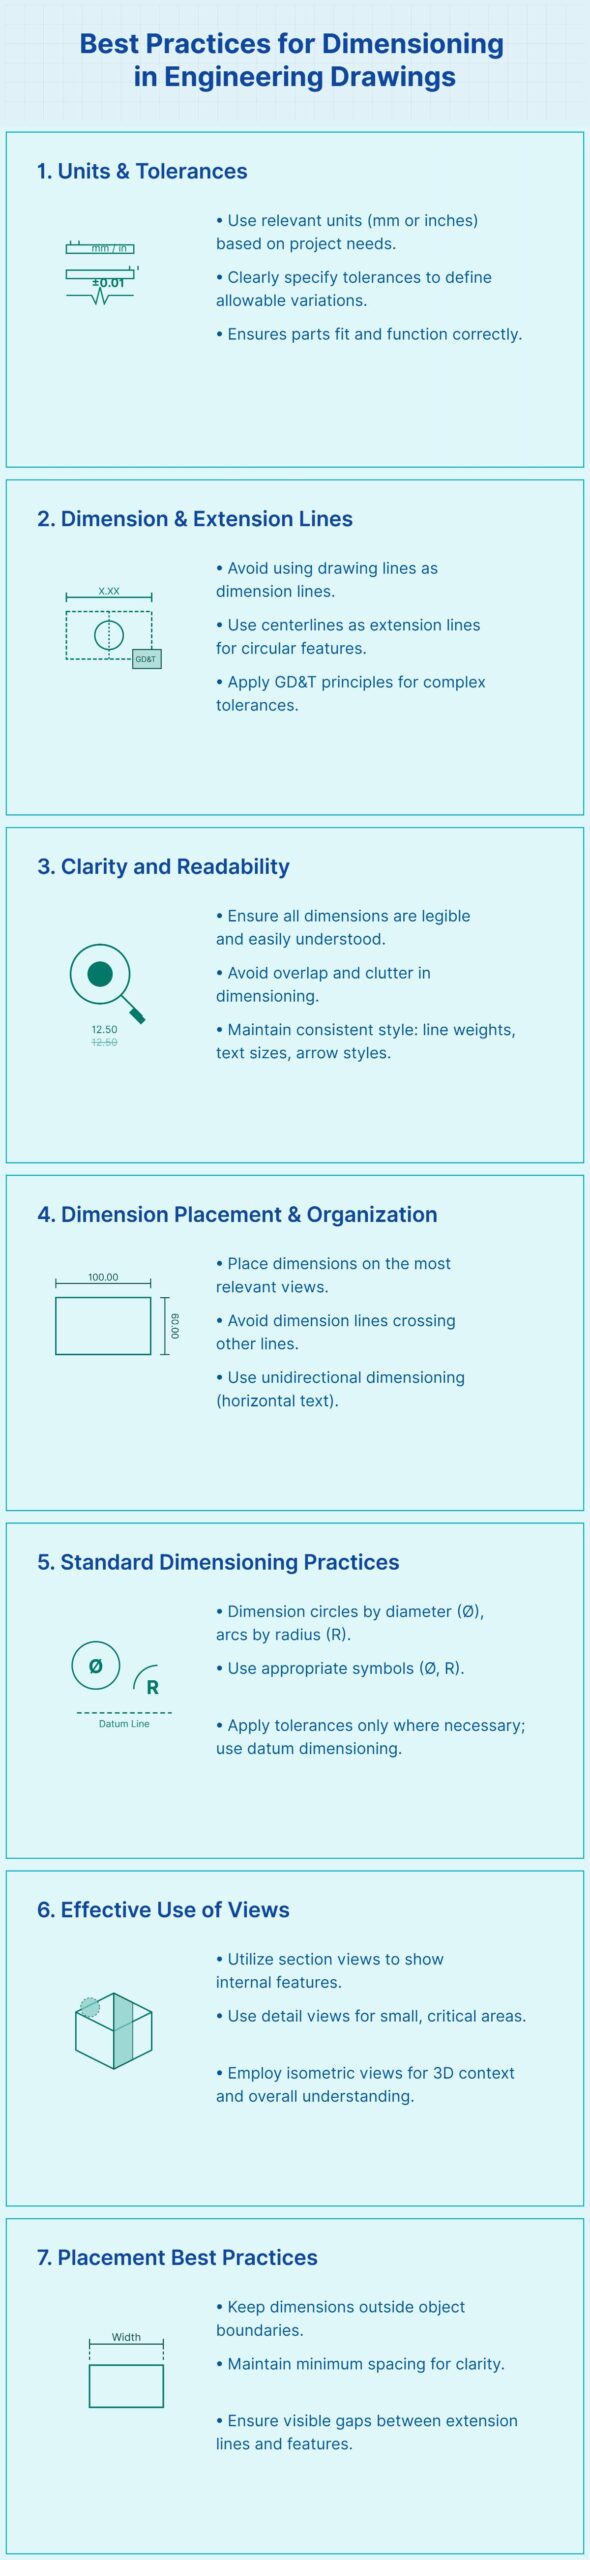
Effective engineering drawings require clear and precise dimensions. This ensures that the design intent is communicated unambiguously, reducing the likelihood of manufacturing errors.
Select units that are standard in the industry, such as millimeters or inches, and use them consistently throughout the drawing. This practice prevents confusion and ensures that all stakeholders understand the measurements without the need for conversions.
Specify tolerances clearly to account for manufacturing variability. Tolerances indicate the acceptable range of variation for a dimension, ensuring that parts fit and function correctly even with slight deviations.
Each feature should be dimensioned only once to avoid redundancy and potential confusion. Redundant dimensions can lead to errors during manufacturing and inspection.
Proper placement of dimensions enhances the readability of engineering drawings. Dimensions should be placed on the view that best represents the feature’s shape and should be outside the view when possible. Extension lines should be perpendicular to the feature being dimensioned and should extend slightly beyond the dimension lines. This practice ensures that the dimensions are clearly associated with the correct features.
Maintaining a consistent style throughout the drawing is essential for clarity. Ensure that dimensions are legible, not overlapping, and presented in a standard format.
Use GD&T principles for detailed tolerancing needs. GD&T offers a complete system for defining part shapes and tolerances to ensure they function correctly.
When dimension lines must cross, use breaks or loops at the point of crossing to maintain clarity. This practice helps to keep the drawing organized and easy to read.
Different dimensioning techniques can be applied based on the design requirements and the complexity of the part.
Chain dimensioning links a series of related features with connected dimensions. However, it can accumulate tolerances, so use it with caution.
Parallel dimensioning features multiple parallel dimension lines, which are useful when dimensions share a common datum. This method helps to maintain consistency and accuracy in the dimensions.
Combining chain and parallel dimensioning techniques can provide clarity and convenience. This approach ensures that all necessary dimensions are included without redundancy.
To ensure that the dimensions in the engineering drawings align with manufacturing capabilities, consider the following:
Dimensions should be compatible with the manufacturing process. Ensure that the specified dimensions can be achieved with the available tools and techniques.
Ensure all dimensions are easy to measure and inspect during quality control. This guarantees that the parts meet specifications.
Utilize digital tools, such as Building Information Modeling (BIM), to enhance the visualization and communication of design intent. These tools can improve the accuracy and efficiency of the dimensioning process.
Adhering to industry standards, such as ASME Y14.5, ensures that dimensioning and tolerancing practices are compliant and consistent. Using a consistent scale throughout the drawing helps prevent errors and misinterpretations.
By following these best practices, engineers can create precise and effective engineering drawings that facilitate accurate part production and quality control.
Interactive dimensioning tools are revolutionizing the way engineers and draftspersons create and manage engineering drawings. These tools offer advanced functionalities that streamline the dimensioning process, improve accuracy, and enhance collaboration. Below is a detailed overview of some popular interactive dimensioning tools and their benefits.
Interactive dimensioning tools provide several advantages over traditional manual methods:
Edraw.AI is an online platform that offers a comprehensive suite of tools for creating precise engineering drawings. It supports multiple dimensioning types, such as linear, angular, radial, and diametral. Key features include:
Adobe Illustrator is a versatile tool that includes advanced dimensioning capabilities. It is widely used in both engineering and graphic design fields. Notable features are:
ArcMap is a powerful GIS (Geographic Information System) software that includes robust dimensioning tools for engineering drawings. Features include:
To optimize engineering drawings for manufacturing, it is essential to understand the various manufacturing processes and their requirements. Each process, including machining, casting, forging, and additive manufacturing, has unique constraints and capabilities to consider during the design phase.
Machining involves removing material to create the desired shape. Key considerations include:
Casting involves pouring molten material into a mold. Important factors are:
Forging shapes metal using compressive forces. Considerations include:
Additive manufacturing builds parts layer by layer. Key aspects are:
DFM principles focus on simplifying the design to make it easier and more cost-effective to manufacture. Key strategies include:
Involving manufacturing engineers early in the design process helps identify potential issues and optimizes the design for manufacturability. This collaboration can lead to:
Engineering drawings must be converted into output files that manufacturing equipment can interpret. Common file formats include:
Modern analytics and automation tools can significantly reduce manual work and improve the efficiency of creating engineering drawings. Techniques include:
Improving collaboration between design and manufacturing teams ensures that drawings meet manufacturing requirements. Effective strategies include:
Clear and precise drawings minimize misinterpretations, ensuring that parts fit and function correctly, thereby reducing errors and rework.
Optimized drawings streamline the manufacturing process, reducing manual tasks and labor costs, and ensuring faster time to market.
Designs optimized for manufacturing lead to higher-quality products with fewer defects. This also supports higher production volumes, making manufacturing more scalable and sustainable.
Advanced dimensioning techniques are crucial for creating precise and efficient engineering drawings, especially for complex parts and assemblies. These techniques enhance the clarity and functionality of drawings, ensuring they are easy to interpret and manufacture.
Tabular dimensioning involves using a table to list dimensions, which helps keep the drawing clean and organized, particularly for parts with numerous features or when multiple parts share similar dimensions. Create a table that lists each feature and its corresponding dimension. Reference each feature on the drawing with a code or number that corresponds to the table. This method reduces clutter on the drawing and makes it easier to read, facilitating updates to dimensions without redrawing the entire part.
Polar coordinate dimensioning is ideal for parts with features arranged in a circle, using a radius and angle to specify each feature’s location. Specify the radius from a central point and the angle from a reference direction (usually the horizontal axis) to locate each feature. This simplifies the dimensioning of circular patterns and reduces the number of linear dimensions required, enhancing the readability of the drawing.
Rectangular coordinate dimensioning is used for features arranged in a rectangular or non-circular pattern. Define a reference point (origin) and use X and Y coordinates to specify the location of each feature relative to this point. This method provides a straightforward way to dimension parts with rectangular patterns and helps ensure accurate placement of features.
Baseline dimensioning involves dimensioning from a common baseline or datum. Establish a baseline or datum from which all dimensions are taken, with each dimension measured from this common reference point. This reduces tolerance buildup and improves the accuracy of feature placement, simplifying the inspection and manufacturing processes.
Geometric Dimensioning and Tolerancing (GD&T) is a comprehensive system for defining the geometry of parts and the allowable variations in their features. Use GD&T symbols to define geometric characteristics like flatness and parallelism, specifying tolerance zones to control variations. This method provides a precise and unambiguous way to describe complex geometries, ensuring parts will fit and function correctly even with variations in manufacturing.
In CAD software like SolidWorks, the Fully Define Sketch tool automates the process of applying dimensions and relations to fully define a sketch. Use the Fully Define Sketch tool to automatically add dimensions and constraints to a sketch, then adjust them as needed to meet design requirements. This saves time by automating the dimensioning process and ensures that sketches are fully defined and ready for further design work.
Ensure clarity and consistency in your dimensions by avoiding overlaps, using standard units, and applying appropriate tolerances. Place dimensions outside part views and use tables or coordinate systems to keep the drawing organized. By mastering these advanced dimensioning techniques, engineers can create precise and efficient drawings that facilitate accurate manufacturing and inspection.
Over-defining tolerances happens when multiple tolerances are set for the same feature, leading to confusion. This can complicate the manufacturing process and increase the likelihood of errors.
Simplify drawings by using a single tolerance method for each feature. For example, if a position tolerance is specified, avoid adding unnecessary angular tolerances that might conflict with it.
Features without sufficient positional tolerance can lead to manufacturing inconsistencies.
Ensure all critical features have appropriate positional tolerances. Perform a tolerance analysis to determine acceptable positional error limits.
Inconsistent use of dimensioning standards can result in misunderstandings and errors during manufacturing.
Establish and adhere to consistent dimensioning standards across all drawings. Use tools like AutoCAD to ensure accuracy and consistency in dimension data.
Excessive use of symbols and details can clutter drawings, making them difficult to interpret.
Consider breaking down complex assemblies into separate drawings for each component. Focus on essential details to maintain clarity.
Incorrect use of Geometric Dimensioning and Tolerancing (GD&T) symbols can lead to confusion.
Ensure GD&T symbols are used correctly according to established standards. For example, the symmetry symbol should not be used to define patterns but rather for specific geometric conditions.
Crossing dimension lines can obscure important information and create confusion.
Avoid crossing dimension lines. If unavoidable, use loops at intersections to maintain clarity.
Failure to adhere to established dimensioning standards can lead to misinterpretation.
Follow standards such as ASME Y14.5 for dimensioning and tolerancing. Use appropriate units and maintain consistency throughout the drawing.
Dimensions placed on hidden lines or in cluttered areas can be misleading.
Place dimensions on visible outlines and outside the view whenever possible. Ensure that dimension lines are thin, continuous, and clearly marked with arrows.
Specifying overly tight tolerances can increase manufacturing costs without adding value.
Define tolerances necessary for the function and fit of the part, avoiding unnecessary tight specifications in non-critical areas.
Below are answers to some frequently asked questions:
To ensure precise and effective engineering drawings, follow these best practices for dimensioning:
By adhering to these practices, engineers can create clear and accurate drawings that facilitate manufacturing and assembly, reducing errors and improving product quality.
To optimize engineering drawings for manufacturing, start by ensuring clear and precise dimensioning. Avoid duplications and ensure all dimensions are unique, using unidirectional dimensioning to enhance readability. Focus on dimensioning only critical features and apply tolerances sparingly to essential elements, preventing unnecessary complexity. Utilize multiple drawing views, including orthographic, section, and detail views, to accurately represent the part’s geometry and reveal internal features.
Embrace technology by using software that supports automation, such as CNC machines, to interpret digital drawings and streamline production. Maintain consistency in styles, sizes, and standards across all drawings to avoid confusion. Clearly define essential information in title blocks and use concise notes to clarify design intent.
Ensure that all critical dimensions are inspectable and mark them clearly to facilitate quality control. Adhering to these practices will improve manufacturing efficiency, enhance collaboration, and reduce production errors, resulting in high-quality, manufacturable engineering drawings.
ASME Y14.5 and ISO GPS are the two prominent standards for dimensioning in engineering drawings.
ASME Y14.5, maintained by the American Society of Mechanical Engineers, is widely used in the United States and other countries. It provides a comprehensive system for geometric dimensioning and tolerancing (GD&T), establishing symbols, rules, and practices to ensure clear and consistent communication of specifications. Key principles include the Envelope Principle, which states that size tolerances inherently control form tolerances unless otherwise specified. The standard covers various categories such as Form, Orientation, Location, Profile, and Runout.
ISO GPS (Geometrical Product Specifications) standards are developed by the International Organization for Standardization and offer a global framework for specifying and verifying part geometry. Key standards within ISO GPS include ISO 8015 for fundamental rules, ISO 1101 for drawing symbols, and ISO 2768 for general geometrical tolerances. The Independency Principle is central to ISO GPS, meaning each dimensional or geometric tolerance must be met independently unless a specific relationship is indicated.
Both standards aim to ensure precision in engineering drawings but differ in principles and application scope, with ASME Y14.5 being more common in North America and ISO GPS facilitating international collaboration.
Common symbols used in dimensioning are essential for accurately conveying specifications in engineering drawings. Here are some frequently used symbols:
These symbols ensure clarity and precision in engineering drawings, facilitating accurate manufacturing and quality control processes.
Automation significantly impacts dimensioning in engineering by enhancing efficiency, precision, and However, automation also introduces challenges. For instance, it can create redundant dimensions, complicating inspections and increasing the workload for manufacturers. Additionally, automated dimensioning may not always convey design intent clearly, potentially leading to misunderstandings during manufacturing.
Despite these challenges, the benefits of automation, such as time and cost savings, make it a valuable asset in engineering. As technology advances, the development of more sophisticated automation tools will further optimize the dimensioning process.
Common mistakes in dimensioning engineering drawings can significantly impact the manufacturing process and product quality. Some of the most frequent errors include:
By avoiding these common mistakes, engineers can produce clear and accurate engineering drawings that facilitate efficient and error-free manufacturing.

