Cast Bronze vs. Bronze: What’s the Difference?
Bronze has long been revered for its strength and versatility, but did you know that not all bronze is created…
Have you ever wondered what holds massive structures together, ensuring they stand strong against the test of time? J-bolts are a crucial component in the world of construction and manufacturing, providing the necessary stability and support. This comprehensive guide delves into the various types of J-bolts, their diverse applications, and the meticulous steps required for proper installation. Whether you’re securing machinery or fortifying a building’s foundation, understanding the nuances of J-bolts can significantly impact the success and safety of your projects. Ready to master the art of using J-bolts efficiently? Let’s explore the specifics of each type, their unique applications, and the essential safety measures to keep in mind.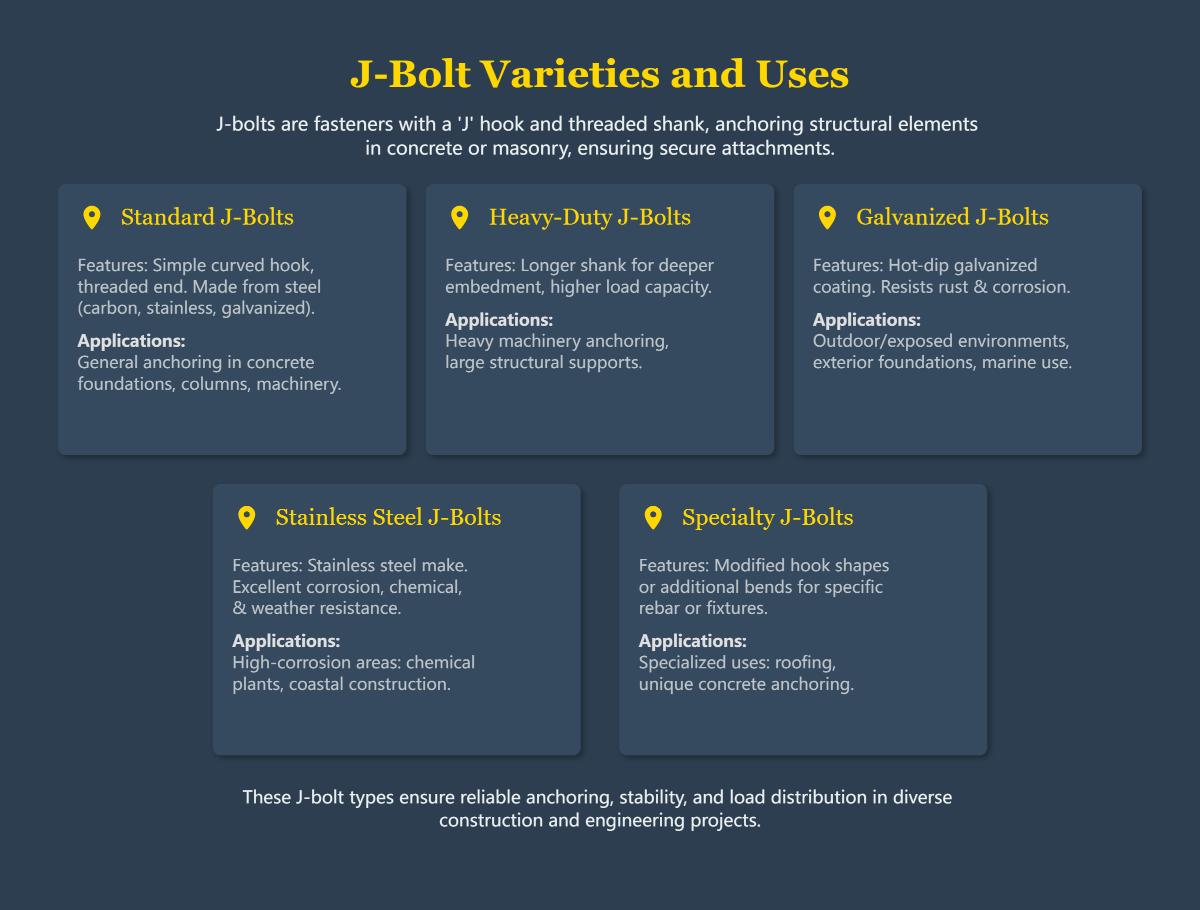
J-bolts are crucial fasteners in construction and engineering, easily identified by their distinctive J-shaped hook. This design allows them to anchor structural components to concrete foundations effectively. The primary function of J-bolts is to secure columns, beams, machinery, and equipment to concrete slabs or foundations, ensuring the stability and integrity of the structure.
In construction, J-bolts play a crucial role in maintaining the structural integrity of buildings and other constructions. Their ability to hook around rebar and embed securely in concrete makes them indispensable for projects that demand high load-bearing capacity and durability.
In manufacturing, J-bolts mount machinery and equipment onto concrete bases, ensuring stability during operation. This application is particularly important in industries where heavy machinery is involved, as it prevents movement and potential damage.
J-bolts are a fundamental component in construction and manufacturing, providing reliable anchorage and ensuring the stability of various structures and equipment. Their unique design, strength, and versatility make them a vital part of numerous engineering applications.
Standard J-bolts are widely used in construction and manufacturing due to their J-shaped design, which allows them to hook securely around rebar embedded in concrete.
Description and Common Uses:
Structural Applications:
L type anchor bolts, distinguished by their L-shaped bend, offer additional anchoring strength compared to J-bolts.
Features and Specific Applications:
Machinery Mounting:
U type anchor bolts, or U-bolts, feature a U-shaped design with threaded ends, making them ideal for securing pipes and conduits.
Benefits and Industry Uses:
Securing Roof Structures:
J-bolts play crucial roles in construction and engineering, offering reliable anchorage and structural support.
Foundation Anchoring:
Roofing:
Equipment Mounting:
Pole and Signpost Installation:
Marine and Outdoor Structures:
Before installing J-bolts, ensure the concrete foundation is properly prepared for secure anchoring.
Having the right tools and materials on hand is crucial for the successful installation of J-bolts.
Prioritize safety by following these precautions during the installation process:
Follow these step-by-step instructions to install J-bolts in concrete correctly.
J-bolts can be installed in various types of concrete and other materials. Here are some considerations for different environments:
Proper alignment and securing of J-bolts are critical for the stability of the structures they support.
Avoid these common mistakes to ensure a successful installation:
Always verify the J-bolts’ load capacity to match the structural requirements for safety. Overloading J-bolts can lead to structural failures, which can be catastrophic. Check the manufacturer’s specifications and guidelines to confirm that the J-bolts are suitable for the intended load.
Choose J-bolts based on the environment they will be used in. For high-moisture or chemically aggressive environments, opt for J-bolts made from corrosion-resistant materials such as galvanized steel or stainless steel. This will prevent corrosion and ensure the longevity and reliability of the installation.
Proper positioning of J-bolts is crucial for maintaining the integrity of the concrete foundation. Position the J-bolts at least 2 inches inward from the edge of concrete slabs or footings. This practice helps to prevent cracking or pull-out during stress, thereby enhancing the stability and safety of the structure.
Adhere to the manufacturer’s recommendations for the minimum embedment depth of J-bolts. Typically, this depth is 4–12 times the bolt diameter, depending on the load requirements. Proper embedment ensures that the J-bolts can handle the specified loads without failing.
Ensure that J-bolts are embedded deeply enough to resist upward forces, particularly in areas prone to seismic activity or high winds. Insufficient embedment can lead to pull-out failures, compromising the stability of the structure.
In applications involving machinery, use locknuts or thread-locking compounds to prevent the J-bolts from loosening over time due to vibrations. This practice is essential for maintaining the secure attachment of equipment and preventing operational disruptions.
Avoid overtightening the nuts on J-bolts, as this can cause the surrounding concrete to crack (spall). Spalling weakens the concrete and reduces the holding capacity of the bolts. Tighten nuts to the specified torque to prevent such issues.
Inspect J-bolts regularly, especially in high-stress environments. Check for signs of rust, deformation, or loosening every 6–12 months. Promptly address any issues to maintain the integrity of the installation.
Periodically verify the integrity of the J-bolt anchors using torque tests or non-destructive evaluation methods. This practice ensures that the bolts remain secure and capable of handling the specified loads over time.
Monitor the environment around the J-bolts for signs of corrosion. Apply protective coatings or replace corroded bolts as needed to prevent structural weakening and ensure long-term reliability.
For retrofitting projects, pair J-bolts with epoxy adhesives to enhance bond strength. This combination provides additional security and stability for structural steel connections.
In manufacturing plants, combine J-bolts with vibration-dampening washers to reduce fatigue caused by constant vibrations. This setup helps to prolong the lifespan of both the bolts and the machinery.
Follow OSHA-compliant spacing guidelines when using J-bolts to secure warehouse racking. Proper spacing prevents shelving collapse under dynamic loads, ensuring the safety of the storage system.
Ensure that J-bolts meet the ASTM F1554 grade requirements (e.g., Grade 36, 55, or 105) for tensile strength and elongation. Compliance with these standards guarantees that the bolts are suitable for the intended applications.
Adhere to the International Building Code (IBC) standards for anchor spacing and embedment in seismic design categories. This compliance is critical for ensuring the safety and stability of structures in seismic zones.
Verify compliance with OSHA standards when using J-bolts for structural steel assembly in construction. Adhering to these regulations helps to maintain a safe working environment and prevent accidents.
Use calibrated torque wrenches for accurate tightening of J-bolts and impact drivers for embedded installations. Proper tools ensure that the bolts are installed securely and to the correct specifications.
Wear appropriate PPE, including cut-resistant gloves, safety goggles, and steel-toe boots, during the handling and installation of J-bolts. This equipment helps to protect against potential injuries and ensures a safe installation process.
Avoid anchoring J-bolts in partially cured concrete, as this can reduce the holding capacity by up to 50%. Ensure that the concrete has fully cured before proceeding with the installation.
Prevent cross-threading during nut installation, as it weakens the connection and accelerates wear. Proper threading ensures a secure and durable attachment.
Clean anchor holes thoroughly before installing J-bolts to ensure full epoxy adhesion or mechanical grip. Removing debris and dust from the holes is critical for achieving a strong and secure bond.
In high-load applications, use non-shrink grout around J-bolts to distribute forces evenly. This technique enhances the load-bearing capacity and stability of the installation.
Install rebar near slab edges to prevent concrete failure when using J-bolts in perimeter applications. Edge reinforcement provides additional support and prevents cracking under stress.
Apply controlled tension to J-bolts during installation to minimize long-term relaxation in dynamic environments. Pre-tensioning helps to maintain the structural integrity and stability of the installation over time.
Below are answers to some frequently asked questions:
J-bolts are essential fasteners in construction and engineering, characterized by a “J” shaped hook at one end and a threaded shank on the other. They primarily serve as anchor bolts embedded in concrete or masonry to provide secure attachments for structural elements. There are several types of J-bolts, each suited for specific applications:
Each type of J-bolt is designed to provide reliable anchoring solutions in various construction and engineering scenarios, ensuring stability and load distribution.
To properly install J-bolts in concrete, follow these steps:
By following these steps, you ensure a strong and reliable installation of J-bolts in concrete.
When using J-bolts, several safety considerations are crucial to ensure both personal safety and the structural integrity of the installation. First, always wear appropriate personal protective equipment (PPE) such as gloves, safety glasses, and protective footwear to prevent injury from handling sharp or heavy materials. Additionally, inspect the site to identify potential hazards and ensure a safe working environment.
Proper installation is key; J-bolts should be inserted into wet concrete and allowed to set, ensuring a strong bond. Use the correct tools and follow manufacturer guidelines to avoid improper placement, which can compromise the bolt’s effectiveness. Ensure the J-bolt is rated to support the intended load, considering factors like environmental conditions and stress.
Common mistakes during J-bolt installation can compromise the integrity and effectiveness of the anchoring system. One frequent error is inadequate embedment depth, which can diminish the load-carrying capacity and lead to potential failure. This can be avoided by following the recommended embedment depth specified by engineering guidelines or anchor manufacturers, considering factors such as the type of anchor bolt, load requirements, and substrate properties.
Poor bolt alignment is another common issue. Misalignment can weaken the anchoring system. To prevent this, use templates or jigs for precise hole drilling and verify alignment with levels or plumb lines. Inadequate bolt tightening is also problematic, as under-tightened bolts can compromise the system’s effectiveness. Always tighten bolts according to the manufacturer’s specifications.
Additionally, insufficient hole cleaning can prevent proper contact between the bolt and concrete. Ensure holes are clean before installation using methods like wire brushing or air blowing. Lastly, the straightening of the hook can reduce the holding power of J-bolts under stress. Proper installation techniques should be followed to avoid any bending or straightening of the hook. By addressing these common mistakes, you can ensure a secure and reliable J-bolt installation.
To ensure the proper alignment of J-bolts during installation, start by reviewing the blueprints to determine the exact positions. Mark these positions on the concrete surface to ensure correct spacing and alignment. Drill holes at the marked positions, keeping the drill perpendicular to the surface for accuracy. Clean the J-bolts, removing any debris or protective coatings. Carefully insert each J-bolt into its corresponding hole, applying slight downward pressure for proper seating.
Verify that each J-bolt is perpendicular to the surface using a level or plumb line. Ensure they are inserted to the specified depth according to the construction plans. Hold the J-bolts securely in place during installation to prevent shifting, using temporary supports if necessary. Double-check the alignment and location of all J-bolts after installation, making adjustments as needed. Finally, clean the surrounding area to avoid interference with the installation process. Following these steps will help achieve accurate and secure J-bolt alignment.
Yes, J-bolts can be used in different types of materials other than concrete. While their primary application is anchoring elements to concrete foundations, they are also effective in materials such as steel, wood, plastic, and composites. For instance, stainless steel J-bolts are often used to secure lighting fixtures or megatree structures to steel or plastic mounts, offering durability and corrosion resistance. Galvanized J-bolts are suitable for outdoor wooden frameworks, providing protection against rust. When using J-bolts in these materials, ensure appropriate preparation, such as pre-drilling holes in wood to prevent splitting, and using washers and locking nuts to distribute the load and prevent loosening. This versatility makes J-bolts a valuable component in various construction and mounting applications beyond concrete.

