Polished Nickel: Characteristics, Maintenance, and Design
Imagine walking into a room where every detail gleams with a luxurious shine, instantly capturing your attention—this is the magic…
Have you ever admired the timeless elegance of antiqued metal and wondered how you could achieve that same look with polished nickel? Transforming shiny, polished nickel into a piece with character and history is both an art and a science. In this comprehensive guide, we’ll walk you through each step of the antiquing process, ensuring you have all the knowledge and tools necessary to succeed. You’ll learn how to properly prepare your polished nickel, what materials and safety gear you need, and the detailed steps to achieve that coveted antique finish. Are you ready to give your polished nickel a vintage makeover that stands out? Let’s dive in!
Polished nickel is a metallic finish composed primarily of nickel, a silvery-white metal known for its warm, lustrous appearance, durability, and resistance to corrosion. The polished finish enhances the natural sheen of nickel, resulting in a subtle satin-like appearance. This finish is less reflective than polished chrome, offering a more understated and elegant look.
Polished nickel is widely used in various metalworking and crafting applications due to its appealing finish and durability. Here are some common uses:
Before beginning the antiquing process, gather the following tools and materials:
Safety is crucial when working with chemicals and tools. Ensure you have the following safety gear:
Begin by washing the polished nickel surface with a mixture of mild dish soap and warm water. Use a soft cloth or microfiber towel to gently remove dirt, grease, and any surface contaminants. Thoroughly rinse the cleaned surface with clean water and dry it completely with a soft cloth. Ensuring the surface is dry is crucial to prevent water spots and ensure the effectiveness of subsequent steps.
After polishing, use automotive parts cleaner or rubbing alcohol to remove any residual polishing compound from the surface, then dry it thoroughly with a soft cloth. This step ensures the nickel is clean and ready for antiquing.
Antiquing polished nickel involves intentionally aging the metal surface to create a vintage, classic look. The goal is to achieve a finish that highlights the natural patina and wear, giving the item a timeless and unique character.
Antiquing polished nickel involves a series of chemical reactions that alter the metal’s surface, creating an aged appearance. The primary reaction in antiquing is oxidation, which changes the color and texture of the nickel surface.
Oxidation occurs when the nickel reacts with an oxidizing agent, such as acids or hydrogen peroxide. This results in the formation of nickel oxides on the surface:
This chemical change produces a patina, ranging in color from dark brown to green or blue, depending on the acids and chemicals used.
The specific acids used can create varying effects. For instance, hydrochloric acid (HCl) accelerates the oxidation process, creating a deep, dark patina. Citric acid, on the other hand, offers a more controlled and less aggressive reaction, resulting in a subtler finish.
The ingredients in antiquing solutions are key to the final look of the nickel. These solutions often contain a mix of acids, oxidizers, and other compounds to achieve the desired effect.
Handling chemicals for antiquing requires strict adherence to safety protocols to prevent health hazards and environmental damage.
The choice of chemicals significantly impacts the appearance and texture of the antiqued nickel.
Hydrochloric acid creates a deep, dark patina by aggressively oxidizing the nickel surface. This method is suitable for achieving a heavily aged look.
Citric acid offers a more controlled oxidation process, resulting in a lighter, more uniform patina. It is ideal for achieving a subtle, antique finish.
Proper care is essential to maintain the aesthetic appeal of antiqued nickel.
Clean with mild products designed for antiqued metals and avoid abrasives or harsh chemicals that can damage the patina.
Keep antiqued pieces in a cool, dry place and use protective covers to maintain their finish and prevent further oxidation or tarnishing.
To maintain the beautiful antiqued finish on polished nickel, regular, gentle cleaning is essential.
Use a soft, non-abrasive cloth with a mild soap solution (mild dish soap mixed with warm water) to clean the surface. This method effectively removes grime and oils without damaging the finish. Avoid harsh chemicals or abrasive materials, as they can strip the finish and cause damage to the aged appearance.
Dry the surface thoroughly with a microfiber cloth after cleaning to prevent water spots, which can affect the finish.
To prolong the life of the antiqued finish and protect it from environmental factors, consider applying additional protective measures.
Apply a clear coat or lacquer to protect the aged finish from environmental factors, especially for indoor items. Additionally, applying a layer of pure beeswax polish after cleaning can enhance the appearance and provide a barrier against moisture and contaminants.
Limit handling with bare hands, as oils and acids from the skin can gradually damage the finish. Using gloves when handling antiqued nickel items can help preserve their appearance. Regularly clean the items after frequent use to prevent grime buildup, which can dull the finish and affect the aesthetic appeal.
Environmental factors can significantly impact the longevity and appearance of antiqued nickel. Proper placement and care are crucial.
Avoid using antiqued nickel items outdoors, as exposure to the elements can accelerate deterioration. If outdoor use is unavoidable, regular cleaning and reapplication of a protective clear coat are essential to maintain the finish.
Avoid placing nickel hardware in direct sunlight or high-moisture areas. These conditions can accelerate tarnishing and oxidation, diminishing the antique finish’s appearance.
Understanding the impact of chemicals on antiqued finishes is crucial for maintaining their integrity.
Be aware of the risks associated with using chemicals for cleaning antiqued nickel, including potential health hazards and damage to the metal surface. Always ensure proper ventilation and use appropriate safety gear when handling chemicals.
Never use harsh chemical cleaners on antiqued nickel, as they can strip the finish and cause significant damage. Stick to mild cleaning agents and non-abrasive cloths to preserve the aged look.
Below are answers to some frequently asked questions:
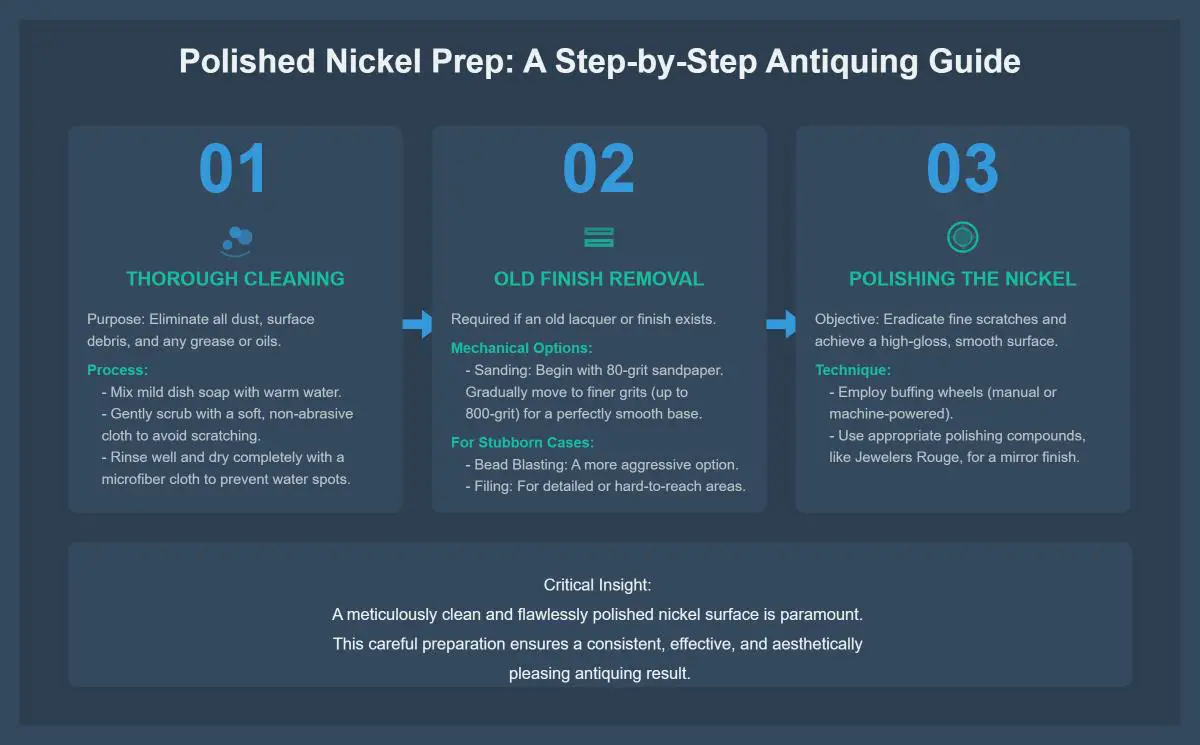
To prepare polished nickel for antiquing, start by thoroughly cleaning the surface to remove any dust, debris, or grease. Use a mixture of mild dish soap and warm water with a soft, non-abrasive cloth, then rinse and dry with a microfiber cloth to prevent water spots. If there is an old finish, remove it using mechanical methods such as sanding with 80-grit sandpaper, progressing to finer grits up to 800 for a smooth surface. For stubborn finishes, bead blasting or filing can be used. Next, polish the nickel using buffing wheels and polishing compounds like Jewelers Rouge to eliminate scratches and achieve a smooth, shiny surface. Ensuring the nickel is clean and polished is crucial for a consistent and effective antiquing process.
To antique polished nickel, you will need several materials to achieve the desired aged look. Essential items include mild dish soap and warm water for initial cleaning, followed by automotive parts cleaner, paint thinner, or rubbing alcohol to remove any remaining residues. A primer is necessary to ensure the antiquing paint or product adheres properly and prevents chipping. For the actual antiquing, products like Rub n Buff, which contain carnauba waxes, metallic powders, and pigments, are commonly used. Optional household chemicals can be employed for a more authentic aged appearance. Additionally, a soft cloth is required for buffing, and protective gear such as gloves and a dust mask are essential for safety, especially when working with older pieces.
To maintain the finish after antiquing polished nickel, start by gently cleaning the surface with a mixture of mild dish soap and warm water using a microfiber cloth. Regular cleaning, ideally every few weeks, helps remove dirt without damaging the finish. Avoid harsh chemicals like strong acids, alkalis, or cleaners containing bleach or ammonia, as they can strip the antiqued finish. For stubborn stains, use a gentle polish designed for metal surfaces.
Ensure the surface is thoroughly dried after cleaning to prevent water spots and mineral deposits. Regularly buff the surface with a soft cloth or buffing wheel to maintain its sheen and remove minor imperfections, being careful not to over-buff.
Yes, you can antique other types of metals using similar processes to those used for polished nickel. Metals such as brass, bronze, and copper can be antiqued through chemical treatments and manual techniques. For instance, copper and bronze respond well to sulfur-based solutions like liver of sulfur, which create a patina effect. Brass can be aged using sulfur or selenium solutions, with selenium providing more precise control over the resulting color. Non-noble metals, such as zinc and pewter, often require electroplating with copper or brass before antiquing to achieve a suitable surface. Always ensure proper safety precautions, such as using protective gear and working in well-ventilated areas, and test antiquing methods on small areas first to ensure desired results.
During the antiquing process of polished nickel, several common mistakes can significantly impact the final result. Firstly, insufficient cleaning can leave behind residues that prevent the antiquing solution from adhering properly, leading to an uneven finish. It is crucial to thoroughly clean the surface using appropriate cleaners like automotive parts cleaner or rubbing alcohol.
Another mistake is using incorrect chemicals. Harsh chemicals can damage the nickel plating or create an undesirable aging effect. Opt for gentler solutions like a mix of vinegar, salt, and hydrogen peroxide. Additionally, inadequate preparation, such as not removing old finishes or oxidation, can lead to poor results. Ensure the nickel is completely clean and free of any oxidation before starting.
Uneven application of antiquing products can result in patchy or streaky finishes. Apply the solution in small sections using circular motions for even coverage. Inadequate buffing can also leave excess product on the surface, leading to a dull appearance. Buff gently with a clean, soft cloth to achieve the desired sheen.
Safety precautions are essential; always use appropriate safety gear and ensure proper ventilation when handling chemicals. Lastly, failing to apply a protective coating after antiquing can leave the surface vulnerable to damage. Use a layer of wax or a similar protective coating to maintain the finish and prevent deterioration over time. By avoiding these mistakes, you can achieve a consistent and professional-looking antique finish on polished nickel.
The antiquing process for polished nickel typically takes between 3 to 10 hours from start to finish. This duration includes several key steps:
The total time can vary based on the size and complexity of the piece, the desired level of antiquing, and the specific methods and safety measures employed.

