How to Cast Metal: A Step-by-Step Guide
Have you ever marveled at the intricate details and robust strength of metal objects, wondering how they are created? Welcome…
Have you ever marveled at the intricate details of metal sculptures or functional metal objects and wondered how they were made? Imagine being able to create your own metal masterpieces right from the comfort of your home. With the right guidance, this seemingly complex craft can become an exciting and rewarding DIY project. This step-by-step guide will walk you through the fundamental steps of casting metal at home, from choosing the right metal alloys to mastering techniques like lost wax, sand, and investment casting. We’ll also cover essential safety precautions to ensure your metal casting experience is as safe as it is satisfying. Ready to dive into the world of home metal casting and unleash your inner artisan? Let’s get started!
Metal casting is a manufacturing process that involves pouring molten metal into a mold to create a solid object with a specific shape. For thousands of years, this technique has been used to create tools, decorative items, and industrial parts. For beginners, metal casting offers an accessible way to create custom designs for DIY projects, ranging from jewelry to functional parts. The process combines creativity, engineering, and craftsmanship, making it both rewarding and practical.
Metal casting is particularly useful for DIY enthusiasts because it allows for the creation of complex shapes that would be difficult to achieve with other methods. You can adapt this process for small-scale home workshops, and it works well with metals like aluminum, brass, and tin. It also offers the ability to reuse and recycle metal scraps, making it an environmentally friendly choice for hobbyists. Understanding metal casting enables you to customize items and repair or replicate parts, adding a new dimension to your creative capabilities.
Before diving into metal casting, it’s important to familiarize yourself with a few key concepts and terms:
A mold is the cavity or structure that shapes the molten metal. Molds can be made from materials like sand, ceramic, or metal, depending on the casting method and desired result.
A pattern is a model of the object you want to cast, used to shape the mold cavity. Patterns can be made from wood, plastic, or wax.
The sprue is the channel through which molten metal enters the mold, while runners distribute the metal to different parts of the mold cavity.
A casting alloy refers to the metal or combination of metals used for casting. Common alloys include aluminum for lightweight projects and brass for decorative items.
Solidification is the process where molten metal cools and hardens inside the mold, taking on its final shape.
Knowing these basic terms will help you navigate the casting process more effectively and communicate better with others in the field.
By mastering the basics of metal casting, beginners can create functional and artistic pieces while exploring the fascinating intersection of science and art.
When casting metal at home, using the right personal protective equipment (PPE) is non-negotiable to protect yourself from potential hazards.
Safety goggles that meet ANSI standards are crucial for shielding your eyes from molten metal splashes and flying debris. Adding a face shield provides comprehensive protection for your face.
Heat-resistant gloves are necessary for handling hot materials and equipment. Choose gloves designed for high-temperature resistance and a secure grip.
Sturdy, heat-resistant boots safeguard your feet from accidental spills of molten metal. Avoid wearing open-toed footwear or sandals.
Wear long-sleeved, flame-resistant clothing to protect against heat and sparks. A leather or heat-resistant apron adds an extra layer of defense.
Understanding the dangers of metal casting can help you take proactive steps to reduce risks.
Molten metal poses a serious burn risk. Always handle it cautiously, wear proper protective gear, and move slowly to prevent spills.
Molten metal can release harmful fumes. Make sure your workspace is well-ventilated using fans or an exhaust system to clear fumes and smoke.
Keep flammable materials away from your casting area, and always have a fire extinguisher nearby that you know how to use.
Creating a safe workspace is essential for successful home metal casting.
Ensure your workspace has proper airflow. Use fans or an exhaust system to keep the air clean and free of harmful fumes.
Dedicate a specific area for casting, away from other activities. This minimizes risks and keeps the workspace organized and safe.
Post clear warning signs to alert others, especially in shared workspaces, about potential dangers in the casting area.
Inspect equipment like furnaces, crucibles, and fuel lines regularly, and promptly replace any damaged or worn parts. Regular maintenance helps prevent unexpected failures.
Monitor the temperature of your molten metal closely. Use a reliable thermometer to avoid overheating, which can make the metal volatile.
Always preheat new metal before adding it to the furnace. This prevents sudden temperature changes that could lead to dangerous reactions.
Keep a fully stocked first aid kit and emergency contact numbers easily accessible. Familiarize yourself with procedures for handling burns, fires, and other potential emergencies.
Metal alloys are combinations of two or more elements, with at least one being a metal. These mixtures are designed to enhance specific properties such as strength, corrosion resistance, ductility, or conductivity, making them ideal for various applications in metal casting. Knowing the key properties of common alloys will help you choose the best materials for your casting projects.
The mechanical properties of an alloy determine how well it will perform under stress. For example:
The melting point of an alloy is crucial for home casting. Alloys with lower melting points, such as aluminum or pewter, are easier and safer to work with, especially for beginners. High-melting-point alloys like stainless steel require specialized equipment.
Castability is how well an alloy fills a mold and solidifies without defects. Alloys with good fluidity, such as aluminum and bronze, are easier to work with and produce high-quality results.
For projects exposed to moisture or harsh environments, choose a highly corrosion-resistant alloy like stainless steel or brass for durability.
Balancing cost with performance is essential. Aluminum alloys are generally affordable and widely available, making them a popular choice for beginners, while precious alloys like bronze or nickel offer superior properties at a higher price.
Lost wax casting, also known as investment casting, is an ancient metalworking technique used to create intricate and detailed metal objects. This method involves creating a wax model, which is then encased in a ceramic shell to form a mold. The wax is melted out, and molten metal is poured into the cavity left behind. Once the metal cools and solidifies, the ceramic shell is broken away to reveal the final metal piece.
To begin lost wax casting, you will need the following materials and tools:
Sand casting is one of the most versatile and accessible metal casting techniques, ideal for beginners. It involves creating a mold using sand and then pouring molten metal into it to produce the desired shape. This process is widely used because it allows for the casting of complex shapes with relatively simple tools and materials. Below is a step-by-step guide to help you get started with sand casting.
To perform sand casting, you will need the following:
Investment casting, also known as lost wax casting, is a versatile technique used to produce intricate metal parts with high precision. This method is widely adopted in various industries, including aerospace and healthcare, due to its ability to create complex shapes and fine details.
To get started with investment casting, gather the following materials and tools:
Different casting methods offer unique advantages and challenges, making them suitable for various applications. Here’s a comparison of three popular techniques: sand casting, lost wax casting, and investment casting, focusing on their processes, benefits, and limitations.
In sand casting, a mold is created using sand, a pattern is placed inside, and then molten metal is poured into the cavity. After cooling, the sand mold is broken to retrieve the casting.
Sand casting is ideal for large, simple shapes such as engine blocks, brackets, and basic tools. Its accessibility makes it a great choice for home projects and beginners.
This method uses a wax model to create a mold. The wax is melted out, leaving a cavity that is filled with molten metal. After the metal cools, the mold is broken away, unveiling the finished casting.
Lost wax casting is perfect for jewelry, sculptures, and detailed components in engineering or art. It’s suited for hobbyists with experience or those looking to produce high-quality pieces.
Investment casting, a type of lost wax casting, involves coating a wax pattern with several layers of ceramic material to form a strong mold. The wax is melted out, and molten metal is poured into the cavity.
Investment casting is ideal for producing aerospace components, medical tools, and decorative items. It’s best for professionals or advanced hobbyists with access to specialized equipment.
| Feature | Sand Casting | Lost Wax Casting | Investment Casting |
|---|---|---|---|
| Cost | Low | Moderate | High |
| Detail | Basic | High | Very High |
| Surface Finish | Rough | Smooth | Excellent |
| Ease of Use | User-Friendly | Intermediate | Advanced |
| Applications | Large, simple shapes | Jewelry, sculptures | Complex industrial parts |
Metal casting consumes a lot of energy, but by using sustainable practices, both hobbyists and professionals can reduce their environmental impact and stay efficient. These practices focus on reducing waste, conserving energy, and utilizing eco-friendly materials.
Modern energy-efficient furnaces, such as induction furnaces, convert energy into heat more effectively, reducing energy waste and lowering operational costs.
Opt for low-melting-point alloys like aluminum or pewter, which require less energy to reach their molten state. This is especially practical for beginners working in home setups with limited equipment.
Melt larger batches of metal in one go instead of several small ones to save energy and time.
Recycle and reuse metals and sand from previous projects to reduce waste and save energy. Sieving and conditioning sand can help maintain its quality for multiple uses.
Design molds to minimize excess material such as sprues and runners. This reduces waste and ensures more efficient use of your casting alloy.
In sand casting, you can use bio-based binders instead of traditional petroleum-based ones. These alternatives are biodegradable and reduce the environmental footprint of your casting activities.
When selecting casting alloys, consider materials with lower environmental impact. For example, aluminum is highly recyclable and widely available, making it a sustainable choice for many projects.
Smaller projects typically require less energy and resources. Focus on creating high-quality pieces in smaller quantities to reduce waste and environmental impact.
If possible, power your casting equipment using renewable energy sources like solar panels. This can significantly lower the carbon footprint of your casting activities.
Ensure that any waste materials, such as used sand or ceramic mold fragments, are disposed of responsibly. Some materials may be recyclable or reusable in other forms.
A well-ventilated workspace not only protects your health but also ensures efficient removal of fumes, reducing the risk of harmful emissions accumulating in your environment.
High-quality tools and equipment last longer and reduce the need for frequent replacements. This not only saves money but also reduces the waste associated with disposing of worn-out tools.
By incorporating these sustainability practices into your metal casting process, you can create high-quality projects while making environmentally responsible choices.
Below are answers to some frequently asked questions:
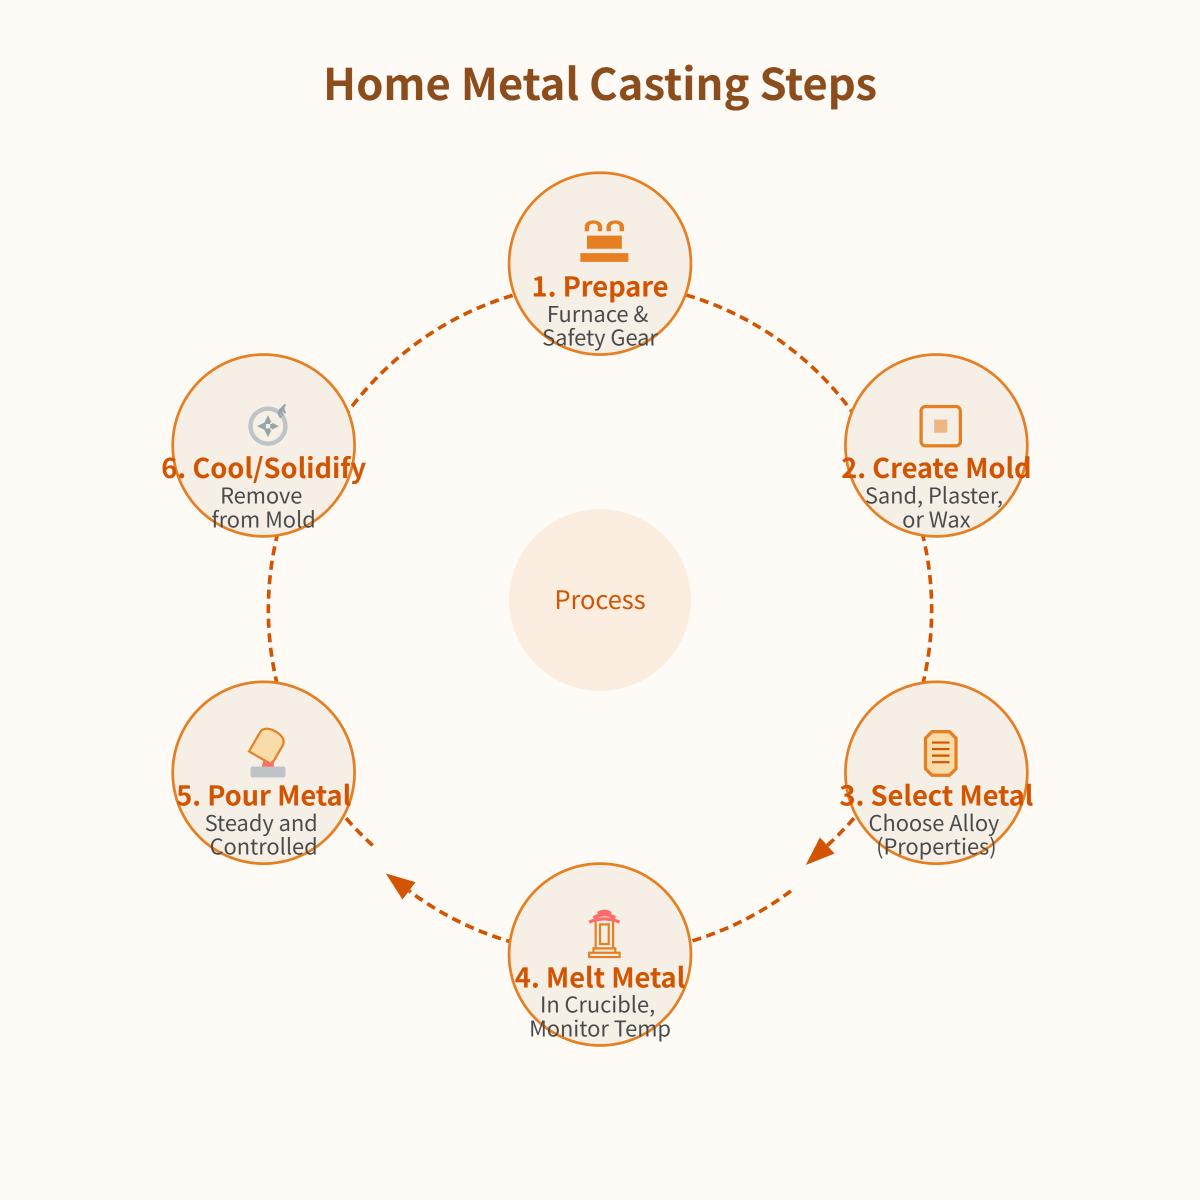
Casting metal at home involves several essential steps to ensure a successful project. First, prepare your furnace and safety gear; use a heat-resistant furnace and wear protective gloves, safety glasses, a face shield, and fire-resistant clothing. Next, create your mold using materials like sand, plaster, or wax, ensuring it matches your desired design. Choose the appropriate metal alloy for your project, considering factors like melting point and material properties.
Once ready, melt the metal in a crucible within the furnace, carefully monitoring the temperature to achieve the correct molten state. Pour the molten metal into the mold, maintaining steady and controlled movements to avoid defects. Allow the metal to cool and solidify completely before removing the mold.
To choose the right metal alloy for casting at home, start by understanding the properties of different metals. Consider factors such as melting point, fluidity, strength, and corrosion resistance, which will impact the suitability of the metal for your specific project. Determine the requirements of your project, such as the need for high strength, lightweight, or corrosion resistance, and select metals like steel, aluminum, or copper accordingly.
Next, align your choice with the casting method you plan to use, whether it is sand casting, investment casting, or lost wax casting, as each method has specific compatibility with certain metals. Balance performance with cost and availability; for instance, aluminum is cost-effective and widely used, while other metals might be chosen for their unique properties.
Lastly, consider the safety and environmental impact of the metal. Ensure it adheres to safety standards and think about its ecological footprint. By carefully evaluating these aspects, you can select the most appropriate metal alloy for your home casting project.
When casting metal at home, it is essential to follow strict safety precautions to prevent accidents and injuries. First, always wear personal protective equipment (PPE) such as heat-resistant gloves, fire-resistant clothing, safety goggles, and face shields to protect against splashes of molten metal. Ensure you have closed-toe shoes to protect your feet.
Prepare your work environment by ensuring it is well-ventilated to avoid the buildup of harmful fumes and gases. Keep the area free from flammable materials to reduce the risk of fire. Regularly inspect and maintain all equipment, including the crucible and furnace, to ensure they are in good working condition.
Operate slowly and carefully when handling hot metal to prevent spills or splashes. Limit the number of people in the workspace to minimize distractions and potential accidents. Always have a fire extinguisher nearby and be familiar with its use. Additionally, keep a first aid kit on hand and have an emergency plan in place.
Comprehensive training and regular updates on safety protocols for everyone involved in the casting process are crucial. By following these guidelines, you can create a safer environment for home metal casting.
Lost wax casting, sand casting, and investment casting are three common methods used in metal casting, each with distinct characteristics and applications.
Lost wax casting involves creating a wax model that is coated with a ceramic shell. The wax is melted out, leaving a cavity into which molten metal is poured. This method is known for producing detailed and intricate designs, making it ideal for jewelry and fine art pieces.
Sand casting uses sand mixed with a binding agent to create a mold. Molten metal is poured into the sand mold to form the desired shape. This technique is suitable for producing large parts, such as engine blocks and machinery components, due to its cost-effectiveness and ease of mold modification.
Investment casting is essentially a modern version of lost wax casting, using advanced materials to create highly precise and smooth components. It is suitable for producing complex and high-precision parts used in industries like aerospace and automotive.
The main differences lie in the mold materials used, the level of detail and precision achievable, and the cost and efficiency of production. Lost wax and investment casting offer high detail and precision but are more costly and suited for low-volume production. Sand casting is less precise but more economical for large-scale production.
Practicing metal casting sustainably at home involves several key practices. First, focus on energy efficiency by using high-efficiency furnaces and heat recovery systems to minimize energy consumption. Secondly, prioritize material recycling; for example, reuse sand and metal scraps from previous projects to reduce waste. Third, select environmentally friendly materials when possible, such as biodegradable mold materials. Additionally, optimize your designs to use less metal and reduce defects, which helps conserve resources. Lastly, ensure that your workspace is well-ventilated and equipped with proper safety gear to protect yourself while minimizing environmental impact. By following these practices, you can make your home metal casting more sustainable and eco-friendly.
To troubleshoot defects in metal castings at home, start by identifying common issues such as porosity (air bubbles trapped in the metal), shrinkage (voids caused by metal contraction), cold shuts (incomplete fusion of molten metal), misruns (incomplete mold filling), and inclusions (foreign material trapped in the casting). Visual inspection is useful for surface defects, while X-ray or ultrasonic testing can reveal internal flaws.
Prevent defects by optimizing mold design for proper ventilation, ensuring the metal is at the correct pouring temperature, and using clean, high-quality materials. Adjust cooling rates to minimize shrinkage and avoid rapid solidification. If defects occur, small surface flaws can often be repaired with welding or polishing. Regularly inspect molds and casting processes to catch issues early. By refining techniques and maintaining equipment, you can improve the quality and durability of your castings.

