How to Color Stainless Steel Green: A Beginner’s Guide
Have you ever wondered how stainless steel can be transformed into vibrant shades of green? This fascinating process not only…
Imagine transforming the sleek, silver sheen of stainless steel into a vibrant red masterpiece that captivates the eye. Whether you’re a hobbyist eager to add a splash of color to your metalwork or a beginner intrigued by the art of metal coloring, this guide will walk you through the fascinating process of heat coloring stainless steel red. You’ll learn about the essential tools—like a jeweler’s torch and burnt oil—and the vital safety gear needed to ensure your project runs smoothly. With step-by-step instructions tailored for novices, you’ll be able to achieve the perfect red hue while mastering techniques to maintain its brilliance. Are you ready to unlock the secrets of stainless steel coloring and add a dazzling touch to your creations? Dive in to discover how!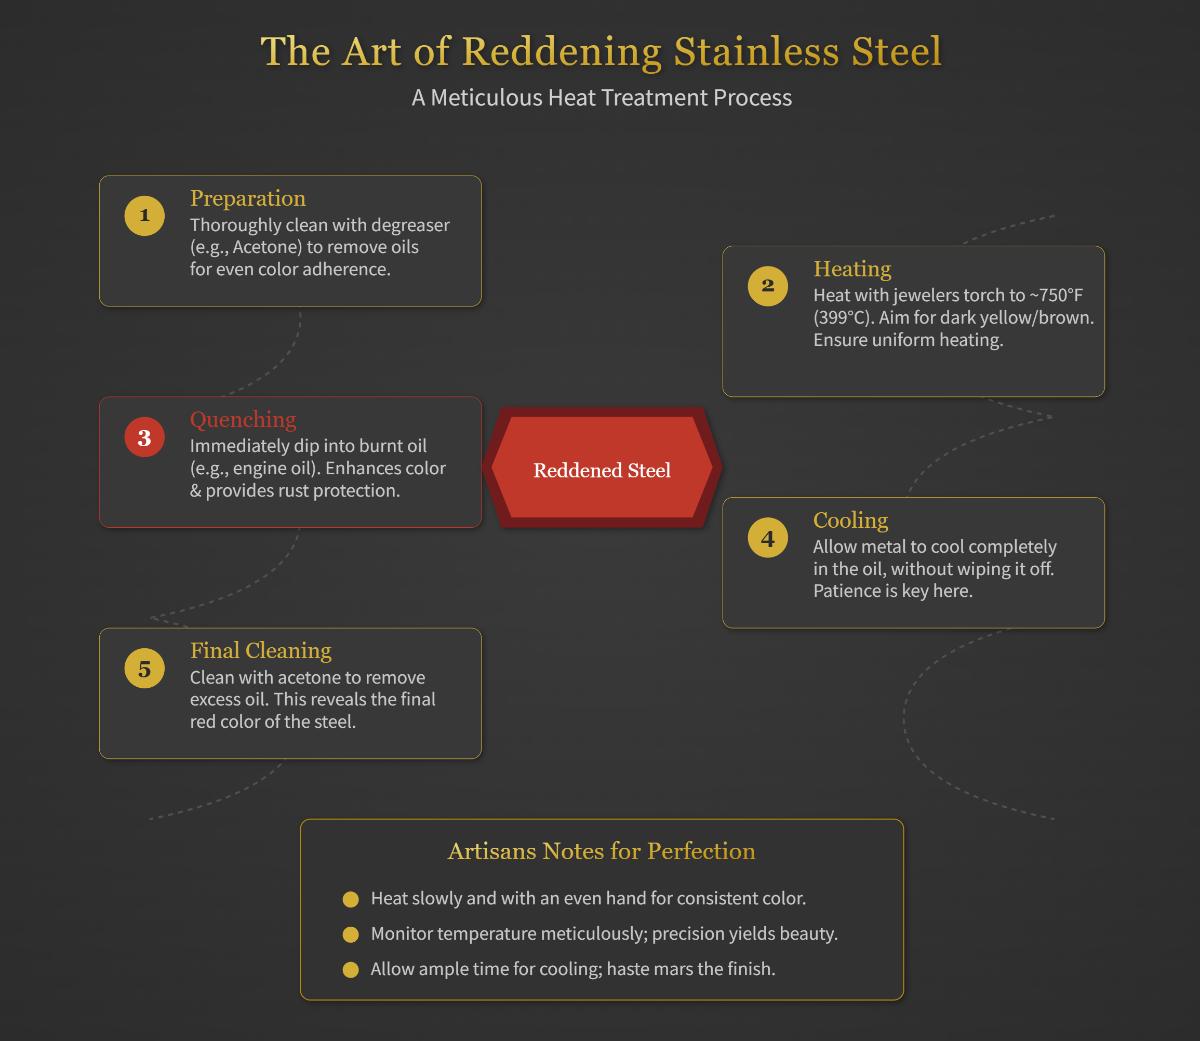
Coloring stainless steel not only elevates its visual appeal but also boosts its functional qualities. This process is particularly valuable for creating visually striking designs and adding a layer of protection against corrosion. Colored stainless steel is often used in decorative applications, architectural elements, and various consumer products, offering greater design flexibility and helping products stand out in the market.
Painting is one of the simplest methods for coloring stainless steel. This approach is straightforward and offers a broad color palette, but the resulting surface may be prone to chipping or peeling over time, especially in high-wear areas.
This technique involves adjusting the thickness of the natural oxide layer on stainless steel, which changes color through light refraction. Chemical coloration can produce a range of colors, but the process requires precise control and the use of specific chemicals.
Electrolytic coloration uses an electrical current in an electrolyte solution to create a thicker oxide layer, resulting in vibrant, durable colors. This method requires specialized equipment and expertise.
Metal ceramic coating involves applying a layer of ceramic material to the stainless steel surface. This coating can be colored and provides excellent durability and resistance to wear and corrosion. The process typically involves spraying or dipping the stainless steel in a ceramic slurry, followed by heating to fuse the coating to the metal. Metal ceramic coatings are highly durable and suitable for demanding applications.
Heat application involves heating stainless steel to create an oxide layer that varies in color from yellow to blue, depending on the temperature. While this method can produce unique gradient effects, achieving a specific red hue can be challenging.
When coloring stainless steel, especially using methods that involve heat or chemicals, it is crucial to follow safety guidelines to protect yourself and your workspace. Always wear appropriate protective gear, such as gloves, goggles, and aprons, to protect against burns, chemical splashes, and other hazards. Ensure your workspace is well-ventilated, especially when using chemicals or heat, as fumes and vapors can be harmful if inhaled. Keep flammable materials away from your workspace and have a fire extinguisher nearby when using a torch or other heat sources. Follow all safety instructions for handling and disposing of chemicals, use containers resistant to the chemicals you are working with, and store them properly.
Choosing the right stainless steel is crucial for heat coloring, with 304-grade being the top choice due to its vibrant color response and corrosion resistance. This grade of stainless steel is widely available and provides an ideal balance of durability and aesthetic potential.
A jeweler’s torch, fueled by butane or propane, provides precise heating, while a firebrick or ceramic tile offers a safe, heat-resistant workspace. This combination allows for controlled application of heat, which is essential for achieving the desired color effects on the metal surface.
Use tongs or locking pliers to safely handle hot metal, ensuring precision without risking burns. These tools are indispensable for maintaining control and safety while working with heated materials.
Start with a clean slate by using acetone or mineral spirits to remove oils, ensuring your stainless steel is primed for vibrant color transformation. A pure brass wire brush can also help in cleaning or polishing the surface, enhancing the final appearance of the colored metal.
Prioritize safety with goggles, a fire extinguisher, and heat-resistant gloves to protect yourself from sparks, heat, and fumes during the process. These precautions are essential to ensure a safe working environment and prevent accidents.
By carefully selecting materials and tools, and adhering to safety protocols, you can achieve beautiful, lasting results in heat coloring stainless steel.
Begin by thoroughly cleaning the stainless steel surface with acetone, mineral spirits, or a suitable degreaser. Use a clean cloth or paper towel to remove any oils, dirt, or residues that might interfere with the coloring process. Avoid touching the cleaned surface with your bare hands to prevent transferring oils or fingerprints, which could affect the final color.
Achieving a uniform surface finish is crucial for consistent coloring. Whether your stainless steel piece has a brushed or high gloss finish, ensure it is even across the entire surface. Uniformity is essential for consistent heat distribution, directly impacting the color’s consistency. If necessary, use a pure brass wire brush to gently polish the surface, enhancing the metal’s readiness for the next steps.
Once the surface is prepared, focus on organizing your workspace to ensure safety and efficiency. Use a firebrick or ceramic tile as a base for heating, providing a stable, heat-resistant platform. Ensure your workspace is well-ventilated to safely disperse any fumes or smoke generated during the process. Keep flammable materials away from the area, and have a fire extinguisher within reach as a precaution.
Wear goggles, heat-resistant gloves, and an apron to protect yourself from burns and fumes. Ensure you understand how to handle your tools safely, particularly the jeweler’s torch, which requires careful manipulation to apply heat evenly without overheating any section of the stainless steel.
Before you start, make sure you have everything you need at hand. Gather all necessary tools and materials, including your cleaned stainless steel piece, a jeweler’s torch, dark burnt engine oil for the oil dipping technique, and cleaning agents for post-coloring cleanup. Having everything on hand will streamline the process and help maintain focus on achieving the desired color.
By preparing your materials and workspace carefully, you ensure a safe and successful coloring process, enhancing both the quality and safety of your work.
This guide offers a detailed, step-by-step approach to heat coloring stainless steel to achieve a red hue, focusing on precision and safety.
Start by cleaning the stainless steel thoroughly using acetone or a degreaser to remove all oils and dirt. This ensures an even color application.
Use a jeweler’s torch to heat the metal evenly to around 750°F (399°C), moving the torch continuously to prevent overheating in one spot. At this temperature, the metal should reach a dark yellow to brown range, which is essential for achieving the red hue.
Quickly submerge the heated metal in burnt engine oil, ensuring it is fully covered. This step is crucial for setting the color. Allow the metal to cool completely in the oil without wiping it off immediately, as this can affect the final coloration.
Once the metal has cooled, use acetone or mineral spirits to remove any excess oil from the surface, revealing the final red color and ensuring it is free of residue.
Always wear gloves and safety glasses, and work in a well-ventilated area to avoid inhaling fumes.
Inconsistent color distribution is a common issue when coloring stainless steel. This issue often arises from uneven heating or contaminants on the surface.
Start by thoroughly cleaning the stainless steel with acetone or mineral spirits to remove oils and dirt, and avoid touching the cleaned surface with bare hands to prevent re-contamination. Move a jeweler’s torch in circular motions to ensure the heat is evenly distributed across the surface. This method helps maintain the necessary temperature range of 300–330°C to achieve red hues. Ensure the stainless steel has a uniform brushed or high-gloss finish before applying heat to achieve consistent color results.
Incorrect temperature settings or rapid cooling can prevent achieving the desired red hue. Utilize an infrared thermometer to keep the heating zones within the ideal range of 300–330°C. Exceeding this range may result in unwanted color changes, such as blue or purple. Allow the heated stainless steel to cool naturally in the air, as using water quenching may lead to cracks or discoloration.
The oil dipping technique can sometimes lead to challenges in achieving the correct color depth. Use fully burnt engine oil for optimal adhesion and color depth. Heat the stainless steel to a blue hue (approximately 300°C) before immersing it in oil. Ensure the piece is fully submerged and allow it to cool in the oil without wiping it off until it reaches room temperature.
Post-color degradation can occur due to residual oil or poor surface sealing. After cooling, wipe the stainless steel with acetone to reveal the final color, then apply a clear lacquer or wax to seal the surface and prevent oxidation. This step is crucial for maintaining the color’s longevity.
For persistent issues that standard methods cannot resolve, advanced techniques may be necessary. Physical Vapor Deposition (PVD) offers a durable and precise red finish, involving thermal evaporation in a vacuum chamber to deposit thin films. Industrial applications may benefit from acid-based treatments, such as chromic-sulfuric solutions, to achieve stable red colors. These methods necessitate strict adherence to safety protocols due to their chemical nature.
A jeweler’s torch provides better control for precise heating compared to standard propane torches. Check the stainless steel under natural light during the cooling phase to ensure accurate color perception, as artificial lighting can distort hues. Conduct practice runs on scrap metal to refine your timing and temperature settings, improving your technique for consistent results.
After completing the heat and oil dipping process, it is essential to allow the stainless steel to cool while still submerged in the oil. This step is crucial for ensuring that the color sets properly and the surface gains some rust protection. Do not wipe the oil off before the metal has completely cooled, as this can damage the finish or cause uneven coloration.
After the metal has fully cooled, use a clean cloth with acetone or mineral spirits to gently remove any excess oil. This helps eliminate oily residues while preserving the integrity of the colored surface. Avoid harsh detergents or abrasive cleaners, as these can scratch or dull the color layer.
Prevent discoloration and uneven patina by wearing gloves instead of touching the colored stainless steel with bare hands. Oils and salts from your skin can adversely affect the surface, so use clean gloves or a cloth when handling the material.
Regular maintenance is key to preserving the colored finish; dust the surface frequently with a soft cloth to keep it clean and free from dirt. If your stainless steel features a brushed or polished finish, take care to maintain it to ensure even heat distribution for any future touch-ups or recoloring efforts.
Although the oil dipping process provides some rust resistance, prolonged exposure to moisture, chemicals, or saltwater can degrade both the color and the metal. Apply a clear protective coating, like metal sealant or wax, to items exposed to harsh outdoor conditions or frequent handling.
Store colored stainless steel components in a dry, clean environment to prevent damage. Avoid stacking them or allowing them to rub against other hard surfaces, as this could cause scratches that reveal the metal beneath.
Should the color fade or become uneven over time, recoloring can be achieved by repeating the heating and oil dipping process. Ensure even heat application and proper oil dipping techniques to maintain color consistency. Regular practice and adherence to the original process will help achieve the desired results.
Below are answers to some frequently asked questions:
To achieve a red color on stainless steel, you can use the heat coloring method. Begin by cleaning the stainless steel surface thoroughly with a degreaser like acetone to remove any oils or contaminants. This ensures the color will adhere evenly.
Next, use a jeweler’s torch to heat the stainless steel to approximately 750°F (399°C), which will bring it to a dark yellow to brown range. Move the torch continuously to ensure uniform heating and avoid blotchy results. Once the desired temperature is reached, immediately dip the heated stainless steel into burnt oil, such as burnt engine oil. This step helps enhance the color and provides some rust protection.
Allow the metal to cool completely in the oil without wiping it off. After cooling, clean the surface with acetone to remove excess oil and reveal the red-colored stainless steel. For best results, heat the metal slowly and evenly, monitor temperature closely, and be patient during the cooling process.
To color stainless steel red, you’ll need several key materials. First, ensure you have a stainless steel surface with a uniform finish, like brushed or high gloss, for even heat distribution. Clean the surface thoroughly using cleaning agents such as acetone or mineral spirits to remove any oils or contaminants.
For the heat source, a jeweler’s torch is essential to heat the metal to the desired temperature range of approximately 300°C to 330°C. This temperature is crucial for achieving the red hue. You’ll also need burnt engine oil or a similar dark oil, which plays a vital role in the coloring process when the heated metal is dipped into it.
Additional tools include tongs for holding the hot metal, a brass wire brush for any necessary cleaning, and locking pliers for safe handling. These materials and tools will enable you to successfully color stainless steel red through the heat coloring method.
To ensure the red color on stainless steel lasts longer, follow these steps:
First, clean the surface thoroughly using acetone or a degreaser to remove any oils and contaminants. This helps the color adhere better. During the coloring process, heat the stainless steel to around 300°C to 330°C using a jeweler’s torch, then dip it into burnt engine oil for a richer finish. Allow it to cool completely before wiping off the oil.
After coloring, apply a protective coating, like a clear sealant, to preserve the color and prevent fading and wear. Chemical processes, such as black oxide kits, can also create a protective layer. Minimize exposure to moisture and chemicals, and avoid constant rubbing or friction on the colored surface to maintain its vibrancy over time. These steps will help enhance the durability of the color on your stainless steel piece.
When heat coloring stainless steel, following safety measures is crucial to prevent accidents and ensure successful results. Start by wearing protective gear, including heat-resistant gloves to handle hot metal, safety goggles to protect your eyes from sparks, a face mask to avoid inhaling fumes, and heat-resistant clothing to guard against burns. Set up your workspace on a heat-resistant surface like firebricks, and ensure the area is well-ventilated to disperse any fumes. Remove any flammable materials to prevent fire hazards, and clear tripping hazards from the workspace.
Always have a fire extinguisher nearby for emergencies and access to safety showers or eyewash stations. Control temperature carefully, using a jeweler’s torch suitable for the metal piece size to ensure even heating. Clean the stainless steel thoroughly before starting to achieve a smooth, uniform finish. By adhering to these safety guidelines, you can effectively and safely achieve the desired red color on stainless steel.
Yes, you can use other coloring techniques on stainless steel. Besides heat coloring, which involves heating the metal and applying burnt oil, several other methods are available:
These methods offer diverse options for coloring stainless steel, catering to different aesthetic preferences and durability requirements.
To fix uneven or unwanted color results when coloring stainless steel red, start by ensuring the surface is properly cleaned using acetone or a similar degreaser to remove any oils or dirt that could cause inconsistency. Next, focus on even heating by using a consistent heat source like a jeweler’s torch, moving it steadily across the piece to avoid hot or cool spots. Heat the stainless steel gradually to around 300°C, monitoring the color change closely to stop at the desired red hue.
After achieving the desired color, allow the steel to cool slowly and evenly to preserve the hue. Rapid cooling or premature wiping can lead to blotchy results. If using burnt oil for coloring, immerse the piece immediately after heating and keep it submerged until fully cooled to lock in the color. If uneven color persists, gently clean the surface with acetone or a mild cleaner like a vinegar solution to improve appearance without removing the oxide layer. Consistent application of these steps will help achieve a uniform red finish on stainless steel.

