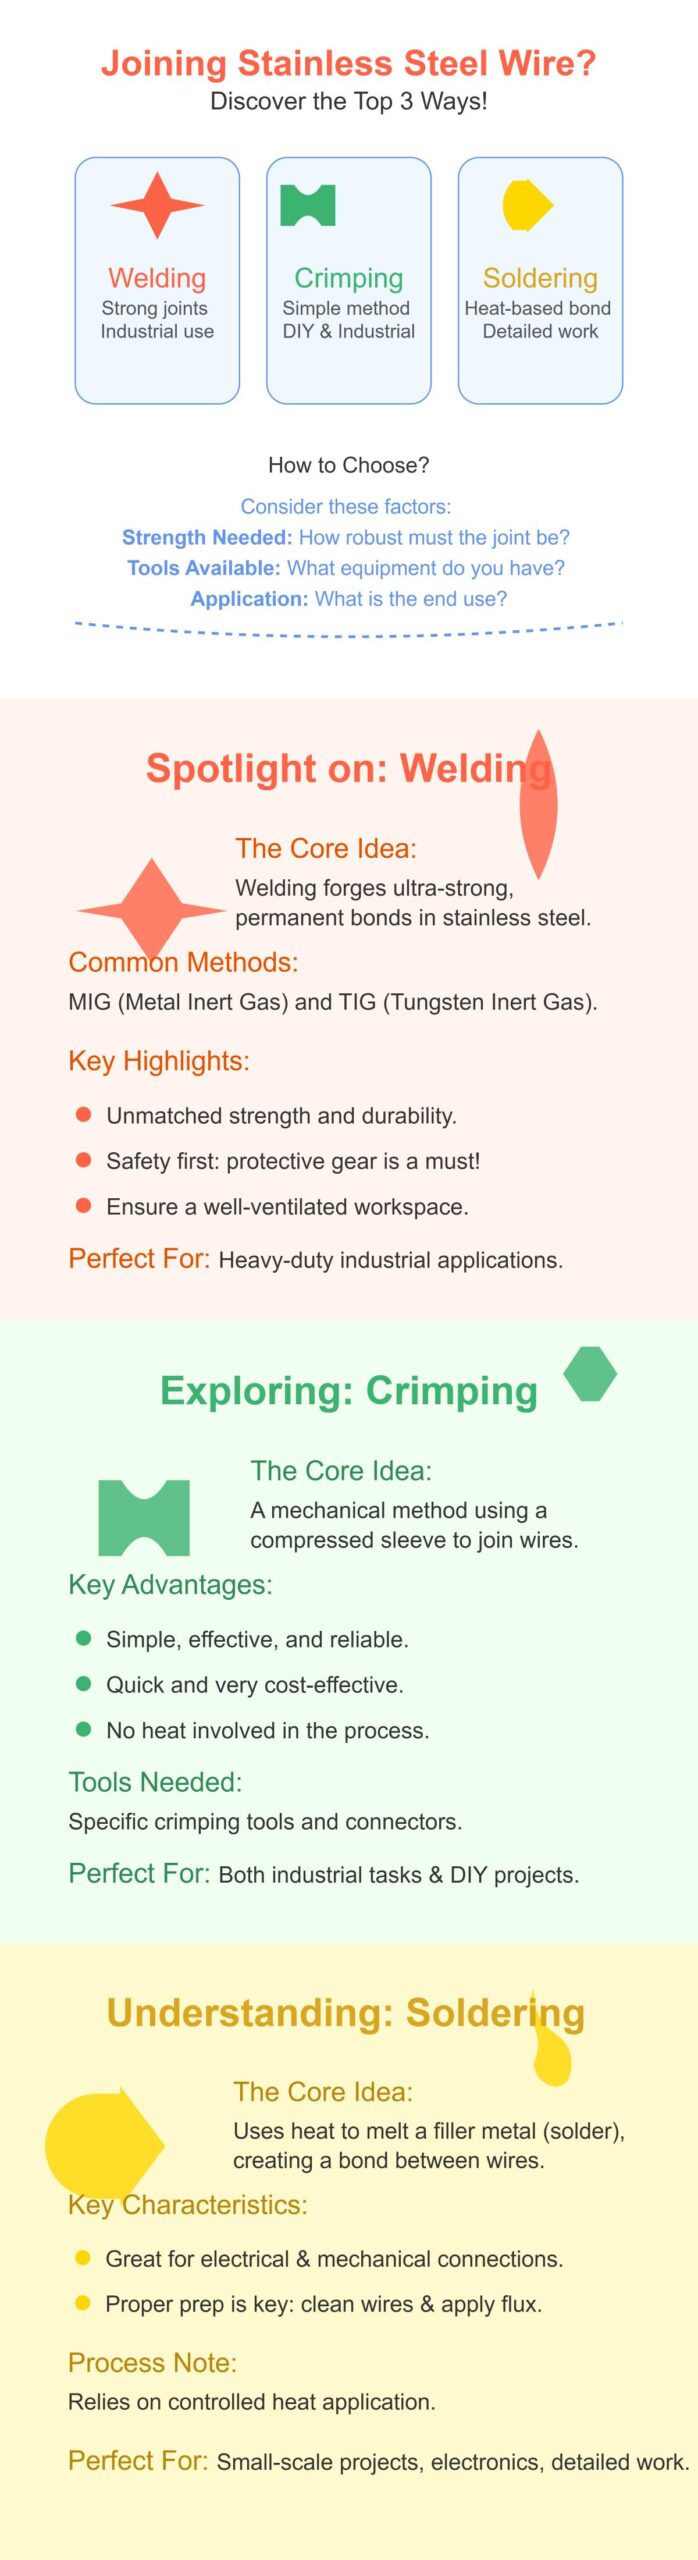
Joining stainless steel wire can seem like a daunting task, especially if you’re new to the world of metalworking. Whether you’re tackling a home DIY project or diving into industrial fabrication, mastering the right techniques is crucial for achieving strong, durable connections. But where do you start? This comprehensive guide will walk you through the best methods for joining stainless steel wire, from welding to crimping and soldering. You’ll learn about the essential materials and tools needed for each technique, understand the pros and cons, and follow detailed, beginner-friendly steps to ensure your projects are a success. Ready to make those perfect joins? Let’s get started!
Introduction to Joining Stainless Steel Wire
Importance of Proper Joining Techniques
Mastering proper joining techniques for stainless steel wire is crucial to ensure the final product is both durable and reliable. Stainless steel wire is known for its strength, corrosion resistance, and versatility, making it a popular choice in various applications. However, its unique properties also require specific handling and joining methods to achieve reliable connections.
Applications in Industrial Fabrication and Home DIY Projects
Stainless steel wire is used in a wide range of applications, from large-scale industrial fabrication to small-scale home DIY projects. Here are some common uses:
- Industrial Fabrication: In industries such as automotive, aerospace, and construction, stainless steel wire is used to create strong, corrosion-resistant structures and components. This includes manufacturing mesh for filtration, reinforcing concrete, and producing cables and wire ropes.
- Home DIY Projects: For hobbyists and DIY enthusiasts, stainless steel wire is ideal for creating durable and attractive projects. This can range from making custom jewelry and artwork to building functional items like garden trellises and fences.
Common Challenges in Joining Stainless Steel Wire
Joining stainless steel wire can be challenging due to its properties. Here are some common issues that need to be addressed:
- Oxidation: Stainless steel forms a layer of oxide when exposed to air, which can make joining difficult. Proper surface preparation is crucial to remove this layer and ensure a strong bond.
- Thermal Conductivity: Stainless steel has low thermal conductivity, meaning it doesn’t dissipate heat quickly. This requires careful heat management during processes like welding and soldering to avoid damaging the wire or creating weak joints.
- Material Hardness: The hardness of stainless steel can make mechanical joining methods, such as crimping or twisting, more difficult. Using the right tools and techniques is essential to achieve secure connections.
Overview of Joining Methods
- Soldering: Uses a filler material with a lower melting point to join two pieces of wire. Ideal for electrical connections and small-scale projects. Requires good surface preparation and flux to reduce oxidation.
- Crimping: Involves compressing a connector onto the wire using a crimping tool. Common in electrical and mechanical connections. Choosing the right size of connector and tool is crucial for a secure fit.
- Twisting: Involves intertwining two wires to create a mechanical bond. Suitable for temporary or less critical connections. Consistent tension and securing the ends are important to prevent untwisting.
- Welding: Joins wires by melting them together using an electrical arc or other heat sources. Provides the strongest and most durable joints, suitable for structural and heavy-duty applications. Requires skill and proper equipment, and is best for thicker wires and mesh.
Tips for Beginners
- Surface Preparation: Always clean the wire thoroughly to remove any oxide layer, grease, or dirt. Use a wire brush or abrasive pad for this.
- Tool Selection: Use high-quality tools specifically designed for stainless steel, including soldering irons, crimping tools, and welding equipment.
- Practice: Joining stainless steel wire requires practice to master the techniques. Start with small projects to build your skills before taking on more complex tasks.
Required Materials and Tools
Materials Needed
Stainless Steel Wire
The primary material needed is stainless steel wire, available in various gauges and types. Its strength and corrosion resistance make it ideal for many applications, and you can choose from different grades and thicknesses depending on your project.
Crimp Connectors and Solder
Crimp connectors are essential for joining two pieces of wire or attaching a wire to a terminal, and they must match the wire gauge and application for a secure connection. For soldering, use a high-temperature solder with compatible flux to create a strong bond by reducing oxidation.
Shrink Tubing or Electrical Tape
Shrink tubing or electrical tape protects twisted wire connections from moisture and abrasion, ensuring they last longer.
Swage Sleeves
Swage sleeves are used for swaging, which involves compressing the sleeve onto the wire to create a secure joint. These sleeves must be compatible with stainless steel, such as zinc-copper sleeves, to prevent corrosion and ensure a strong connection.
Tools Needed
Crimping Tools
High-quality crimping tools are designed specifically for stainless steel wire. These may include hydraulic or manual crimping tools. Properly matched dies and sleeves are crucial for achieving a snug fit and a secure crimp.
Swaging Tools
Swaging tools secure swage sleeves onto the wire and come in various sizes to fit different wire gauges and sleeve dimensions.
Soldering Iron and Flux
A soldering iron capable of reaching high temperatures is essential for soldering stainless steel wire. Additionally, using the right flux is crucial to facilitate the soldering process and ensure a strong bond.
Wire Cutters and Strippers
Wire cutters and strippers are used to prepare the wire for joining by cutting it to the desired length and removing any insulation. High-quality tools are recommended to ensure clean cuts and prevent damage to the wire.
Drill (Optional)
A drill can be used for twisting wires efficiently, especially when creating multiple twists. This is particularly useful for projects that require consistent and tight twists.
After Swage Gauge
An after swage gauge helps verify that the swaging process has been done correctly. This tool ensures that the sleeves are properly compressed and the connection is secure.
Additional Tips
- Ensure that the dies used with crimping tools match the connector size and wire gauge. This compatibility is vital for creating secure connections.
- For stainless steel wire, use sleeves that are corrosion-resistant and compatible, such as zinc-copper sleeves.
- Regularly check and maintain your tools to ensure they are in good working condition. Proper maintenance can significantly impact the quality of your connections and the longevity of your tools.
Comparative Analysis of Joining Methods
Soldering
Soldering involves using a filler metal, which melts at a lower temperature than stainless steel, to join wires together. This technique is suitable for applications requiring high mechanical strength.
Advantages
- Strong Connections: Soldering creates robust joints ideal for high-strength applications.
- Versatility: Suitable for electrical and small-scale projects.
- Corrosion Resistance: Properly executed solder joints maintain the stainless steel’s corrosion-resistant properties.
Challenges
- Surface Preparation: The wire must be cleaned thoroughly to remove oxidation.
- Heat Control: Managing heat is crucial to prevent wire damage.
Crimping
Crimping mechanically secures a connector or ferrule onto the wire using a crimping tool, making it widely used for both electrical and structural applications.
Advantages
- Ease of Use: Crimping is straightforward and efficient.
- Reliability: Produces secure, durable connections.
- Speed: Faster than soldering and welding, making it ideal for repetitive tasks.
Challenges
- Tool Selection: Requires the correct tool and ferrule size for a secure crimp.
- Skill: Proper technique is essential to avoid weak or faulty connections.
Twisting
Twisting wires together creates a mechanical connection, often used for temporary or less critical connections.
Advantages
- Simplicity: Quick and easy to perform.
- Flexibility: Suitable for temporary setups or small adjustments.
Challenges
- Durability: Twisted connections are less durable than soldered or crimped joints.
- Security: May require additional securing methods, such as shrink tubing, to ensure stability.
Manual Techniques (U-channel, Coiling, Interlocking)
Manual techniques involve shaping and securing wire ends by hand. These methods are ideal for precise or small-scale projects.
Advantages
- Precision: Offers flexibility and precision for detailed work.
- Customization: Ideal for custom or intricate designs.
Challenges
- Skill and Patience: Requires careful handling and a steady hand.
- Time-Consuming: More labor-intensive compared to other methods.
Welding (TIG and MIG)
Welding joins wires by melting them together using a heat source, such as an electric arc. There are two primary welding techniques for stainless steel wire: TIG (Tungsten Inert Gas) and MIG (Metal Inert Gas).
TIG Welding
- High-Quality Joints: Produces clean, strong welds with excellent corrosion resistance.
- Precision: Offers high control over the welding process.
MIG Welding
- Productivity: Easier and faster than TIG, suitable for high-speed applications.
- Strength: Creates durable joints but with less aesthetic quality than TIG.
Challenges
- Skill Level: Both methods require training and practice.
- Equipment: Requires specialized welding equipment and safety gear.
Comparison Summary
| Method |
Ease of Use |
Appearance Quality |
Strength and Durability |
Cost-Effectiveness |
| Soldering |
Moderate |
High |
High |
Moderate |
| Crimping |
Easy |
Moderate |
High |
High |
| Twisting |
Easy |
Low |
Low |
Low |
| Manual Tech |
Low |
High |
Moderate |
Low |
| TIG Welding |
Low (Skilled) |
High |
High |
Moderate |
| MIG Welding |
Moderate |
Moderate |
High |
High |
Key Considerations for Choosing a Joining Method
- Application Requirements: Assess the strength, durability, and aesthetic needs of your project.
- Skill Level: Select a method that matches your skill set or the training you have available.
- Tools and Materials: Ensure you have the necessary tools and materials for the chosen method.
- Environmental Conditions: Consider the environmental factors, such as exposure to moisture or chemicals, which may affect the joint’s durability.
Step-by-Step Guide to Welding Stainless Steel Wire
Equipment Setup
Welder Selection
To weld stainless steel wire, you can choose between a MIG (Metal Inert Gas) welder and a TIG (Tungsten Inert Gas) welder. MIG welding is generally easier and faster, making it suitable for thicker materials, while TIG welding offers better control and higher quality for thinner materials.
Polarity and Shielding
When using a MIG welder, set the polarity to Direct Current Electrode Positive (DCEP) and use an argon-rich shielding gas to ensure a stable arc, deeper penetration, and protection from oxidation and contamination.
Amperage and Voltage
Adjust the amperage based on the thickness of the stainless steel wire. A good rule of thumb for MIG welding is to use about 1 amp per 0.001 inch of steel thickness. Stainless steel retains heat more than other metals, so you might need slightly less amperage to avoid overheating.
Material Preparation
Cleanliness
Ensure that the stainless steel wire is clean and free from contaminants like oil, grease, or dirt. Use a stainless steel wire brush or degreasing agents to clean the wire thoroughly. This is essential to prevent impurities from weakening the weld.
Joint Preparation
Select the appropriate joint design for your project, considering the strength and accessibility needed. Common joint types include butt, corner, edge, lap, and tee joints.
Welding Techniques
Torch Angle and Speed
Maintain the correct torch angle to ensure a stable weld pool. For MIG welding, hold the torch at a 10 to 15-degree angle from vertical. For TIG welding, a 15-degree angle is recommended. Keep a steady travel speed to maintain uniformity and avoid defects in the weld.
Arc Control
In TIG welding, dip the filler metal into the weld puddle without letting it drip. This technique helps maintain a stable arc and prevents contamination. Consistent arc control is key to achieving clean and strong welds.
Cooling
To prevent warping and distortion, use a low heat input and allow the wire to cool down if it becomes too hot. This is crucial for maintaining the integrity of the weld and preventing material damage.
Safety and Post-Weld Care
Safety Gear
Always wear appropriate safety gear to protect yourself from potential hazards. This includes welding gloves, a helmet with a proper shade lens, and protective clothing to shield your skin from sparks and UV radiation.
Post-Weld Treatment
After welding, clean the welded area to remove any slag or oxidation that may have formed. Applying a primer to the treated areas can help prevent rust or corrosion, ensuring the longevity and durability of the weld.
Step-by-Step Guide to Crimping Stainless Steel Wire
Tools and Materials Needed
Here are the tools and materials you’ll need to crimp stainless steel wire successfully:
- Crimpers: High-quality crimping tools designed for stainless steel wire.
- Dies: Ensure the dies match the size of your crimp connectors and the wire gauge.
- Crimp Connectors: Metal sleeves used to join wires or attach them to terminals.
- Sleeves and Terminals: Preferably made from stainless steel to withstand environmental conditions.
Step-by-Step Crimping Process
- Prepare the Wire
- Cutting: Use a wire cutter to trim the stainless steel wire to the desired length, ensuring a clean and precise cut.
- Stripping: If the wire is insulated, use a wire stripper to remove the insulation from the ends, taking care not to damage the wire strands.
- Cleaning: Clean the wire ends with a mild solvent and a non-abrasive cloth to remove any dirt or oils.
- Straightening: Straighten any bent or coiled wire for easier handling.
- Position the Wire and Connector
- Fully insert the prepared wire into the crimp connector, making sure it’s even and the strands aren’t splayed.
- Position the Crimper
- Place the crimp connector in the appropriate slot of your crimper according to the tool’s instructions. Ensure the connector is properly aligned within the crimper.
- The Crimping Action
- Squeeze the crimper handles firmly and evenly until the connector is securely crimped around the wire. Make sure the handles are fully closed to complete the crimp.
- Inspection
- Check the connection for uniform deformation without gaps or sharp edges. The wire should be held firmly in place and should not pull out with a moderate tug.
Tips for a Secure Crimp
- Use the Correct Die Size: Ensure the die matches the connector size to avoid a loose or damaged crimp.
- Avoid Re-crimping: Do not crimp the same spot more than once as it can weaken the connection.
- Use a Ratchet Mechanism: Consider using a crimping tool with a ratchet mechanism to apply the correct pressure and ensure a consistent crimp.
Common Issues and Solutions
- Issue: The hardness of stainless steel can make crimping challenging.
- Solution: Use tools specifically designed for stainless steel and apply the correct technique.
- Issue: The wire pulls out of the connector.
- Solution: Ensure the correct die size is used and apply consistent pressure during crimping.
Step-by-Step Guide to Soldering Stainless Steel Wire
Safety Measures for Soldering
Always follow essential safety measures to protect yourself and ensure a smooth soldering process.
- Ventilation: Work in a well-ventilated area to avoid inhaling fumes.
- Protective Gear: Wear gloves, safety goggles, and an air filter mask.
- Heat Protection: Keep flammable materials away from your workspace and have a fire extinguisher nearby.
Selecting Soldering Tools and Materials
Choosing the right tools and materials is key to successful soldering.
Soldering Iron
Choose a soldering iron that can reach high temperatures, ideally with adjustable temperature settings. This ensures you can achieve the necessary heat for stainless steel.
Flux
Use a phosphoric acid-based flux designed for stainless steel to remove oxidation and improve solder flow.
Solder
Select a high tin content solder (greater than 50%) for better adhesion and strength. Lead-free options are available for a more environmentally friendly choice.
Soldering Techniques for Beginners
Follow these steps to solder stainless steel wire effectively:
Step 1: Prepare the Surface
- Clean the Wire: Use a cleaning solvent or degreaser to remove any dirt, grease, or oil.
- Remove Oxide Layer: Use a wire brush or stainless steel brush for thorough cleaning.
Step 2: Apply Flux
Generously apply the chosen flux to the cleaned areas of the stainless steel wire to ensure complete coverage.
Step 3: Pre-heat the Wire
Pre-heat the stainless steel wire with your soldering iron to 300-400°C (572-752°F). This helps the solder flow properly.
Step 4: Apply Solder
- Hold the Solder Wire: Hold the solder wire against the heated stainless steel.
- Melt the Solder: Keep the heat source steady until the solder melts and flows into the joint.
Step 5: Cool and Clean the Joint
- Natural Cooling: Allow the joint to cool naturally to avoid stress fractures.
- Clean the Joint: Use a brush and solvent to remove any remaining flux. For acidic flux, neutralize with a baking soda solution first.
Troubleshooting Common Soldering Issues
Problem: Solder Won’t Stick
- Solution: Ensure the wire is clean and oxide-free. Reapply flux and increase the temperature slightly.
Problem: Weak Joints
- Solution: Check for proper flux application and ensure the solder fully flows into the joint.
Problem: Overheating
- Solution: Adjust the temperature settings and avoid prolonged heating of the wire.
Inspecting the Joint
After soldering, check that the joint is shiny, smooth, and free of gaps or cracks. A strong joint should also be resistant to corrosion.
Frequently Asked Questions
Below are answers to some frequently asked questions:
What are the best techniques for joining stainless steel wire?
The best techniques for joining stainless steel wire include welding, crimping, and soldering. Each method has its advantages depending on the application.
- Welding: This technique is ideal for creating strong, permanent joints. Methods like MIG (Metal Inert Gas) and TIG (Tungsten Inert Gas) welding are commonly used. Welding requires proper safety measures, including protective gear and a well-ventilated workspace. It’s best suited for industrial applications where high strength and durability are essential.
- Crimping: Crimping is a mechanical method that involves compressing a metal sleeve around the wires to join them. This technique is simple and effective for both industrial and DIY projects. It requires crimping tools and connectors designed for stainless steel. Crimping is quick, cost-effective, and provides a reliable connection without the need for heat.
- Soldering: Soldering uses heat to melt a filler metal (solder) to bond wires. It is particularly useful for applications that require both electrical and mechanical connections. Proper preparation, including cleaning the wire and applying flux, is essential for a successful solder joint. Soldering is suitable for both small-scale projects and detailed work.
Each technique has its specific tools and preparation steps, which are detailed in the article. Choosing the right method depends on factors like the required strength of the joint, the tools available, and the specific application.
How do I crimp stainless steel wire effectively?
To crimp stainless steel wire effectively, you need the right tools and a precise technique. Start by cutting the wire to the desired length using high-quality wire cutters to ensure clean edges. If necessary, strip any insulation carefully to avoid damaging the wire strands. Clean the wire with a mild solvent and a non-abrasive cloth to remove any dirt or oils.
Next, insert the wire into the crimp connector, ensuring it is fully seated. Position the crimp connector in the correct slot of your crimping tool, matching the die size to the wire gauge and connector. Firmly squeeze the crimper handles together until you feel resistance, applying consistent pressure.
Inspect the crimped connection for uniform compression and perform a tug test to ensure the wire does not pull out. Avoid over-crimping to prevent weakening the connection. By following these steps and maintaining cleanliness, you can achieve a strong, reliable crimp on stainless steel wire.
What safety precautions should I take when joining stainless steel wire?
When joining stainless steel wire, safety is paramount. Here are the key precautions you should take:
- Wear Protective Gear: Always use gloves, safety glasses, and a face shield to protect against sharp edges, sparks, and heat.
- Ensure Proper Ventilation: Work in a well-ventilated area to avoid inhaling fumes, especially when welding or soldering.
- Use Appropriate Tools and Materials: Select tools specifically designed for stainless steel, such as crimping tools, welding equipment, and flux.
- Maintain Cleanliness: Clean the wire surface to remove any oils, dirt, or oxidation. This ensures a strong bond and prevents contamination.
- Control Heat: When welding or soldering, avoid overheating the wire to prevent damage. Use the right temperature settings and allow the wire to cool gradually.
By following these precautions, you can safely and effectively join stainless steel wire in various projects.
What tools do I need for soldering stainless steel wire?
To solder stainless steel wire, you will need several specific tools and materials to ensure a successful and durable connection. Here is a concise list suitable for beginners:
Tools:
- Heavy-Duty Soldering Iron or Torch: A high-temperature tool, such as an oxy-acetylene torch or a heavy-duty soldering iron, is necessary to melt the solder and activate the flux on stainless steel.
- Stainless Steel Brush or Wire Brush: Used to clean the surface of the wire by removing dirt, oxides, and contaminants.
- Emery Cloth or Fine-Grit Sandpaper: These are used to scrub the joint area, exposing a clean metallic surface for better adhesion.
- Safety Goggles and Gloves: Essential for protecting yourself from heat and potential chemical exposure during soldering.
Materials:
- Aggressive Flux: A phosphoric acid-based flux or a specialized flux like Superior No. 71 is needed to break down the oxide layer on stainless steel.
- High Tin Content Solder: Solder with more than 50% tin, or tin-silver-copper compositions, is recommended for creating strong joints and ensuring corrosion resistance.
- Cleaning Solvent: Used to remove any grease and oils from the surface before soldering.
- Water or Isopropyl Alcohol: For cleaning off flux residues after soldering to prevent corrosion.
Following these guidelines will help you achieve a strong and reliable solder joint on stainless steel wire.
How can I troubleshoot common problems in welding stainless steel wire?
To troubleshoot common problems in welding stainless steel wire, it’s important to understand and address specific issues that frequently arise.
Porosity is often caused by inadequate shielding gas coverage or moisture in the flux-cored wire. To resolve this, ensure proper gas flow, check for leaks, and keep the wire dry. Lack of fusion occurs when the weld metal does not fully fuse with the base metal, usually due to insufficient heat or incorrect technique. Adjust welding parameters like voltage and wire feed speeds, and maintain a proper gun angle to ensure a strong weld.
Cracking can result from thermal stresses or incorrect ferrite levels, making the weld brittle. Using filler metal that matches the base metal’s thermal properties, preheating the joint, and allowing slow cooling can help prevent cracking. Excessive spatter, caused by low voltage or improper gas flow, can be minimized by increasing voltage, ensuring good gas coverage, and cleaning the base materials.
For successful welding, ensure the stainless steel wire is clean, use correct polarity and amperage, employ an inert gas like argon, and manage preheating and cooling carefully. By addressing these issues, beginners can achieve high-quality, durable welds with stainless steel wire.

