Have you ever wished to transform the look of your stainless – steel items into the warm, luxurious appearance of brass? Whether it’s for a DIY project or to give old metal pieces a new lease on life, learning how to make stainless steel look like brass is a valuable skill for beginners. There are three main methods: patina, burnishing, and painting. Each method involves specific materials and processes, and safety precautions are a must. So, are you ready to discover which method will work best for your project?
Introduction
Overview
Changing the look of stainless steel to mimic brass can be attractive for both decorative and industrial uses. This way, you can enjoy the attractive appearance of brass without losing the durability and rust resistance of stainless steel.
Primary Materials and Processes
There are several methods to achieve a brass-like finish on stainless steel, each with its own set of materials and techniques. The three main approaches are:
- Patina Application: Utilizing chemical treatments to create a brass-like patina on the surface.
- Burnishing: Employing mechanical techniques to alter the metal’s surface appearance.
- Painting: Using special metallic paints to create a brass-like appearance.
Safety Precautions
Handling chemicals, heat, and tools can be risky, so it’s important to follow safety guidelines. Here are some essential safety measures:
- Wear Protective Gear: Always use gloves, safety glasses, and appropriate clothing to protect against chemical splashes, heat, and sharp tools.
- Work in a Well-Ventilated Area: Ensure adequate ventilation when working with chemicals or paints to avoid inhaling fumes.
- Read and follow the instructions for any chemicals or tools, and keep your workspace organized and clean to prevent accidents and achieve the best results.
Understanding the Materials
Stainless Steel
Stainless steel, known for its exceptional corrosion resistance and strength, is a versatile and popular metal made primarily of iron, chromium, and often nickel, with other elements enhancing its properties.
Properties of Stainless Steel
- Corrosion Resistance: The presence of chromium allows stainless steel to form a passive layer that protects it from rust and corrosion.
- Strength and Durability: Its high tensile strength makes stainless steel suitable for various structural and industrial applications.
- Aesthetic Appeal: The sleek, modern appearance of stainless steel is often used in decorative applications.
- Hygienic: Its smooth surface is easy to clean, making it perfect for kitchens, medical tools, and food processing.
Common Uses of Stainless Steel
- Construction: Utilized in building frameworks, bridges, and cladding.
- Household Items: Found in kitchen appliances, cutlery, and cookware.
- Industrial Equipment: Used in machinery, piping, and tanks.
- Medical Devices: Due to its biocompatibility, stainless steel is used in surgical instruments and implants.
Brass
Brass, made mainly of copper and zinc, is celebrated for its distinctive gold color and easy machinability.
Properties of Brass
- Malleability and Ductility: Brass is easy to work with, making it suitable for various forming processes.
- Corrosion Resistance: Although not as resistant as stainless steel, brass offers good corrosion resistance, especially in low-friction applications.
- Acoustic Properties: Brass is favored in musical instruments due to its favorable acoustic characteristics.
- Aesthetic Appeal: Its bright, gold-like appearance makes it popular for decorative items.
Common Uses of Brass
- Decorative Items: Used in jewelry, ornaments, and hardware like doorknobs and handles.
- Musical Instruments: Commonly used in trumpets, trombones, and other brass instruments.
- Plumbing: Found in fittings, valves, and other plumbing components due to its corrosion resistance.
- Electrical Applications: Utilized in electrical connectors and terminals because of its good conductivity.
Comparing Stainless Steel and Brass
- Appearance: Stainless steel has a modern, sleek look, while brass offers a warm, classic appearance.
- Corrosion Resistance: Stainless steel generally has superior corrosion resistance compared to brass.
- Workability: Brass is easier to machine and form than stainless steel.
- Applications: Stainless steel is preferred in structural and industrial contexts, whereas brass is favored for decorative and low-friction applications.
Knowing the unique properties and uses of stainless steel and brass helps in choosing the right material or mimicking their appearances.
Comparing Methods
Pros and Cons of Each Method
Patina
- Pros:
- Offers a natural and aged look, similar to the patina that forms on real brass over time.
- It can penetrate the metal surface, creating a more integrated and long-lasting finish.
- Allows for some variation in color and texture, giving a unique appearance to each piece.
- Cons:
- Involves working with chemicals, which can be hazardous if not handled properly.
- The process can be time-consuming, as it may require multiple applications and waiting periods for the patina to develop.
- Achieving the exact desired color can be challenging, as it depends on factors like metal composition and environmental conditions.
Burnishing
- Pros:
- It is a relatively straightforward mechanical process that doesn’t require the use of complex chemicals.
- Can create a smooth and shiny finish similar to polished brass.
- It’s a cost-effective method as it mainly requires basic tools like burnishing pads or brushes.
- Cons:
- May not provide as realistic a brass color as other methods.
- The finish may not be as long-lasting, especially if the item is subject to heavy use or abrasion.
- It can be labor-intensive, especially for larger surfaces.
Painting
- Pros:
- Allows for precise control over the color and finish, with a wide range of metallic paints available.
- It is a quick and easy method, especially for covering large areas.
- The finish can be very uniform, providing a consistent brass-like appearance.
- Cons:
- The paint may chip or peel over time, especially if not applied properly or the surface isn’t well-prepared.
- Painted finishes may not have the same depth and authenticity as patina or burnished finishes.
- Working with paint involves fumes, so proper ventilation is required.
Durability and Maintenance Considerations
Patina
A well-applied patina can be quite durable, especially if it has penetrated the metal surface. However, it may be sensitive to harsh chemicals and abrasive cleaning methods. Regular cleaning with mild soap and water is usually sufficient. Avoid using abrasive cleaners that could damage the patina.
Burnishing
The burnished finish may wear off over time, especially with frequent handling or contact. It is more prone to scratches compared to patina. To maintain the shine, periodic polishing with a soft cloth may be required. Avoid using rough materials that could scratch the surface.
Painting
The durability of a painted finish depends on the quality of the paint and the application. A properly primed and sealed paint job can last a long time, but it may still be vulnerable to chipping and peeling. Clean the painted surface gently with a mild detergent. If the paint chips, touch-up painting may be necessary.
Cost-Effectiveness and Sustainability
Budget-Friendly Options
Burnishing is often the most budget-friendly option as it mainly requires basic tools that can be reused. Painting can also be cost-effective, especially if you choose a mid-range metallic paint. You can find affordable metal primers and paints at hardware stores. Patina may be more expensive as it often involves purchasing specialized chemical solutions.
Environmental Impact of Each Method
Patina chemicals can harm the environment if not disposed of properly. Look for eco-friendly patina solutions if possible. Burnishing has a relatively low environmental impact as it mainly involves mechanical processes and doesn’t produce chemical waste. Paints can release volatile organic compounds (VOCs) into the air. Choose low-VOC or VOC-free paints to reduce the environmental impact.
Surface Preparation
Cleaning the Stainless Steel
Proper cleaning is the first and most crucial step in surface preparation. A clean surface ensures better adhesion for any subsequent treatments, such as patina, burnishing, or painting.
- Remove Grease and Dirt: Use a degreaser or mild detergent to eliminate any oils, grease, or dirt from the stainless steel surface. Apply the cleaner with a soft cloth or sponge, scrubbing gently to avoid scratching the metal.
- Rinse Thoroughly: After cleaning, rinse the surface thoroughly with clean water to remove any residue from the detergent or degreaser.
- Dry the Surface: Use a clean, dry cloth to wipe down the stainless steel, ensuring it is completely dry before moving on to the next steps. Any remaining moisture can affect the adhesion of treatments.
Sanding and Smoothing
Once the surface is clean, sanding helps to create a smooth surface, which is essential for achieving a professional-looking finish. It also helps to remove any existing coatings or imperfections.
- Choose the Right Sandpaper: Start with a medium-grit sandpaper (around 400-600 grit) to remove any rough spots or old coatings. Then, move to a finer grit (800-1000 grit) for a smoother finish. The medium grit effectively removes surface imperfections, while the finer grit ensures a polished, even surface.
- Sand the Surface: Sand the stainless steel in a circular motion, applying even pressure. Make sure to cover the entire surface area to ensure uniformity.
- Inspect for Smoothness: After sanding, run your hand over the surface to check for smoothness. If you feel any rough spots, continue sanding with the finer grit until the surface is completely smooth.
Ensuring a Smooth Surface for Better Finish Adherence
A smooth surface is critical for the finish to adhere properly and look its best.
- Remove Dust and Debris: After sanding, clean the surface again to remove any dust or debris. Use a vacuum or a damp cloth to ensure no particles are left behind.
- Final Wipe Down: Perform a final wipe down with a lint-free cloth dampened with a bit of rubbing alcohol. This wipes away any leftover oils or residues.
- Dry Completely: Make sure the surface is completely dry before applying any finish. Moisture can interfere with the adhesion and appearance of the final finish.
Applying a Patina
What is Patina?
Patina is a thin layer that forms on metal surfaces over time due to oxidation and environmental exposure. In the context of making stainless steel look like brass, patina can create an aged, brass – like appearance. The purpose of applying a patina is to mimic the natural aging process of brass, giving stainless steel a warm, antique look.
Types of Patina Suitable for Creating a Brass – like Finish
Chemical patinas, especially those that are copper – based, can produce colors similar to brass, ranging from golden – yellow to deep bronze.
Step – by – Step Patina Application
Materials Needed
Patina solution, brushes, gloves, safety glasses, clean cloths, plastic sheeting or a well – ventilated work area.
Detailed Application Process
- Prepare the Workspace: Lay down plastic sheeting to protect your work surface. Ensure the area is well – ventilated to avoid inhaling fumes from the patina solution.
- Wear Safety Gear: Put on gloves and safety glasses to protect yourself from the chemicals.
- Clean the Surface: Use a clean cloth to wipe the stainless steel surface, removing any dust or debris to ensure better adhesion of the patina.
- Apply the Patina Solution: Dip the brush into the patina solution and apply it evenly to the stainless steel surface. Start with a thin layer and work in small sections for uniform coverage. Pay special attention to edges and corners.
- Let it React: Allow the patina solution to react with the stainless steel surface. The reaction time can vary depending on the type of patina solution used, usually taking a few minutes to an hour. You may notice the color starting to change as the patina forms.
- Check the Color: Periodically check the color of the patina. If you want a darker or more intense color, apply additional layers of the patina solution, waiting for each layer to dry before applying the next one.
- Final Wipe – Down: Once satisfied with the color, gently wipe the surface with a clean cloth to remove any excess patina solution.
Tips for Achieving the Best Results
- Test on a Small Area: Before applying the patina to the entire stainless steel piece, test it on a small, inconspicuous area to see the color and how the patina reacts with the stainless steel.
- Control the Environment: Temperature and humidity can affect the patina process. Work in a stable environment with moderate temperature and humidity for consistent results.
- Be Patient: The patina process takes time. Rushing the application or not allowing enough time for the reaction can result in an uneven or unsatisfactory finish.
Burnishing Techniques
What is Burnishing?
Burnishing is a technique used to polish metal surfaces, making them smooth and shiny. This process uses pressure and friction to create a reflective, metallic finish on stainless steel, making it look similar to polished brass.
Benefits of Burnishing
- Enhanced Appearance: Burnishing produces a high-gloss, mirror-like finish that can mimic the look of polished brass.
- Surface Hardening: The process compresses the metal surface, increasing its hardness and wear resistance.
- Cost-Effective: It requires minimal materials, mainly involving tools that can be reused.
- Environmentally Friendly: Unlike chemical treatments, burnishing does not involve harmful substances.
Tools Required for Burnishing
- Burnishing Tool: Choose from a hand-held tool, a burnishing pad, or a mechanical burnisher.
- Polishing Compound: A fine abrasive compound to aid in the polishing process.
- Protective Gear: Gloves and safety glasses to protect against metal shavings and debris.
Step-by-Step Burnishing Process
1. Surface Preparation
Before burnishing, ensure the stainless steel surface is clean and smooth.
- Clean the Surface: Remove any dirt, grease, or residue using a degreaser or mild detergent. Rinse thoroughly and dry the surface.
- Sand the Surface: Use fine-grit sandpaper (800-1000 grit) to smooth out any imperfections. This step is crucial for achieving a uniform finish.
2. Applying the Polishing Compound
- Select the Compound: Choose a fine polishing compound suitable for stainless steel.
- Apply the Compound: Spread a small amount of the compound onto the surface or directly onto the burnishing tool.
3. Burnishing the Surface
- Use the Burnishing Tool: If using a mechanical tool, turn it on. If using a hand-held tool, start manually.
- Apply Even Pressure: Move the tool in a consistent, circular motion across the surface, applying even pressure. Ensure you cover the entire area for a uniform finish.
- Check Progress: Periodically stop to check the surface. Reapply the polishing compound as needed and continue burnishing until the desired shine is achieved.
4. Final Polishing
- Wipe Clean: Once the burnishing is complete, wipe the surface with a clean, dry cloth to remove any remaining compound.
- Inspect the Finish: Ensure the surface is smooth and has a consistent, high-gloss finish. If necessary, repeat the burnishing process for areas that need additional polishing.
Best Practices for a Professional Finish
- Work in Small Sections: Burnishing small areas at a time ensures more control and a more uniform finish.
- Maintain Consistent Pressure: Uneven pressure can result in an inconsistent finish. Keep your hand steady and the pressure even throughout the process.
- Use Quality Tools: Investing in high-quality tools and compounds will noticeably improve your final results.
- Practice Patience: Burnishing is a gradual process. Take your time to achieve the best possible finish.
Painting with Metallic Finishes
Choosing the Right Paint
Selecting the appropriate paint is crucial for achieving a realistic and durable brass-like finish on stainless steel. Here are the key factors to consider:
Types of Metallic Paints Available
- Spray Paints: Easy to apply and ideal for covering large surfaces quickly. Brands like Rust-Oleum and Krylon offer a variety of metallic finishes, including brass.
- Brush-On Paints: These provide more control and precision, making them especially useful for detailed work. Brands like Modern Masters and Dixie Belle offer high-quality metallic paints.
- Metal-Specific Paints: Designed to adhere better to metal surfaces and provide a long-lasting finish. Ensure the paint is suitable for stainless steel.
Factors to Consider When Selecting Paint
- Color Accuracy: Choose a paint that closely matches the desired brass color.
- Durability: Look for paints that offer good resistance to chipping, peeling, and wear.
- Finish Type: Decide between matte, satin, or glossy finishes based on the desired final appearance.
- Environmental Impact: Opt for low-VOC or VOC-free paints to minimize environmental and health risks.
Step-by-Step Painting Process
Achieving a professional-looking brass finish involves careful preparation and application. Follow these steps for the best results:
Preparation and Priming
- Clean the Surface: Ensure the stainless steel is free of dirt, grease, and oils. Use a metal cleaner or a mixture of mild detergent and water. Rinse thoroughly and let dry completely.
- Sand the Surface: Lightly sand the surface with fine-grit sandpaper (400-600 grit) to create a slightly rough texture for better paint adhesion. Wipe away any dust with a clean, damp cloth.
- Apply a Primer: Apply a primer that is specifically designed for metal surfaces. Apply a thin, even coat and allow it to dry according to the manufacturer’s instructions. This step is essential for ensuring the paint adheres well and lasts longer.
Application Techniques
- Apply the Metallic Paint:
- Spray Paint: Shake the can well before use. Hold it about 10-12 inches away from the surface and apply in smooth, even strokes. Start with a light coat to avoid drips and runs. Let it dry completely before applying additional coats.
- Brush-On Paint: Stir the paint thoroughly. Use a high-quality brush or foam roller for application. Apply thin, even coats, brushing in one direction to avoid streaks. Allow each coat to dry fully before applying the next.
- Build Up Layers: To achieve a deeper, richer brass color, apply several thin layers instead of one thick coat. This helps achieve a smooth and uniform finish.
Sealing and Protecting the Finish
- Apply a Clear Coat: After the final coat of paint has dried completely, apply a clear protective topcoat. This can be a glossy, satin, or matte finish, depending on your preference. The clear coat adds durability and protects the paint from chipping and wear.
- Cure the Finish: Follow the manufacturer’s instructions for curing time. This may involve allowing the piece to dry undisturbed for several days to ensure the finish fully hardens and adheres to the stainless steel.
Tips for Best Results
- Work in a Well-Ventilated Area: Ensure good ventilation when using spray paints and primers to avoid inhaling fumes.
- Avoid Humidity: Paint in a dry, dust-free environment. High humidity can affect the paint’s drying time and finish quality.
- Test First: Before beginning your main project, test the paint on a small, inconspicuous area to ensure you are happy with the color and finish.
- Use Proper Tools: High-quality brushes, rollers, and spray equipment can significantly impact the final result.
By following these steps and tips, you can achieve a beautiful brass-like finish on stainless steel, enhancing its aesthetic appeal while maintaining its durability.
Frequently Asked Questions
Below are answers to some frequently asked questions:
What methods can I use to make stainless steel look like brass?
To make stainless steel look like brass, you can use one of the following methods:
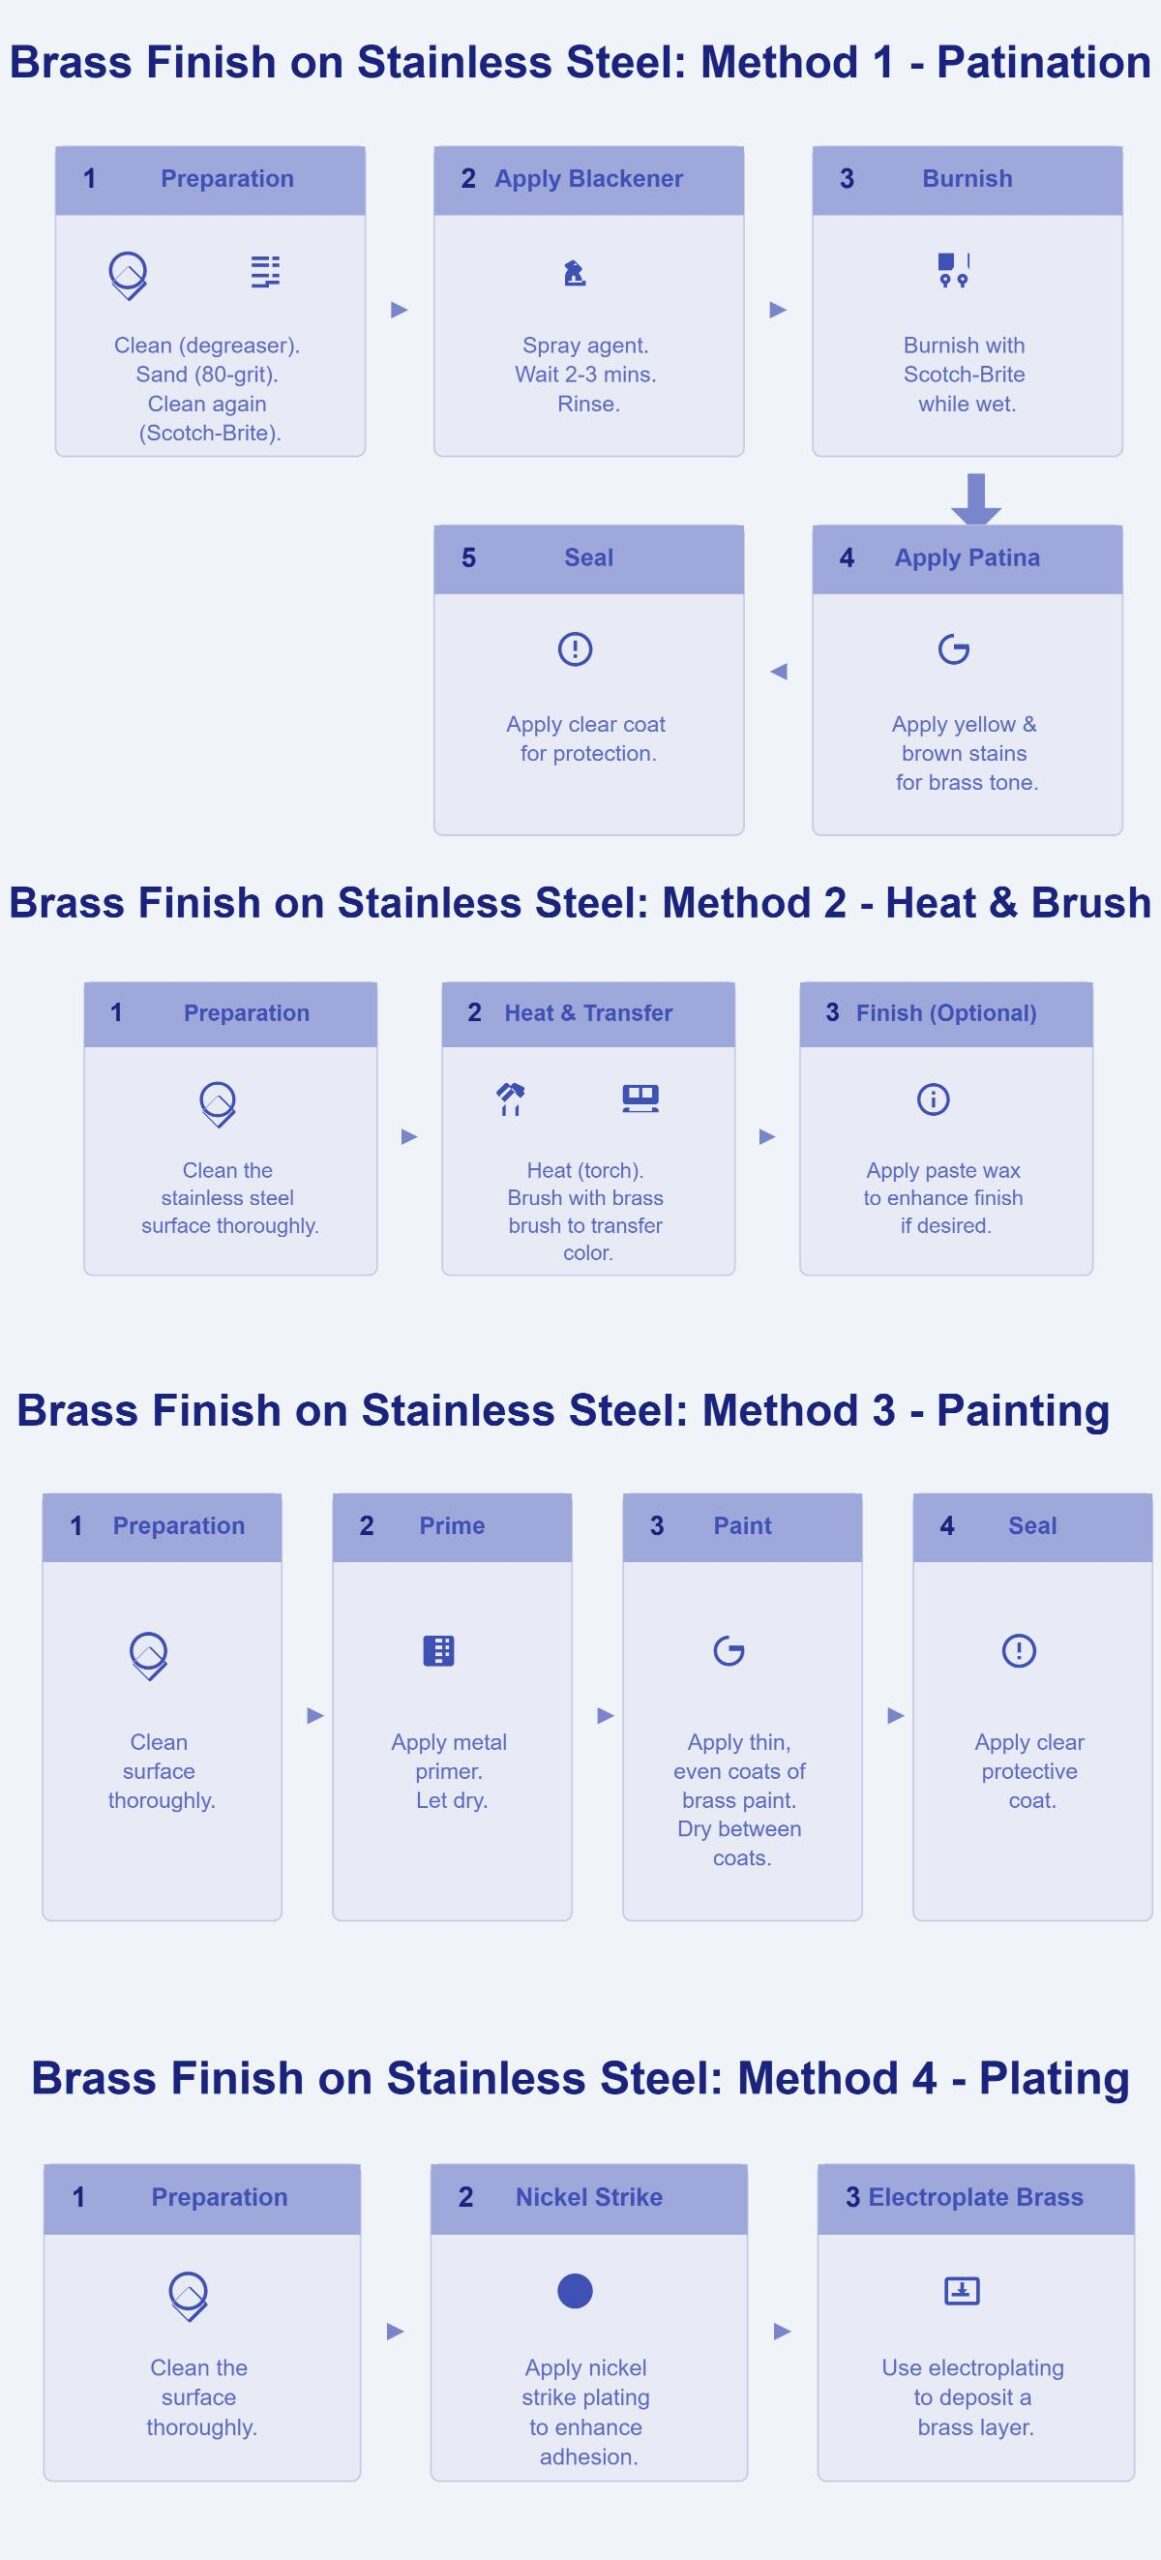
- Patination: This involves applying a chemical patina to the stainless steel surface. Begin by sanding the surface with 80-grit sandpaper to remove the nickel and chrome layer, then clean it thoroughly. Apply a blackening agent, like Birchwood Casey Presto Stainless Black, and allow it to set before rinsing. Burnish the surface with a Scotch-Brite pad, then apply patina stains in yellow and brown to achieve the brass tone.
- Heat Application and Brass Brush: Clean the stainless steel thoroughly, then use a blowtorch to heat it until hot but not red-hot. Gently brush the heated area with a genuine brass brush attached to a drill, transferring a brass color to the surface. Apply a paste wax if desired to enhance the finish.
- Painting with Metallic Finishes: Clean the surface and apply a metal primer. Use metallic brass paint, applying thin, even coats and allowing each to dry properly. Seal with a clear protective coat to ensure durability.
Each method has its pros and cons, so choose the one that best fits your needs and resources.
How do I apply a brass finish to stainless steel?
To apply a brass finish to stainless steel, you can use several methods, each with its steps and requirements. Here’s a concise guide for beginners:
- Chemical Patination Method:
- Preparation: Clean the stainless steel thoroughly with a degreaser and sand it with 80-grit sandpaper to remove the outer layer of nickel and chrome. Use a metal cleaner and a Scotch-Brite pad for further cleaning.
- Applying Patina: Apply a blackening agent like Birchwood Casey Presto Stainless Black. Spray it on and leave for 2-3 minutes, then rinse with water. Burnish with a Scotch-Brite pad while still wet. Apply layers of yellow and brown patina stains to achieve a brass tone. Seal with a clear coat.
- Heat Application Method:
- Preparation: Clean the stainless steel surface.
- Heating and Transfer: Use a torch to heat the metal. Brush the heated surface with a 100% brass brush to transfer the brass finish. Ensure the brush is at the appropriate temperature for effective transfer.
- Painting Method:
- Preparation: Clean the surface and apply a metal primer. Allow it to dry.
- Painting: Apply brass or gold spray paint in thin, even coats, letting each coat dry before the next. Finish with a clear coat for protection.
- Brass Plating Method:
- Preparation: Clean the surface thoroughly.
- Plating: Start with a nickel strike plating to enhance adhesion. Then, use an electroplating process to deposit a brass layer onto the prepared surface.
Each method has its pros and cons in terms of durability, aesthetic appeal, and complexity. Choose the one that best suits your needs and resources.
What is the durability of a brass-like finish on stainless steel?
The durability of a brass-like finish on stainless steel largely depends on the method used to achieve it and the environmental conditions it is exposed to. Generally, applying a chemical patina can create a durable finish, especially if it is properly sealed. This method can withstand wear and tear but may fade over time if exposed to harsh conditions. The heat and brass brush technique offers a more temporary solution, often requiring frequent touch-ups. Painting with metallic finishes provides the least durable option, as the paint can chip or fade more easily. To ensure longevity, proper surface preparation and sealing are essential. Regular maintenance and protection from high humidity, salts, or acids will also help maintain the appearance of the brass-like finish.
Are there any safety precautions to consider?
Yes, there are several important safety precautions to consider when making stainless steel look like brass. Firstly, ensure you are working in a well-ventilated area to avoid inhaling harmful fumes from chemicals or paints. Always wear personal protective equipment (PPE) such as gloves, safety goggles, and a mask to protect yourself from chemical exposure and metal debris. When handling chemicals, follow the product instructions carefully and be cautious to prevent accidental contact or inhalation. It’s also crucial to have a first aid kit nearby and know basic first aid procedures in case of an accident. For processes involving heat, use heat-resistant gloves and protective clothing to avoid burns. Regularly maintain your tools and ensure all electrical equipment is used safely to prevent accidents. Keeping your workspace clean and organized will help prevent slips, trips, and other hazards. Regular safety training can also enhance your awareness and preparedness for potential risks.
Can I achieve a brass finish on other metals?
Yes, you can achieve a brass finish on other metals such as steel and aluminum, in addition to stainless steel. The process generally involves surface preparation, application of a brass-like patina, burnishing, or painting with metallic finishes.
- Surface Preparation: Clean the metal thoroughly to remove any oils, dirt, or fingerprints. Sand the surface with appropriate grit sandpaper to ensure smoothness.
- Chemical Treatment: Apply a suitable brass-colored patina or chemical agent designed for the specific metal. For example, Birchwood Casey Presto Stainless Black can be used for stainless steel, while other agents may be suitable for steel and aluminum.
- Heat Treatment: Another method is to heat the metal until it reaches a brass-like color and then brush it with a brass brush while it is still warm.
- Painting: Use high-quality brass-colored metallic paint. Prepare the surface by priming, then apply the paint evenly, and finish with a protective sealant to enhance durability.
By following these steps, you can successfully create a brass finish on various metals, adding both aesthetic appeal and value to your projects.
What are some common mistakes to avoid?
When transforming stainless steel to look like brass, beginners often make a few common mistakes. First, inadequate surface preparation is a major error. It’s essential to thoroughly clean and degrease the stainless steel to ensure the finish adheres properly. Additionally, insufficient sanding can prevent the patina or paint from sticking well.
Another mistake is using incorrect chemicals or patinas. Always select solutions specifically designed for stainless steel to avoid undesired colors or damage. Applying these solutions incorrectly, such as using too much or not allowing proper drying time, can also lead to poor results.
Improper heat application is another issue. Stainless steel must be heated evenly to prevent discoloration. Controlling the temperature carefully is crucial to avoid overheating and damaging the metal.
Neglecting to seal the finish is a common oversight. Without proper sealing, the finish can fade or lose vibrancy due to environmental exposure. Using the wrong type of sealant can also dull the finish.
By avoiding these mistakes and following the correct techniques, you can achieve a durable and attractive brass-like finish on stainless steel.

