Are you eager to master the art of MIG welding but unsure where to start with 1/4 inch steel? Look no further! This comprehensive guide is designed specifically for beginners who want to learn the essential techniques and settings for a successful weld. In this step-by-step tutorial, we will walk you through everything from preparing your steel to choosing the right welding wire and shielding gas. You’ll learn how to set up your welder with the optimal voltage and wire feed speed, ensuring strong and consistent welds. By the end, you’ll have the confidence and knowledge to tackle your welding projects with ease. Ready to spark up your skills? Let’s dive in!
Introduction to MIG Welding
What is MIG Welding?
MIG welding, or Metal Inert Gas welding, is a popular welding process also known as Gas Metal Arc Welding (GMAW). This technique involves feeding a continuous solid wire electrode through a welding gun into the weld pool, which melts the wire and joins the base materials together. The welding gun also delivers a shielding gas, typically a mixture of argon and carbon dioxide, to protect the weld pool from contamination by the surrounding air.
Benefits of MIG Welding for Beginners
MIG welding offers several advantages, making it an excellent choice for beginners:
Ease of Learning
MIG welding is straightforward and easy to learn compared to other welding methods. The process is partially automated, which means the welder only needs to focus on guiding the welding gun along the joint, while the machine handles the wire feed and gas flow.
Versatility
MIG welding can be used on various metals, including steel, aluminum, and stainless steel. This versatility makes it ideal for a wide range of applications such as DIY projects, automotive repairs, and industrial fabrication.
Clean and Efficient
The use of shielding gas in MIG welding reduces slag and spatter, resulting in cleaner welds and less post-weld cleanup. This efficiency allows welders to complete projects more quickly and with higher precision.
Continuous Welding
The continuous wire feed in MIG welding ensures a consistent and stable arc, which is particularly beneficial for welding long seams without frequent interruptions. This feature enhances productivity and reduces the likelihood of defects.
Control and Precision
MIG welding allows for excellent control over the welding process, enabling welders to adjust parameters like voltage and wire feed speed to match different materials and thicknesses, ensuring strong and reliable welds.
By understanding the basics and benefits of MIG welding, beginners can confidently start their welding journey and achieve high-quality results in their projects.
Preparing 1/4 Inch Steel for Welding
First, identify the type of 1/4 inch steel you have, such as mild carbon steel, to understand its properties and how it will react during welding. Decide on the intended use of the welded piece, as this will influence the weld joint configuration, such as whether you need a butt joint, lap joint, or T-joint. Also, plan how you’ll prepare the surface for welding.
Use plasma cutters or right-angle grinders to make precise cuts on the steel. Make sure the pieces fit tightly together. Minimizing gaps is crucial, as large gaps can lead to weak welds. If required, bevel the edges of the steel. Beveling increases the weld penetration, resulting in a stronger joint.
Ensure the steel surface is clean before welding, as contaminants like oil, grease, rust, or mill scale can cause defects. You can use acetone, wire brushes, sandpaper, or an angle grinder to remove these contaminants. After cleaning, use a clean rag to wipe away any remaining debris.
Choose the appropriate grit for sanding or grinding the steel. A grit that is too coarse may remove too much material, while a grit that is too fine may not clean the surface effectively. The goal is to achieve a clean surface without excessive material removal.
Use small temporary welds, known as tack welds, to hold the metal pieces together and maintain alignment during the main welding process. Use clamps to secure the alignment further. Clamps ensure that the pieces stay in place and prevent any movement that could affect the quality of the final weld.
Choosing the Right Welding Wire and Shielding Gas
Choosing the right welding wire is crucial for strong, durable welds when MIG welding 1/4 inch steel. The most commonly used wire for mild steel is ER70S-6, known for producing high-quality welds with excellent penetration and minimal spatter. It has more deoxidizers, making it good for welding slightly rusty or dirty steel.
The thickness of the welding wire is critical, as it determines the balance of heat input and penetration needed for 1/4 inch steel. For this thickness, consider using:
- 0.030 inches: Suitable for thinner sections of 1/4 inch steel, offering good control and a stable arc, ideal for beginners.
- 0.035 inches: Provides higher heat input and better penetration, making it more suitable for thicker sections of 1/4 inch steel, beneficial for achieving stronger welds.
Shielding gas protects the weld pool from contaminants that can cause defects. The choice of shielding gas significantly affects weld quality:
Pure Carbon Dioxide (CO2)
- Benefits: Cost-effective, offers deep penetration suitable for thicker materials.
- Drawbacks: Produces more spatter and results in a rougher weld finish.
75% Argon / 25% CO2 Mix (C25)
- Benefits: The most popular choice for MIG welding mild steel. It offers balanced penetration and spatter control, resulting in cleaner and smoother welds. Argon helps to stabilize the arc and reduce spatter.
- Drawbacks: Though pricier than pure CO2, it offers higher quality welds, making it worth the cost.
98% Argon / 2% CO2
- Benefits: Beneficial for achieving high-quality welds with minimal oxidation, often used for welding stainless steel.
- Drawbacks: More expensive and not typically necessary for mild steel welding projects.
Understanding the differences between pure CO2 and an argon-CO2 mix helps in making an informed decision for your welding projects:
- CO2: Cost-effective, suitable for thicker materials, provides deep penetration but produces more spatter and a rougher weld finish.
- Argon-CO2 Mix: Smoother arc, reduced spatter, cleaner welds, better
Setting Up Your Welder
Step 1: Safety Precautions
- Personal Protective Equipment (PPE): Before you start setting up your welder, make sure to wear a welding helmet, gloves, and protective clothing. These items protect you from UV radiation and sparks that are common during the welding process.
- Work Environment: Ensure your workspace is well-ventilated to avoid inhaling harmful fumes. Also, remove any flammable materials from the area to prevent fires.
Step 2: Equipment Setup
- MIG Welder and Power Cord: Connect your MIG welder to a stable power source. Check the power cord for signs of damage like cuts or fraying, as a damaged cord can be a safety hazard and affect the welder’s performance.
- MIG Gun: Attach the MIG gun to the welder. If it comes pre-installed, double-check that it is securely connected. A loose connection can lead to inconsistent welding.
- Shielding Gas: In MIG welding, you usually use a shielding gas such as Argon or an Argon-CO2 mix. Attach the gas regulator to the gas cylinder and then connect the hose to the welder. Make sure all connections are tight to prevent gas leaks.
- Ground Clamp: Connect the ground clamp to a clean metal surface near your workpiece. This completes the electrical circuit necessary for the welding process.
Step 3: Loading the Welding Wire
- Selecting Wire: For welding 1/4 inch mild steel, use ER70S-3 wire. This type of wire is compatible with the base metal and helps produce strong welds.
- Installing the Wire: Put the wire spool on the feeder, making sure it can unroll without issues. Thread the wire through the wire guide and into the MIG gun. Adjust the wire tension so that the wire feeds without kinking or jamming.
Step 4: Adjusting Welder Settings
Look in your welder’s manual to find the right voltage and wire speed settings for 1/4-inch steel. Refer to your welder’s manual to set the appropriate voltage, amperage, and wire feed speed for 1/4-inch steel, as thicker materials generally need higher wire feed speeds.
Step-by-Step MIG Welding Process
Step-by-Step MIG Welding Process for 1/4 Inch Steel
MIG welding, also known as Gas Metal Arc Welding (GMAW), is an effective and versatile technique for joining metals. Here is a step-by-step guide to help beginners successfully weld 1/4 inch steel.
1. Prepare the Workpiece
- Clean the Metal: Start by thoroughly cleaning the steel surface to remove any oil, grease, rust, or other contaminants. Use a degreaser followed by wiping with a clean cloth.
- Surface Preparation: Grind the area to be welded using an angle grinder or sanding discs to expose clean, bare metal. This ensures a smooth surface for welding.
2. Set Up the Welding Machine
- Voltage and Current Settings: Adjust the machine to appropriate settings for 1/4 inch steel. Typically, set the voltage around 18-20 volts and the current between 150-200 amps.
- Wire Size: Use a .035-inch or .045-inch welding wire, as these sizes are suitable for thicker materials like 1/4 inch steel.
3. Install the Welding Wire
- Load the chosen welding wire onto the wire feeder, ensuring it is properly aligned and not twisted.
- Feed the wire through the welding gun until it emerges from the contact tip. Ensure it moves smoothly without any snags.
4. Connect the Ground Clamp
- Attach the ground clamp to the workpiece securely. Ensure the connection is clean and solid to complete the electrical circuit necessary for welding.
5. Choose the Right Shielding Gas
- For 1/4 inch steel, a mixture of 75% Argon and 25% Carbon Dioxide (C25) is commonly used. This mixture provides good penetration and a clean weld appearance.
6. Position the Welding Gun
- Hold the welding gun at a slight angle, typically 5-15 degrees from perpendicular, with the nozzle about 1/4 inch from the workpiece. Maintain a consistent travel speed and weave pattern to achieve the desired weld bead.
7. Initiate the Arc
- Pull the trigger on the welding gun to start feeding the wire and establish the arc.
- Begin welding at the edge of the joint and move steadily along the joint.
8. Welding Technique
- Use steady, controlled motions to weld along the joint. Adjust the gun angle, travel speed, and weave pattern to ensure proper fusion.
- For thicker materials, a slight hesitation at the top toe of the weld can help prevent undercut and ensure a proper tie-in.
9. Complete the Weld
- Continue welding along the joint until it is fully completed. Allow the weld to cool gradually to prevent stress and distortion in the welded material.
Safety Precautions
- Personal Protective Equipment (PPE): Wear essential safety gear: welding helmet, safety glasses, leather gloves, and flame-resistant clothing.
- Fire Safety: Ensure the welding area is free of flammable materials and have a fire extinguisher nearby for emergencies.
Troubleshooting
- Wire Feed Issues: Check for proper wire alignment and tension if the wire does not feed smoothly.
- Weld Quality: Adjust voltage, current, or travel speed if the weld quality is poor or inconsistent.
By following these steps and maintaining proper technique, you can achieve strong and clean welds on 1/4 inch steel using MIG welding.
Safety Tips for MIG Welding
Protective Gear
- Welding Helmet: Always wear a full-face welding helmet equipped with a proper shade filter to protect your eyes from intense UV radiation. Choose the right shade filter based on the amperage of your welding process; darker shades are necessary for higher amperages to ensure optimal protection.
- Flame-Retardant Clothing: Opt for flame-retardant coveralls or jackets. These protect your body from burns caused by sparks and the high heat generated during the welding process.
- Gloves: Wear dry, hole-free gloves to safeguard your hands from electrical shock and heat, allowing you to handle the welding gun and other equipment safely.
- Boots: Leather boots offer additional protection against sparks and heat, preventing burns to your feet.
Work Environment Safety
- Ventilation: Ensure your workspace has good ventilation. MIG welding produces harmful fumes such as ozone, nitrogen, and carbon monoxide. Use extraction fans or work in well-ventilated areas to avoid inhaling these toxic gases.
- Flammable Materials: Keep the workspace clear of flammable materials like sawdust, plastic, or paper bags. These can easily catch fire from the sparks generated during welding.
Electrical Safety
- Insulation: Insulate the welder and workpiece using dry materials such as rubber mats or dry wood to prevent electrical shock.
- Avoid Contact: Never touch electrically hot parts with bare skin or wet clothing to reduce the risk of electrical accidents.
- Equipment Maintenance: Regularly check the welding electrode holder and cable insulation to ensure they are in good condition. Damaged insulation can lead to electrical malfunctions and shocks.
Fire Prevention
- Fire Extinguisher: Have a fire extinguisher nearby, preferably a CO2 extinguisher for electrical fires or a bucket of sand for flammable material fires. In case of a fire, you can quickly extinguish it before it spreads.
- Alertness: Stay alert for signs of fire. Fires may not appear bright when looking through a welding visor, so be vigilant.
Health Risks Awareness
- Metal Vapors: Be aware of the long-term effects of metal vapors. Prolonged exposure can lead to heavy metal poisoning. Take necessary precautions to minimize inhalation.
- Skin Protection: Protect your skin from UV exposure by ensuring it is covered, as the intense light during MIG welding can cause burns similar to sunburn.
Troubleshooting Common Issues
Lack of Fusion
A common problem in MIG welding 1/4 inch steel is lack of fusion, where the weld metal fails to bond correctly with the base metal.
- Cause: This can occur due to an incorrect MIG gun angle, insufficient heat input, or moving the welding gun too quickly.
- Solution: Adjust the gun angle to 0 – 15 degrees, ensure correct positioning relative to the joint, increase the voltage and wire feed speed, and slow down your travel speed to allow proper fusion of the weld puddle with the base metal.
Undercut
Undercut weakens the weld by creating a groove along the base metal.
- Cause: Excessive current or voltage, or an improper gun angle can cause undercut.
- Solution: Reduce the welding current and voltage settings. Adjust the gun angle so that it points more toward the joint. Slow down your travel speed to ensure the melted areas are completely filled with weld metal.
Spatter
Spatter occurs when small droplets of molten metal are ejected from the weld pool, creating a messy work area.
- Cause: High voltage, excessive wire feed speed, or too much stick – out can cause spatter.
- Solution: Lower the voltage and wire feed speed settings. Maintain a shorter stick – out, typically around 1/4 inch, to reduce spatter. Use anti – spatter spray on the workpiece to minimize adhesion.
Distortion and Warping
Distortion and warping can occur when the heat input is not evenly distributed, causing the metal to bend or warp.
- Cause: Uneven heat input or improper welding sequence.
- Solution: Maintain a moderate travel speed to distribute heat more evenly. Ensure a tight fit – up of parts before welding. Consider welding from both sides or using backstep techniques to balance the heat input.
Porosity
Porosity refers to the presence of gas pockets or voids in the weld, which can weaken the weld strength.
- Cause: Inadequate shielding gas coverage or a contaminated metal surface.
- Solution: Ensure proper shielding gas flow and coverage by checking for leaks and setting the correct flow rate. Clean the metal surface thoroughly to remove any contaminants before welding. Maintain the nozzle at an appropriate distance of 1/4 to 1/2 inch from the workpiece.
Burnback
Burnback happens when the welding wire fuses to the contact tip, halting the welding process. This can be caused by a slow wire feed speed or holding the gun too close to the workpiece. To prevent burnback, increase the wire feed speed and maintain an appropriate distance between the gun and the workpiece.
Incorrect Material Preparation
Proper material preparation is critical to achieving a strong weld.
- Cause: Not cleaning the metal properly or incorrect joint preparation can cause welding issues.
- Solution: Clean the metal surface thoroughly using a wire brush, grinder, or acetone. Ensure proper joint fit – up to prevent contaminants from interfering with the weld. Bevel the edges if necessary to enhance weld penetration.
Voltage Drops and Cable Issues
Voltage drops and cable issues can affect the stability and quality of the weld.
- Cause: Incorrect cable management leading to voltage drops.
- Solution: Use welding cables that are appropriately sized for your setup. Keep cables straightened and avoid excessive connections to minimize inductance and voltage drops.
Troubleshooting Steps
- Check Equipment Settings: Ensure that voltage and wire feed speed are set correctly for the material thickness and welder model.
- Adjust Gun Angle: Maintain an angle of about 15 degrees to ensure proper gas coverage and consistent welds.
- Monitor Weld Bead Size: Adjust travel speed based on the weld bead size to prevent weak or inconsistent welds.
- Maintain Proper Shielding Gas Flow: Clean the nozzle regularly and ensure adequate shielding gas flow.
- Preheat if Necessary: Especially for high – strength steels or highly restrained joints, preheat to prevent cracking and ensure a stronger weld.
Frequently Asked Questions
Below are answers to some frequently asked questions:
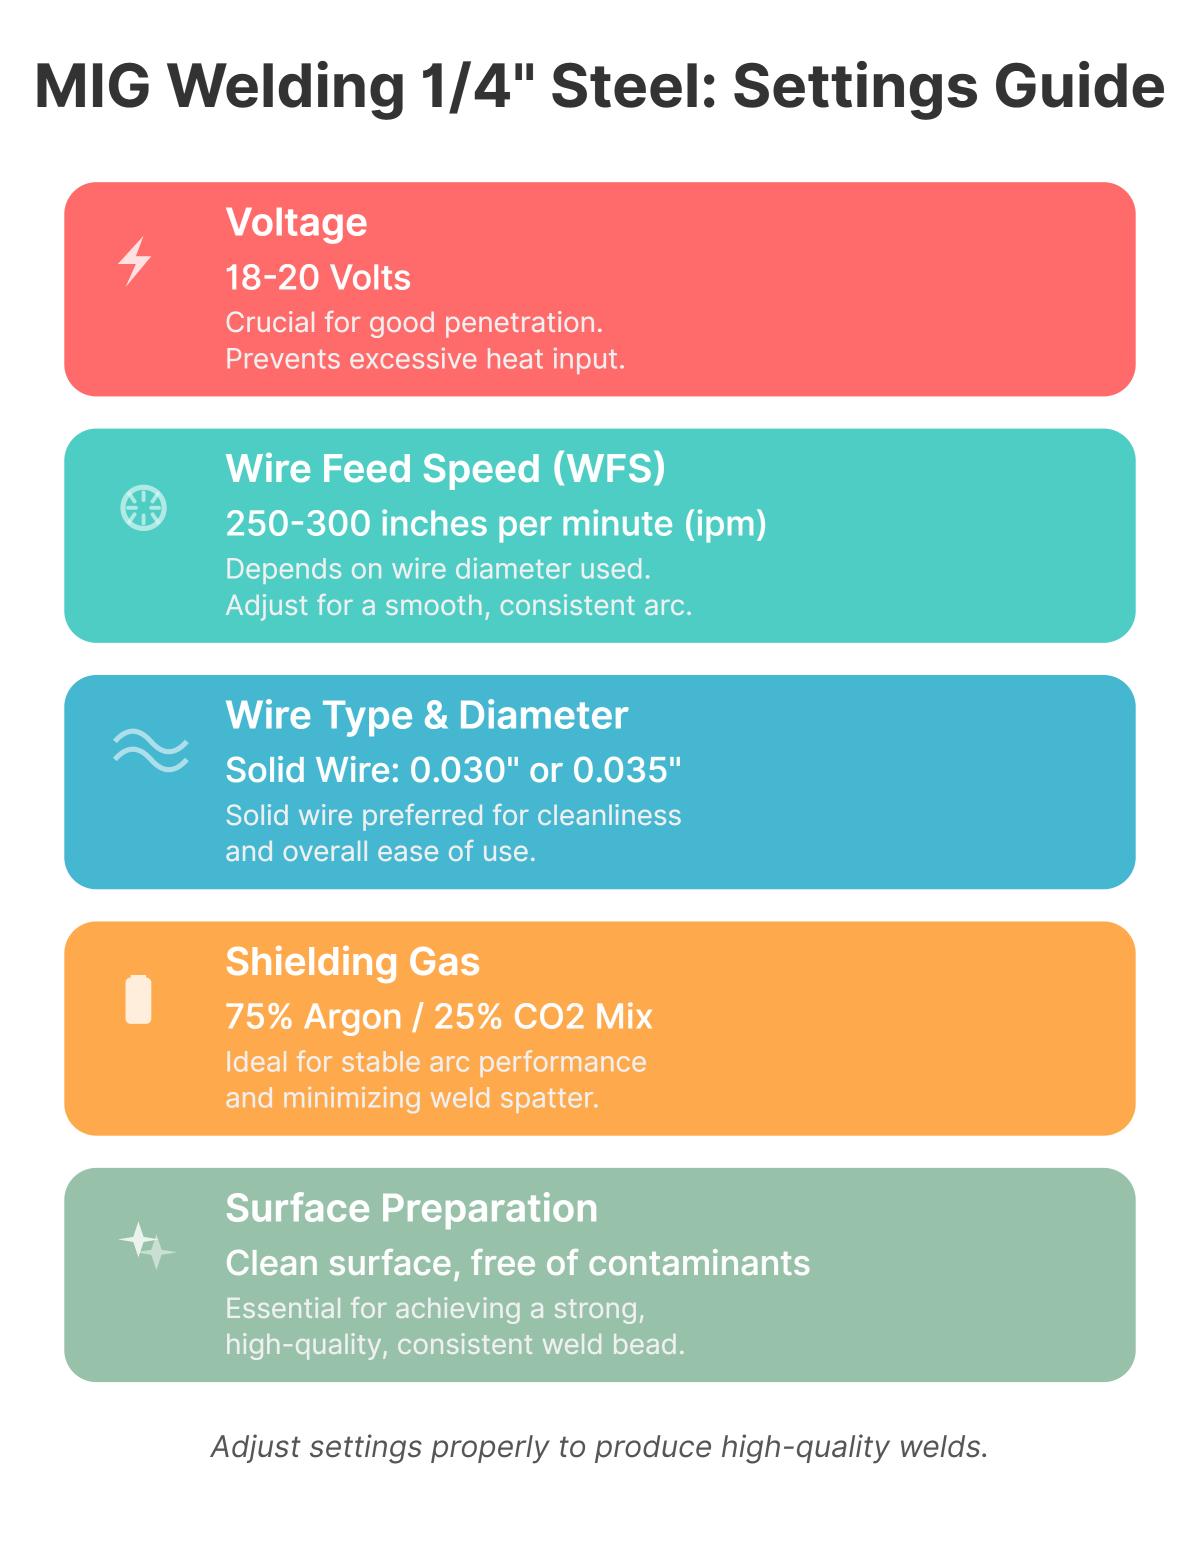
What are the best settings for MIG welding 1/4 inch steel?
For MIG welding 1/4 inch steel, the best settings involve adjusting the voltage, wire feed speed, and choosing the appropriate wire and shielding gas. Set the voltage to around 18-20 volts to ensure good penetration without causing excessive heat. The wire feed speed should be between 250-300 inches per minute (ipm), depending on the wire diameter you are using—0.030 or 0.035 inch wire is recommended.
For the wire type, solid wire is preferred for its cleanliness and ease of use. When it comes to shielding gas, a 75% Argon and 25% CO2 mix is ideal as it provides a stable arc and minimizes spatter.
Ensure that the steel surface is clean and free from contaminants before welding. This preparation helps in achieving a strong, consistent weld. Adjusting these settings properly will help you produce high-quality welds on 1/4 inch steel.
What shielding gas should I use for MIG welding?
For MIG welding 1/4 inch steel, the most recommended shielding gas is a mix of 75% Argon and 25% Carbon Dioxide, often referred to as C25 or 75/25. This combination offers a good balance between arc stability and penetration, making it ideal for welding mild steel. The Argon in the mix creates an inert environment that minimizes oxidation, while the CO2 helps in stabilizing the arc and improving penetration. This results in high-quality welds with manageable spatter and minimal cleanup. For beginners, this mix is user-friendly and effective for achieving strong, consistent welds on 1/4 inch steel.
How do I prepare 1/4 inch steel for welding?
To prepare 1/4 inch steel for MIG welding, start by cleaning the steel surface thoroughly. Use a solvent like acetone to remove oils and grease, and follow with mechanical cleaning using a wire brush, sandpaper, or an angle grinder to eliminate rust and mill scale. This ensures a clean metal-to-metal connection, which is crucial for a strong weld.
Next, set up your MIG welder. For 1/4 inch steel, select a welding wire with a diameter of 0.030 or 0.035 inches, with 0.035 inches being preferred for better penetration. Adjust the welder settings to a voltage between 18 and 22 volts and a wire feed speed of 250-300 inches per minute.
Use a shielding gas mixture of 75% argon and 25% carbon dioxide, maintaining a flow rate of around 12-25 cubic feet per hour. Ensure tight fit-up of the metal parts and consider beveling the joint for better fusion. By following these steps, you can achieve high-quality MIG welds on 1/4 inch steel.
How does wire thickness affect welder settings?
Wire thickness significantly impacts welder settings when MIG welding 1/4 inch steel. Thicker wires require higher amperage to maintain a stable arc because they have more metal to melt. For example, a .035 inch wire is commonly used for 1/4 inch steel and requires higher amps compared to thinner wires like .023 inch.
Voltage also needs adjustment based on wire thickness. Thicker wires generally need slightly higher voltages to maintain a consistent arc and ensure proper penetration. A moderate voltage setting, such as 18-22 volts, is a good starting point for mild steel.
Wire feed speed is another critical factor. Thicker wires need a faster feed speed to deliver the necessary amount of filler material into the weld pool. For instance, a .035 inch wire might require a wire feed speed of approximately 200 inches per minute at 125 amps.
By understanding these relationships, you can set up your welder correctly to achieve strong, clean welds on 1/4 inch steel.
What are some tips for achieving a strong weld?
To achieve a strong weld when MIG welding 1/4 inch steel, follow these tips:
- Proper Equipment Setup: Ensure your MIG welder settings are optimized. For 1/4 inch steel, set the voltage between 18 to 22 volts and adjust the wire feed speed to around 260-285 inches per minute if using 0.030 inch wire.
- Wire and Contact Tip Management: Trim the wire nearly flush with the contact tip before starting. Maintain a wire stick-out of about 3/8 to 1/2 inch to ensure a stable arc.
- Welding Technique: Use a travel angle of 5-15 degrees and maintain a steady travel speed. The push method (gun pushing the weld pool) is recommended for better visibility and heat distribution.
- Material Preparation: Clean the steel thoroughly to remove any rust, oil, or debris. For thicker joints, bevel the edges to allow for full penetration.
- Multipass Welding: For thicker materials, use multiple passes to ensure full penetration and a strong joint. Distribute heat evenly to avoid distortion.
- Safety and Standards: Always follow safety guidelines and ensure compliance with standards such as ASTM and AWS for quality assurance.
By following these steps, you can achieve strong, reliable welds suitable for 1/4 inch steel.
Why is compliance with welding standards important?
Compliance with welding standards is important because it ensures that welds meet specific quality, safety, and reliability criteria. By adhering to established guidelines, such as those from ASTM and AWS, welders can achieve consistent and high-quality results, which are crucial for the structural integrity of welded components. This is particularly important when working with 1/4 inch steel in MIG welding, where precise control over welding parameters like voltage and wire feed speed is necessary.
Moreover, compliance with standards helps prevent accidents and ensures that proper safety measures are followed, protecting both the welder and the public. It also helps avoid legal issues, as many industries and regulatory bodies require adherence to specific welding standards. Overall, following these standards guarantees that the welding work is reliable, safe, and up to industry benchmarks, which is essential for both beginners and experienced welders alike.

