How to Clean Mild Steel Before Painting: A Complete Guide
Getting a flawless finish when painting mild steel starts long before you ever pick up a paintbrush. Properly cleaning and…
Are you looking to transform that dull piece of mild steel into a sleek, protected masterpiece? Painting mild steel may seem daunting, but with the right guidance, even a beginner can achieve professional results. This step-by-step guide will walk you through everything you need to know, from surface preparation to choosing the best primer and paint. We’ll start with the crucial process of rust removal, ensuring your steel is clean and ready for its new coat. Then, we’ll delve into selecting the right primer and applying it properly to create a strong foundation. Finally, you’ll learn the painting techniques that guarantee a smooth, durable finish. Ready to give your mild steel a fresh, new look? Let’s dive in and explore the essential steps to master this rewarding DIY project.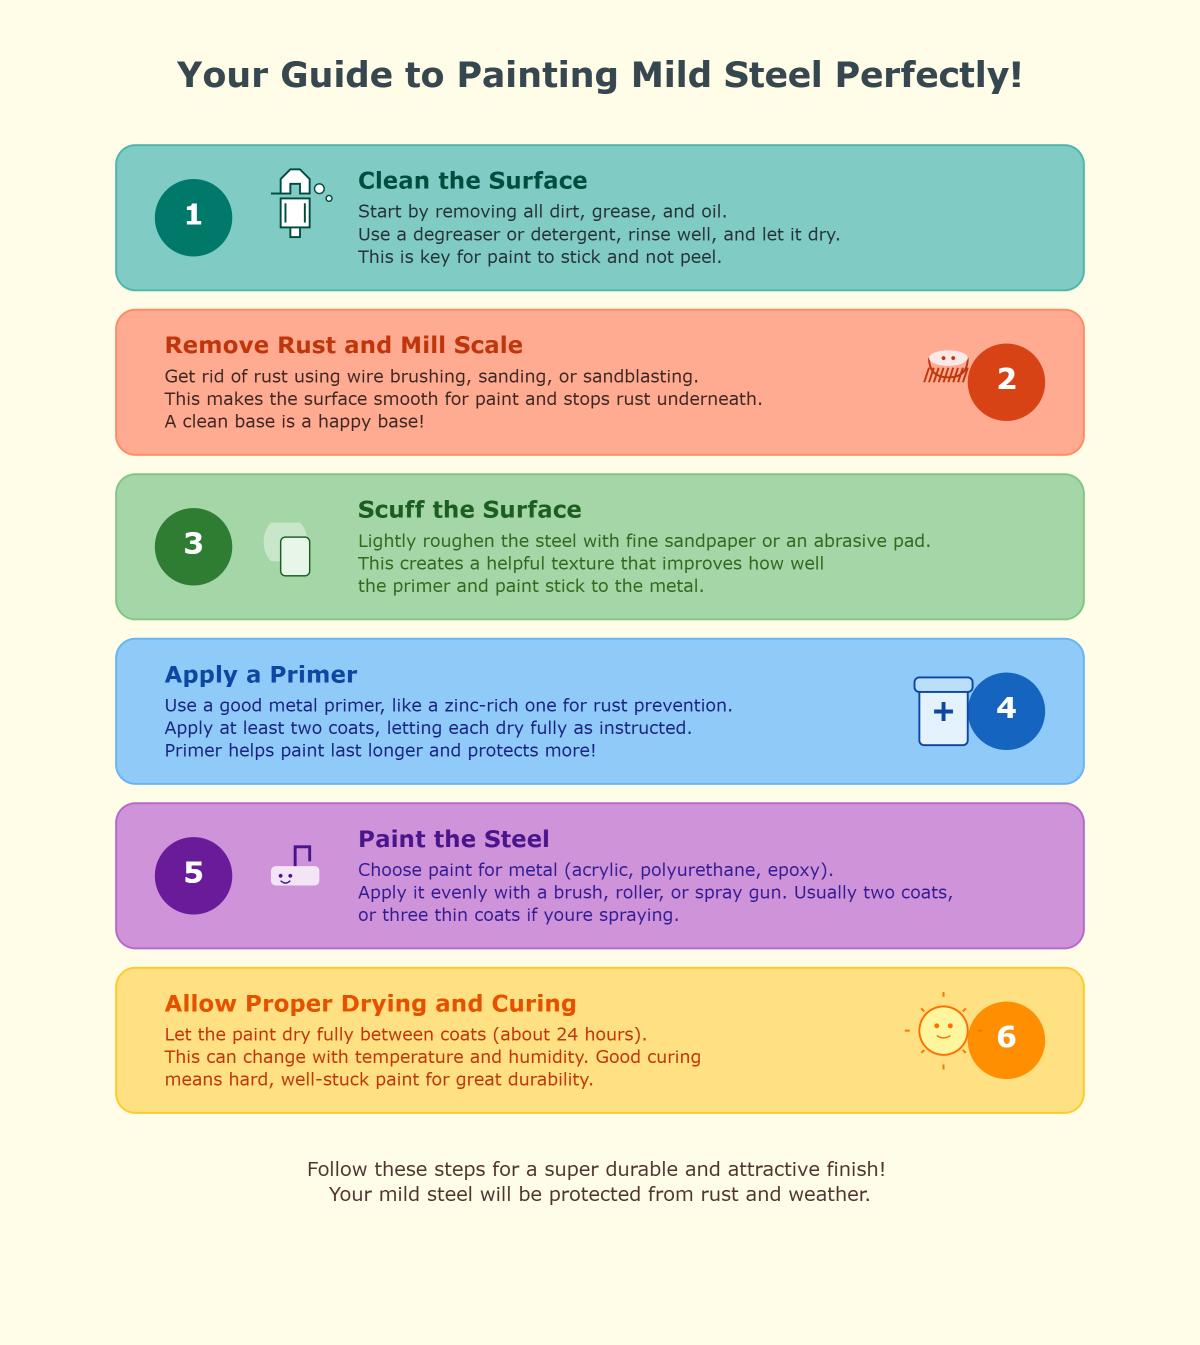
Mild steel, or low-carbon steel, contains less than 0.3% carbon, giving it unique properties. This low carbon content imparts several advantageous characteristics, making mild steel a preferred material in various applications.
Mild steel’s versatility and beneficial properties enable its use across numerous industries:
Mild steel is widely used in metal fabrication, including welding, cutting, and forming. Its malleability and weldability make it easy to manipulate into various shapes and structures.
Industries rely on mild steel for building machinery, equipment, and infrastructure due to its strength and durability. It is ideal for components that must endure significant wear and tear.
For home improvement and DIY enthusiasts, mild steel is a popular choice for creating furniture, fixtures, and various other projects. Its ease of handling and affordability make it an excellent option for hobbyists.
While mild steel is strong and versatile, it is susceptible to rust and corrosion if not properly protected. Painting mild steel is essential to enhance its durability and appearance. A well-applied paint layer acts as a barrier, preventing moisture and oxygen from reaching the steel surface and causing rust.
Proper painting involves preparing the surface, applying a primer, and then painting, ensuring long-lasting protection and improved appearance. By following the correct procedures, you can significantly extend the life of mild steel products and maintain their aesthetic appeal.
Properly preparing mild steel before painting is essential. This preparation ensures that the paint adheres well, providing a durable and long-lasting finish. Without adequate preparation, paint may peel, chip, or fail to protect the steel from corrosion.
One of the primary reasons for surface preparation is to ensure strong paint adhesion. Contaminants such as dirt, grease, rust, and old paint can create barriers between the steel and the new paint layer. These contaminants can significantly reduce paint adhesion, leading to premature paint failure.
Cleaning, degreasing, and removing rust are critical steps in the process. Use cleaning agents to remove grease and oil, and employ mechanical methods like sanding or chemical methods like rust converters to eliminate rust. This ensures a smooth and clean surface, ready for the next steps.
Abrasive blasting roughens the surface, helping paint stick better. Techniques like sandblasting or grit blasting are used to achieve the desired surface roughness. The ideal profile varies depending on the type of paint being used but generally falls within specific micron ranges to ensure optimal adhesion.
Cleaning the steel removes rust and other sources of corrosion. This step is crucial in extending the life of the steel and the paint coating. Applying a primer after surface preparation provides an additional layer of protection. Primers, especially zinc-rich primers, offer excellent rust prevention and improve the longevity of the paint job.
Proper surface preparation not only improves adhesion but also enhances the overall durability of the paint. A well-prepared surface ensures that the paint can withstand environmental factors, such as moisture, UV exposure, and temperature fluctuations. By following the correct surface preparation steps, the paint finish will be more resilient and last longer, reducing the need for frequent touch-ups or repainting.
The surface preparation process involves several key steps to ensure the mild steel is ready for painting. Each step is designed to eliminate contaminants, create a suitable surface profile, and provide a clean and stable base for the paint.
Removing rust from mild steel is crucial for ensuring proper paint adhesion and long-lasting protection. Using wire brushes and scrapers is a straightforward and effective way to remove loose rust and mill scale from mild steel surfaces. For more stubborn rust spots, sandpaper can be used. Start with a coarse grit, such as 80, to remove the bulk of the rust, and gradually move to finer grits (120 and 240) for a smoother finish.
Chemical methods are highly effective for rust removal, especially for intricate or hard-to-reach areas.
Soak the rusty object in white vinegar overnight. Then, scrub off the rust with steel wool or a metal brush. This method works well for small items or components.
Creating a paste from baking soda and water can also help remove rust. Apply the paste to the rusty area, let it sit for 15-20 minutes, then scrub and rinse the surface. This method is environmentally friendly and easy to use.
For severe rust, specialized products like Evapo-Rust or Naval Jelly can be used. These products are designed to dissolve rust effectively but should be handled with care due to their chemical nature. Always follow the manufacturer’s instructions and safety guidelines when using these products.
Power tools can expedite the rust removal process, especially for larger surfaces or heavy rust.
An electric angle grinder equipped with a wire wheel or cup brush attachment can quickly remove rust from mild steel surfaces. This method is efficient but requires proper safety gear, including gloves, eye protection, and a dust mask, to protect against flying debris and dust.
After successfully removing rust, it’s essential to clean and prepare the surface for painting. Thoroughly clean the metal surface with mild soap or detergent, and rinse with water to remove any remaining debris or oils. Use mineral spirits if necessary to ensure the surface is completely clean and ready for priming. Once the surface is clean and dry, apply a suitable primer to enhance paint adhesion and provide additional corrosion protection.
Cleaning mild steel is crucial for a smooth, durable paint finish. Proper surface cleaning removes contaminants like dirt, grease, oil, and rust that could prevent paint from adhering properly, ensuring a long-lasting finish.
Using a primer before painting mild steel is essential for several key reasons. Primers enhance the adhesion of the paint to the steel surface, which helps achieve a smoother and more durable finish. Additionally, primers act as a protective barrier against corrosion, preventing rust formation and extending the lifespan of the painted steel.
Epoxy-based primers and zinc-rich primers are highly recommended for mild steel. Epoxy-based primers offer excellent adhesion and strong protection, forming a tough bond with the metal surface. Zinc-rich primers, containing a high percentage of zinc, provide superior rust prevention by offering sacrificial protection.
Rust-inhibiting primers contain specific additives that help prevent rust formation under the paint layer. These primers are particularly beneficial in industrial settings where steel surfaces are exposed to harsh environments and need extra protection against corrosion.
When choosing a primer, consider the environmental conditions to which the mild steel will be exposed. If the steel is in an area with high humidity, frequent temperature fluctuations, or exposure to chemicals, select a primer that offers strong protection against these elements. For outdoor applications, UV-resistant primers are recommended.
Ensure the primer has excellent adhesion properties to prevent issues like peeling and cracking over time. Primers with strong bonding capabilities will provide a more durable and long-lasting finish.
Primers can be applied using various methods, including spray cans, spray guns, brushes, or rollers. The choice of application method depends on the size of the surface and the specific requirements of the project. Always follow the manufacturer’s instructions regarding application techniques and drying times to achieve optimal results.
For most mild steel surfaces, a single coat of primer is usually enough. However, if extra protection is needed, or the surface is rough or porous, applying a second coat can be beneficial. A double coat can enhance the protective barrier and improve the overall finish.
Before applying the primer, ensure the mild steel surface is thoroughly cleaned and free from contaminants like grease, dirt, and rust. Proper surface preparation is essential to maximize the effectiveness of the primer and ensure a smooth application. Use appropriate cleaning agents and tools to prepare the surface.
Primers require specific drying and curing times for the best results. Generally, primers require several hours to dry, but the exact time can vary based on the type of primer and environmental conditions. Follow the manufacturer’s guidelines for drying and curing times to ensure the primer is fully set before applying the paint.
Selecting the right type of paint is crucial for ensuring the durability and appearance of mild steel. Here are some common types of paints that work well for mild steel:
Acrylic paint is a popular choice for mild steel due to its UV resistance and durability. It is suitable for both indoor and outdoor applications and offers a wide range of color options. Acrylic paints dry quickly and form a flexible coating that resists cracking and peeling.
Polyurethane paint is known for its excellent resistance to abrasion, chemicals, and weathering. It provides a tough, durable finish that is ideal for surfaces exposed to harsh conditions. Polyurethane paints are particularly well-suited for industrial and exterior applications.
Epoxy coatings are highly durable and provide excellent protection against corrosion, chemicals, and impact. They are often used in industrial settings where the steel is subjected to heavy wear and tear. Epoxy coatings have a long lifespan and can protect steel surfaces for many years.
For optimal protection and a durable finish, it is generally recommended to apply 2–3 thin coats of paint. Each coat should be allowed to dry thoroughly before applying the next one. Thin coats are preferable to one thick coat as they reduce the risk of runs and ensure better coverage.
Allow each coat to tack-dry before applying the next one. Tack-drying typically takes 5–10 minutes, but follow the paint manufacturer’s guidelines for specific drying times. Ensure that the surface is not sticky to the touch before proceeding with the next coat.
Let the final coat cure for at least 24 hours at room temperature. Note that high humidity or low temperatures can extend drying times by up to 30%. Proper curing is essential for the paint to achieve its full hardness and protective properties.
For additional protection and a glossy finish, consider applying a clear coat over the painted surface. Clear coats provide an extra layer of durability and can enhance the appearance of the paint.
To achieve a high-gloss finish, you can buff the surface with fine-grit polishing compounds. This step is optional but can significantly improve the aesthetic appeal of the painted mild steel.
Choosing the right primer is essential for ensuring the durability and protection of mild steel. Here are some common types of primers and their specific applications:
Advantages: Zinc rich primers contain a high percentage of zinc dust, which provides excellent corrosion resistance. They adhere well and greatly extend the life of painted steel, especially in harsh environments.
Use Cases: Ideal for outdoor applications where the steel is exposed to harsh weather conditions. They are commonly used in marine and industrial settings.
Advantages: Red oxide primers are versatile and known for their strong anti-corrosive qualities. They offer good adhesion and are relatively easy to apply.
Use Cases: Suitable for various ferrous metals, including mild steel. Often used in industrial applications where the steel is exposed to moderate environmental conditions.
Advantages: These primers are renowned for their rust-inhibiting properties. They create a durable protective layer for both metal and wood.
Use Cases: Recommended for projects that require a durable protective layer against rust, such as automotive parts and outdoor metal structures.
Advantages: Self-etching primers contain acids that lightly etch the metal surface, ensuring better adhesion for the next paint layers. They create a strong bond between the primer and the metal.
Use Cases: Suitable for both ferrous and non-ferrous metals. They are often used after applying a zinc chromate primer to ensure better adhesion on surfaces with residual rust.
Advantages: Two-pack epoxy primers offer excellent adhesion and corrosion resistance. They form a tough, durable layer that is resistant to chemicals and physical wear.
Use Cases: Ideal for applications requiring high durability and protection, such as industrial machinery and equipment.
Selecting the right type of paint is crucial for the longevity and appearance of mild steel. Here are some commonly used paints:
Advantages: Acrylic paints are UV resistant, making them suitable for outdoor applications. They dry quickly and provide a flexible, durable finish that resists cracking.
Use Cases: Best for surfaces exposed to sunlight and varying weather conditions. Commonly used for outdoor furniture and metal structures.
Advantages: Polyurethane paints offer excellent durability and resistance to UV radiation, chemicals, and abrasion. They create a durable layer that withstands tough environmental conditions.
Use Cases: Suitable for both indoor and outdoor applications, including industrial equipment and exterior metal surfaces.
Advantages: Two-component epoxy coatings provide long-lasting protection and are highly effective in preventing corrosion. They are particularly resistant to chemicals and physical damage.
Use Cases: Ideal for industrial applications where the steel is exposed to heavy wear and tear, such as pipelines, tanks, and structural steel.
Proper surface preparation is critical for ensuring the adhesion and effectiveness of both primers and paints. Cleaning and sanding the steel surface is necessary to remove any contaminants and create a suitable profile for painting.
Ensure that the chosen primer is compatible with the paint type. Consider whether the primer and paint are oil-based or water-based, as compatibility issues can affect adhesion and durability.
Select primers and paints based on the environmental conditions where the mild steel will be used. Factors such as humidity, temperature fluctuations, and exposure to chemicals should be considered to maximize protection against corrosion.
By carefully selecting the appropriate primers and paints, you can achieve a durable and long-lasting finish on mild steel, ensuring it remains protected and visually appealing for years to come.
UV rays from the sun can greatly affect the durability of paint on mild steel. UV radiation breaks down the chemical bonds in paint, leading to fading, chalking, and loss of gloss.
Solutions:
Extreme temperature changes cause the steel to expand and contract, stressing the paint film and potentially leading to cracking and peeling.
Solutions:
High humidity and moisture can penetrate paint, leading to mildew, blistering, and rust, especially in coastal areas.
Solutions:
Heavy rainfall and extreme weather conditions can weaken paint films. Intense heat can cause blistering, while cold can lead to flaking.
Solutions:
Improper application can greatly reduce the lifespan of paint on mild steel. Ensuring proper surface preparation and following manufacturer guidelines are crucial.
Solutions:
Understanding and addressing these factors can extend the life and durability of paint on mild steel.
Proper rust removal is crucial for ensuring that paint adheres well to mild steel and provides long-lasting protection. Here are some effective methods for rust removal:
Wire Brush and Sandpaper
Use a wire brush or sandpaper to remove loose rust and mill scale from the surface. Start with a coarse grit (such as 80) to remove heavy rust, then move to finer grits (120 and 240) to smooth the surface.
Electric Angle Grinder
For larger areas or more stubborn rust, an electric angle grinder equipped with a wire wheel or cup brush attachment can be very effective. Always wear safety gear, including gloves, eye protection, and a dust mask, to protect against flying debris and dust.
Phosphoric Acid
Apply the acid to the rusty area, let it sit according to the product instructions, then rinse thoroughly with water. This method also helps to etch the surface, improving paint adhesion.
Citric Acid Soak
Dissolve 2-3 tablespoons of citric acid in hot water, soak the rusty parts overnight, then scrub off the loosened rust with a brush or steel wool the next day.
Homemade Baking Soda Paste
Create a paste using two parts baking soda and one part lemon juice. Apply the paste to the rusty area, let it sit for about 30 minutes, then scrub with a brush or steel wool.
Vinegar Soak
Soaking rusty parts in white vinegar overnight can help dissolve rust. Scrub the parts with a metal brush or steel wool after soaking.
After removing rust, it’s essential to clean and prepare the surface for painting:
Rinse off any remaining chemical residues and dry the surface completely. Use a degreaser to remove any oils or dirt. Ensure the surface is clean and dry before applying primer.
Apply a rust-inhibiting primer, such as a zinc-rich or phosphate-containing primer, to the clean surface. Follow the manufacturer’s instructions for application and drying times.
Choose a paint suitable for metal surfaces. Apply the paint in thin, even coats, following the manufacturer’s recommended drying times between coats. Typically, two to three coats are sufficient for good coverage and protection.
Regular maintenance is key to prolonging the life of the paint and preventing rust:
Regularly inspect painted steel surfaces for chips, scratches, or rust spots to ensure early detection and easier repairs.
Clean and repaint any damaged areas immediately to prevent rust from starting again. Use the same primer and paint used initially for consistency.
Avoid prolonged exposure to moisture and ensure surfaces are kept clean. Moisture and dirt accumulation can accelerate rust formation.
Consider applying waxes or clear sealants over the paint for added protection, especially in harsh environments. These coatings can provide an extra barrier against moisture and contaminants.
Below are answers to some frequently asked questions:
To properly paint mild steel, follow these steps:
By following these steps, you can achieve a durable and attractive finish that protects mild steel from rust and environmental damage.
To prepare a mild steel surface before painting, follow these essential steps:
Following these steps ensures that the mild steel surface is clean and ready for painting, leading to better adhesion and long-lasting protection.
When painting mild steel, choosing the right primer is crucial for ensuring good adhesion, corrosion resistance, and a smooth finish. Two highly recommended primers for mild steel are zinc-rich primer and epoxy primer.
Zinc-rich primers contain zinc phosphate, which provides excellent anti-corrosive protection. They are specifically designed for ferrous metals like mild steel and are effective even on surfaces where early rusting has begun. Zinc-rich primers are ideal for metal gates, doors, and architectural ironwork.
Epoxy primers are two-part, high solids primers that offer exceptional adhesion and protection. They are suitable for both horizontal and vertical surfaces and can be applied directly to metal, providing durable corrosion protection in industrial environments. Epoxy primers are especially useful for mild steel that is rusty or previously painted.
For beginners, following the manufacturer’s instructions regarding application and drying times is essential for achieving the best results.
The best paint types for mild steel are:
Choosing the right type of paint depends on the specific requirements of the project, such as environmental conditions and desired durability. Each of these paint types can provide effective protection and longevity when applied correctly.
The curing time for paint on mild steel depends on several factors, including the type of paint used, environmental conditions, and the thickness of the coating.
Water-based paints generally take about 21 to 30 days to fully cure. Oil-based paints have a shorter initial hardening time of 3 to 7 days, but full curing can take longer. Specialized coatings like two-component epoxy can offer even more durable finishes but may require specific curing conditions.
Environmental factors such as temperature and humidity significantly impact curing times. Higher humidity and lower temperatures can extend the curing period by up to 30%. Additionally, thicker coats of paint will take longer to cure compared to thinner applications.
For best results, follow the manufacturer’s instructions regarding drying and curing times and ensure proper surface preparation and primer application to enhance paint adhesion and durability.
The longevity of paint on mild steel is influenced by several environmental factors. Sunlight and UV exposure can cause thermal stress, leading to the expansion and contraction of the steel, which may result in the paint cracking or peeling. UV radiation also degrades paint binders and pigments, causing fading and loss of adhesion. Moisture and humidity are particularly detrimental, as they accelerate corrosion, especially if water penetrates through damaged paint. High humidity combined with pollutants can form acidic compounds that exacerbate rust formation. Temperature variations cause thermal stresses that may lead to paint losing flexibility and cracking, allowing moisture to reach the steel. Air pollution and chemical exposure, such as sulfur dioxide, nitrogen oxides, and salts, can create corrosive acids that degrade both the paint and the steel. Physical damage to the paint layer, such as scratches or chips, exposes the steel to the environment, accelerating rust. Regular maintenance and choosing appropriate, high-quality coatings can help mitigate these environmental impacts and extend the lifespan of the paint on mild steel.

