How to Powder Coat Steel: A Beginner’s Step-by-Step Guide
Imagine transforming a dull piece of steel into a sleek, vibrant, and durable masterpiece with just a few simple steps.…
Imagine transforming your old, rusty patio furniture into sleek, vibrant pieces that look brand new. Powder coating at home allows you to achieve professional-quality finishes on metal objects without breaking the bank. Whether you’re a DIY enthusiast or just starting out, this beginner’s guide will walk you through the entire process, ensuring your projects turn out beautifully.
In this guide, we’ll cover everything from setting up your workspace to selecting the right equipment and materials. You’ll learn the benefits of powder coating over traditional painting, and we’ll provide step-by-step instructions to help you apply the coating evenly. Safety is paramount, so we’ll also share essential precautions to keep you safe during the process.
Ready to give your metal items a durable and attractive finish? Let’s dive into the world of powder coating and discover how you can achieve professional results right at home!
To establish an effective powder coating workspace at home, you need the right equipment. The primary tool for applying powder coating is the powder coating gun. For home use, consider a model like the PCS-250 Dual Voltage Powder Coating Gun, which provides precise control and operates with minimal compressed air. Additionally, while not mandatory, a powder spray booth helps contain the powder and minimize overspray. You can create a DIY booth using a box fan and filter for small projects.
A dedicated oven for curing the powder is necessary. For small projects, you can use a toaster oven or benchtop oven that reaches temperatures between 325°F and 400°F.
Ensure your workspace has good ventilation to prevent inhaling powder particles and fumes, which can be harmful. Ground all conductive objects to prevent electrical sparks during the powder coating process. Keep the area free of flammable materials and maintain personal hygiene by washing off any powder residue from your skin.
Powder coating involves applying a dry powder to a metal surface, which is then heated to create a solid, durable finish. This method is popular for its ability to create a smooth, uniform finish that is resistant to chips, scratches, and fading. It is widely used in automotive parts, bicycles, home decor, and various other metal items.
A beginner powder coating kit typically includes several essential tools and materials. Here’s a breakdown of what you might find in a basic kit:
The powder coating gun is the primary tool for applying the powder. It uses an electrostatic charge to make the powder stick to the metal surface. For beginners, the Eastwood PCS – 250 Dual Voltage Powder Coating Gun is recommended, as it offers dual voltage settings for precise control over various coating needs.
A powder coating oven is necessary for curing the coated items. The oven heats the powder, causing it to melt and form a smooth, hard finish. For small projects, a toaster oven or benchtop oven that can reach temperatures between 325°F and 450°F can be used. For larger items, a dedicated powder coating oven is ideal.
A powder coating booth helps contain the powder overspray and makes cleanup easier. It also improves safety by reducing the amount of airborne powder. While a professional booth is ideal, a DIY version using a box fan and filters can be effective for small projects.
When selecting a powder coating kit, consider the following factors:
Determine the primary use of your powder coating setup. If you plan on coating small items occasionally, a basic kit with a small oven and gun will suffice. For larger or more frequent projects, invest in a more robust setup.
Powder coating kits vary widely in price. Basic kits for beginners are relatively affordable, while more advanced kits with professional – grade equipment can be more expensive. Decide on your budget and choose a kit that offers the best value for your money.
Make sure you have enough space for powder coating. This includes space for the spray area, curing oven, and storage for materials and tools. Additionally, check if you have the necessary equipment such as a compressor for the powder coating gun and electrical outlets for the oven.
In addition to the basic components of a powder coating kit, you will need some additional tools and supplies:
When choosing an oven for powder coating, consider the following types:
Batch ovens, suitable for small to medium projects, offer the flexibility to load and cure multiple items simultaneously.
Conveyor ovens are ideal for continuous production and higher throughput. They are more suitable for industrial or high – volume settings.
Ensure the oven you choose can reach and maintain the required temperatures for curing powder coating, typically between 325°F and 450°F.
For smaller projects, a toaster oven can be a cost – effective solution. However, for larger items, you may need to invest in a dedicated powder coating oven or consider building your own. Building an oven can be more affordable and tailored to your specific needs.
Thermoset powder coatings are widely used due to their durability. When heated, they undergo a chemical change that creates a strong, lasting finish. These coatings adhere well and are highly resistant to corrosion, making them suitable for many applications.
Thermoplastic powder coatings melt and flow when heated, maintaining their chemical composition upon cooling. They are often chosen for parts requiring high impact resistance and do not need a curing process.
Begin by thoroughly cleaning the surface to remove dust, dirt, oil, or old finishes. Sanding can be particularly effective as it not only cleans but also roughens the surface, improving powder adhesion.
Apply a pretreatment based on the material being coated. A zinc phosphate coating is commonly used to enhance adhesion and corrosion resistance, ensuring a long-lasting finish.
Use an electrostatic spray gun to apply the powder. The gun charges the powder particles as they are sprayed onto a grounded substrate, making the powder adhere evenly to the surface.
Place the coated item in a curing oven, typically set between 150°C and 200°C, for a period of 10 to 20 minutes. As the powder heats up, it melts and forms a uniform layer that solidifies into a hard finish upon cooling.
Safety is crucial for a successful powder coating process. Ensure your workspace is well-ventilated to avoid inhaling powder particles. Use a suitable curing oven, such as a modified domestic oven designed for powder coating. Always wear protective gear, including:
Safety is paramount when engaging in powder coating. Ensure you have the necessary safety tools and precautions in place to protect yourself.
Begin by thoroughly cleaning the metal surface to ensure the powder coating adheres well. Use a solvent-based cleaner or degreaser to remove any dirt, oil, or rust. For aluminum parts, a mild acid wash can help remove oxidation. After cleaning, lightly sand or sandblast the surface to create a rough texture, enhancing the powder’s grip.
For better adhesion and to prevent rust, use a phosphate treatment or a zirconium sealer. Rinse the surface with reverse-osmosis water and allow it to dry completely before proceeding to the next step.
To achieve an even coat in DIY powder coating, start with thorough surface preparation. Remove all contaminants, including oil, grease, dirt, and rust, by using methods like sandblasting, chemical degreasing, or solvent-based cleaners. Ensure the surface is completely dry and free of any residue to enhance adhesion.
Proper grounding is essential for an even powder coat application. Use a grounding clamp to ensure the workpiece is properly grounded, which helps the electrostatic charge work effectively, allowing the powder to adhere evenly. Additionally, wear a grounding strap to reduce the risk of static discharge, which can affect the powder application.
Maintaining consistent air pressure during the application is crucial. Use a compressor that provides clean, dry air at a steady pressure, typically around 10-15 psi. Do not use the compressor for other tasks simultaneously to ensure a consistent air flow.
A steady hand and proper technique are vital for an even coat. Apply the powder with smooth, even strokes, keeping the gun at a consistent distance from the workpiece, typically about 8 inches. Practice on scrap metal to perfect your technique before working on your final project.
Inspecting the coated part before curing helps identify any imperfections. Ensure the powder is evenly distributed with no bare spots or excess buildup. Make any necessary adjustments before placing the part in the curing oven.
Following the correct curing conditions is essential for a durable finish. Follow the manufacturer’s instructions for curing temperature and time, typically setting the oven between 325°F and 450°F for 15-30 minutes. Make sure the oven reaches the recommended temperature and that the exhaust system is clear.
Using the right equipment can significantly impact the quality of the finish. Invest in a quality powder coating gun with adjustable settings for different powder types. If possible, use a spray booth to minimize overspray and ensure a cleaner workspace.
Applying multiple thin layers of powder is more effective than one thick layer. Thin layers help prevent runs and sagging, ensuring a smooth and uniform finish. Allow each layer to dry slightly before applying the next.
Always prioritize safety to avoid accidents and ensure a smooth process. Wear gloves, respirators, and goggles to avoid inhaling powder or getting burned during the curing process. Work in a well-ventilated area to disperse fumes and powder particles.
Mastering a good powder coating technique requires time. Be prepared for a learning curve and practice on scrap metal before coating important items. Regular practice will help improve your technique and the quality of your results.
Powder coating is a method of applying a dry powder to a metal surface, which is then heated to create a solid, durable finish. When deciding on powder coating, you can either do it yourself (DIY) or hire professional services. Each has its own cost structure.
The initial setup can range from $690 to $730, not including potential mistakes or extra materials.
The average cost per item is about $716, with a range of $344 to $1,109.
Below are answers to some frequently asked questions:
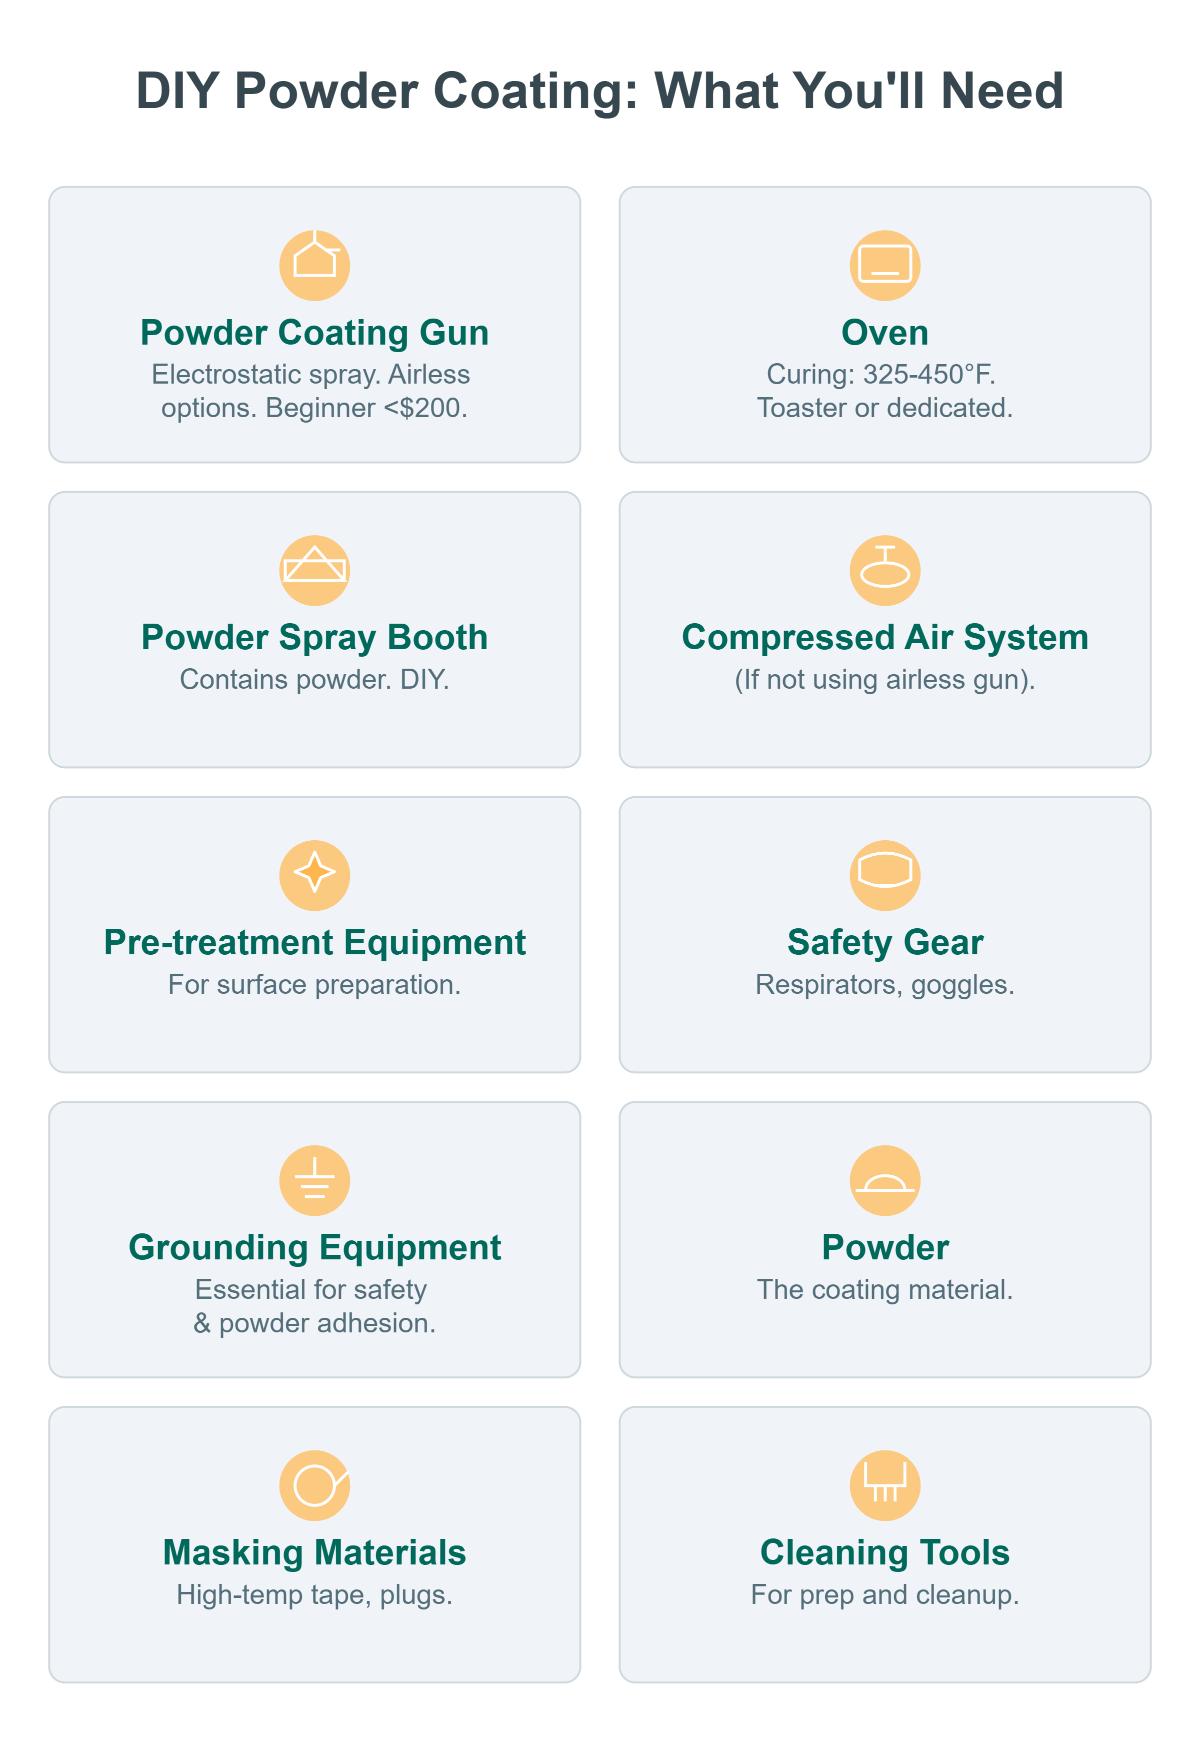
To powder coat at home, you’ll need several key pieces of equipment. First, a powder coating gun, which electrostatically charges and sprays the powder onto the metal. Some beginner guns are under $200, and airless options like the Craftsman don’t need a compressor. An oven for curing is essential, capable of maintaining 325°F – 450°F; a dedicated or toaster oven can work. A powder spray booth helps contain powder, and you can DIY one. You’ll also need a compressed air system (except for airless guns), pre – treatment equipment for surface prep, safety gear like respirators and goggles, grounding equipment, and powder along with masking materials and cleaning tools.
To apply powder coat evenly at home, start with proper surface preparation. Clean the metal with solvents to remove oil, grease, and rust, then roughen it using sanding or abrasive blasting. Use a powder coating gun with adjustable voltage, holding it at least 8 inches from the surface. Keep air pressure around 80 p.s.i. and ensure proper grounding. Apply the powder in steady, even strokes and use a cross – coat pattern. For multiple coats, partially cure each layer except chrome powder, which needs full curing first. Follow the manufacturer’s curing instructions for temperature (usually 325° – 450° Fahrenheit) and time, and monitor for even heat. Always wear PPE for safety.
Powder coating offers several benefits over traditional painting. It’s highly durable, resisting chipping, scratching, and fading, which means a long – lasting finish that retains color and gloss. Environmentally, it’s VOC – free and non – toxic, reducing air pollution and health risks. Also, less waste is generated as excess powder can be reused. In terms of efficiency, it has a single – step application and curing process, faster than multi – coat traditional painting. Cost – wise, despite higher upfront costs, long – term savings occur due to reduced maintenance. Lastly, it provides a uniform finish and a wide range of color and texture options for better customization.
Maintaining your powder coating equipment is essential for achieving consistent, high-quality results and ensuring the longevity of your tools. Here are some key practices to follow:
By adhering to these maintenance practices, you can keep your powder coating equipment in optimal condition, reduce downtime, and ensure high-quality finishes.
Yes, you can powder coat various types of metal at home, including steel, aluminum, iron, and zinc. The key to successful powder coating is ensuring that the metal surface is thoroughly cleaned and free of any old paint, rust, or contaminants. You will need essential equipment such as a powder coating gun, a curing oven, and safety gear like gloves and a respirator. Proper preparation, application, and curing are crucial steps to achieving a durable and even finish. With the right setup and some practice, you can achieve professional-quality results on your DIY powder coating projects.
If your powder coating process fails, there are several common troubleshooting steps you can take to resolve the issues:
By addressing these common issues, you can improve the quality and success of your powder coating projects at home.

