Seasonal Sale! Enjoy 10% off on all machines, Request FREE Quote!

How to Remove Nickel Plating in 5 Easy Steps

Best Method to Remove Nickel Plating

When deciding on the best method to remove nickel plating, it is important to consider factors such as the type of base metal, the thickness of the nickel layer, available tools and materials, and safety precautions. Several methods are available for removing nickel plating, each with its advantages and specific use cases. Below are the most common techniques for stripping nickel, from the simplest to the more complex.

Chemical Stripping

Chemical stripping involves using a specialized solution to dissolve the nickel plating. This method is highly effective for removing nickel from delicate or intricate items without causing damage to the base metal. Products like Caswell’s MetalX Nickel Stripper are designed to dissolve the plating while leaving the underlying material intact.

Chemical stripping is particularly suitable for items made from softer metals or for objects with intricate designs where mechanical methods could cause damage. For example, it is commonly used in the restoration of vintage car parts, jewelry, and delicate tools. However, it is essential to follow the manufacturer’s instructions carefully to ensure optimal results and avoid damage to the base metal.

A common alternative to commercial stripping solutions is using muriatic acid (hydrochloric acid). This method requires a higher level of caution and proper personal protective equipment (PPE), such as gloves and goggles. While muriatic acid can be effective, it poses a higher risk of damage to the underlying metal and should only be used by those familiar with handling strong acids.

Electrolytic Stripping

Electrolytic stripping is a method that uses an electric current to remove the nickel plating. In this process, the nickel-plated part is made the anode (positive electrode) in a bath of sulfuric acid, or a mixture of sulfuric acid and ammonia. The nickel plating dissolves as the current flows through the solution, leaving the base metal intact.

This method is ideal for removing nickel plating from more durable metals such as steel and aluminum, particularly in industrial settings. Electrolytic stripping offers a controlled and efficient way to strip the nickel without affecting the base metal. For instance, it is often used in manufacturing processes where large quantities of parts need to be de-plated quickly and with minimal damage.

It is important to monitor the current density carefully during electrolytic stripping to avoid damaging the base metal. Too much current can lead to pitting or other forms of surface damage. For this reason, this method is generally recommended for professionals or those with experience in electroplating.

Reverse Electroplating

Reverse electroplating, also known as "electrolytic de-plating," is a DIY-friendly method that involves reversing the polarity of the electroplating process. In this method, the nickel-plated object is connected to the positive terminal of a power supply, and a brass or copper electrode is connected to the negative terminal. The solution used typically consists of distilled vinegar and canning salt, which helps to remove the nickel plating when a low voltage is applied (typically around 5 volts).

This method is particularly useful for small, household items like coins, hardware, or tools. It is a more accessible option for individuals who may not have access to industrial equipment but still want an effective and low-cost solution for removing nickel plating. Reverse electroplating is also relatively safe, as the solution is non-toxic and the process is relatively gentle on the base metal, making it suitable for those new to plating and stripping techniques.

While reverse electroplating is effective for small-scale projects, it may not be as efficient for large-scale or heavily plated items. The process can be slow and may require several cycles to completely remove the plating, depending on the thickness of the nickel layer.

Mechanical Removal

Mechanical removal is a more hands-on method that involves physically grinding, sanding, or sandblasting the nickel plating off the item. This technique is effective for removing thicker layers of plating, especially when the base metal is robust and can withstand the abrasiveness of the process. Methods like sandblasting or using a rotary tool with a wire brush can quickly strip the plating, but they require careful handling to avoid scratching or damaging the base metal.

Mechanical removal is typically used when chemical or electrolytic methods are not practical, such as with large, heavy items or objects that are resistant to chemical stripping solutions. For example, it might be applied in industrial settings or when restoring machinery parts where speed and efficiency are key. However, the method is more labor-intensive and can result in a rougher finish, which may need further finishing work after the plating is removed.

Specialized Solutions

In cases where the above methods are not suitable, specialized chemical solutions are available from suppliers like Brownells. These products are formulated to remove nickel plating without damaging the underlying metal, and they are often used for more specific applications. While these solutions are effective, their availability can be limited, and they may have restrictions for international shipping.

Specialized solutions tend to be highly effective for sensitive items like firearms, vintage tools, or intricate hardware where precision is essential. However, these solutions are usually more expensive than off-the-shelf products, and proper safety precautions are still necessary to ensure safe handling.

Key Considerations

  • Safety: Always prioritize safety by wearing appropriate PPE, such as gloves, goggles, and respirators when working with chemicals, acids, or electrical equipment.
  • Base Metal Protection: Choose the method that best preserves the integrity of the base metal. For example, delicate or intricate parts are best treated with chemical or electrolytic methods, while robust metals can tolerate mechanical methods.
  • Efficiency: Consider the time and effort required for each method. While chemical stripping may be more time-consuming, it offers a gentler approach for delicate items. In contrast, mechanical methods may be faster but can be more damaging to the surface.

By evaluating these factors—safety, base metal type, and efficiency—you can choose the most appropriate method for removing nickel plating based on your specific needs and the material you are working with.

Removing Nickel Plating: Chemical Solution Preparation and Safety

When preparing a chemical solution to remove nickel plating, it is crucial to follow proper steps to ensure both effectiveness and safety. Different stripping agents require specific methods of preparation, but all involve using appropriate chemical concentrations and mixing protocols to avoid risks and achieve optimal results.

Selecting the Right Chemicals

The choice of chemical depends on the type of nickel plating and the substrate material. For instance:

  • Sulfuric Acid with Hydrogen Peroxide: This combination is effective for thinner nickel layers and is relatively eco-friendly due to the oxygen released by the peroxide. It is commonly used when working with ferrous substrates.
  • Hydrochloric Acid (Muriatic Acid): This aggressive option is better suited for removing thicker or tougher nickel coatings. However, its fumes are highly corrosive, making ventilation essential.
  • Citric Acid: A safer, biodegradable alternative for hobbyists. While less aggressive, it works well for decorative nickel plating or smaller items.
  • Sodium Hydroxide with Ethylenediamine: Often used for removing nickel plating from copper or its alloys, this method is effective at breaking down nickel complexes while protecting the underlying substrate.

Preparation of Chemical Solutions

Sulfuric Acid and Hydrogen Peroxide Solution

  1. Diluting the Acid: Carefully add one part concentrated sulfuric acid to three parts water. Always pour acid into water slowly to prevent exothermic reactions that can cause splashing. Stir gently to ensure proper dilution.
  2. Incorporating Hydrogen Peroxide: Add hydrogen peroxide (concentration typically around 30%) to the diluted acid. This enhances the stripping process by breaking down the nickel layer through oxidation. Stir until fully mixed.
  3. Practical Example: This solution is ideal for removing electroplated nickel from steel components, such as automotive parts.

Sodium Hydroxide and Ethylenediamine Solution

  1. Dissolving Sodium Hydroxide: Gradually dissolve 100-120 grams of sodium hydroxide in a small volume of water. Stir continuously to avoid localized overheating.
  2. Adding Ethylenediamine: Mix in 200-220 grams of ethylenediamine. This chelating agent binds to nickel ions, forming soluble complexes that facilitate removal.
  3. Practical Example: This solution works well for removing nickel plating from copper plumbing fixtures or decorative items.

Monitoring pH Levels

Maintaining proper pH is critical for effective stripping. Acidic solutions, such as those containing sulfuric acid, typically require a pH below 1 to maximize their efficiency. Use pH strips or a digital pH meter for precise measurement. If the solution’s pH rises over time due to nickel ion buildup, add more acid to restore its effectiveness.

Importance of Additives

Certain additives can enhance the stripping process:

  • Chelating Agents: Citric acid or similar compounds prevent redeposition of nickel by stabilizing metal ions in solution.
  • p-Hydroxybenzenesulfonic Acid: This additive slows the decomposition of hydrogen peroxide, ensuring the solution remains active for longer periods. To incorporate additives, mix them gently into the solution after the main chemicals have been combined.

Safety Considerations

Handling chemicals requires strict adherence to safety protocols:

  • Sulfuric Acid: Can cause severe burns. Always wear gloves, goggles, and chemical-resistant clothing.
  • Hydrochloric Acid: Emits corrosive fumes; work under a fume hood or in a well-ventilated area. A respirator may be necessary for prolonged exposure.
  • Sodium Hydroxide: Extremely caustic. Have vinegar or diluted acetic acid on hand to neutralize any accidental skin contact.
  • Emergency Procedures: Keep baking soda or sodium bicarbonate nearby to neutralize spills of acidic solutions. For alkaline solutions, use a weak acid like vinegar.

Waste Disposal

Proper disposal of used solutions is essential to minimize environmental harm:

  • Neutralization: Neutralize acidic solutions with sodium bicarbonate until the pH reaches a neutral level (around 7). For alkaline solutions, use dilute acid.
  • Local Regulations: Follow local hazardous waste disposal guidelines. Many municipalities offer chemical drop-off services for industrial or hobbyist use.
  • Avoid Drains: Do not pour used solutions down the drain, as they can corrode plumbing or harm aquatic ecosystems.

By adhering to these procedures, you can ensure safe and efficient removal of nickel plating, while protecting both yourself and the environment.

Chemical Application Methods

When applying a chemical solution to remove nickel plating, ensure the item is fully immersed in the prepared solution. Use a container that is resistant to the chemicals being used, such as glass or specific types of plastic. Common chemicals for this purpose include hydrochloric acid (HCl) and nitric acid (HNO₃). For instance, a solution with a concentration of 30% HCl can effectively strip nickel plating. The duration of immersion will depend on the thickness of the nickel layer and the concentration of the solution. Typically, an immersion time of 10-30 minutes is sufficient, but this can vary. Periodically check the progress to avoid over-stripping, which could damage the base metal. Agitate the solution gently, if possible, to enhance the stripping process and ensure even exposure to the chemical.

Electrochemical Application Methods

For electrochemical stripping, establish a proper setup to apply voltage to the nickel-plated item. Connect the item as the anode (the positive terminal) in a circuit with a suitable electrolyte solution, such as a sulfuric acid (H₂SO₄) bath. Ensure the current density, which is the amount of electrical current per unit area of the electrode surface, is controlled, typically around 5 A/dm². This helps prevent damage to the base metal. Monitor the process closely, adjusting the voltage or current as necessary to optimize the removal of the nickel layer. This method is effective for uniform removal but requires careful handling of electrical components and solutions.

Reverse Electroplating

In reverse electroplating, connect the nickel-plated item to the negative terminal of a power supply, and a suitable inert electrode (such as brass or copper) to the positive terminal. Immerse both in a non-corrosive electrolyte, like a solution of distilled vinegar and salt. Apply a low voltage, around 5 volts, to begin the stripping process. This setup allows nickel ions to migrate from the plated item to the solution, effectively removing the plating. Monitor the process to ensure even stripping and prevent damage to the item.

Safety Considerations

Regardless of the method chosen, always prioritize safety by wearing protective gear such as gloves, goggles, and aprons. Ensure adequate ventilation when working with chemical solutions to avoid inhaling harmful fumes. For electrochemical and reverse electroplating methods, ensure electrical safety by using equipment with proper insulation and grounding. Regularly inspect connections and equipment to prevent electrical hazards.

Monitoring the Process

Chemical Stripping

Chemical stripping is an effective method for removing nickel plating, particularly with muriatic acid-based solutions. The process involves maintaining the solution temperature between 50 to 65°C (120 to 150°F) to ensure optimal stripping efficiency. For example, in tests using a 10% muriatic acid solution, maintaining proper agitation increased the stripping rate from approximately 10 microns per hour to 50-55 microns per hour. To enhance results, ensure the solution is continuously agitated. Periodic inspection is essential to verify uniform nickel removal without damaging the base metal. In one case study, a steel component was stripped successfully in under two hours using this approach, demonstrating its efficiency for medium-thickness nickel layers.

Electrolytic Stripping

Electrolytic stripping is highly precise and often used for components requiring careful handling. The process involves connecting the part anodically in a sulfuric acid or sulfuric-ammonia solution while maintaining a controlled current density. For example, a 5% sulfuric acid bath operated at 3-5 amps per square inch proved effective in removing 20 microns of nickel plating in under an hour. Lead anodes are typically used for better conductivity. Monitoring temperature and concentration ensures that the process proceeds efficiently without affecting the base material. Comparing this method to chemical stripping highlights its suitability for delicate parts or unevenly plated components.

DIY Methods

DIY stripping methods, such as using a vinegar and salt solution or a peroxide mix, are accessible alternatives for small-scale tasks. The solution darkens as the nickel dissolves, signaling progress. For instance, a coin treated with a salt-vinegar solution exhibited full nickel removal after three iterations of a 20-minute soak, followed by thorough rinsing. Regular checks are necessary to avoid over-stripping and potential damage to the underlying surface. This method is most effective for thin nickel layers or decorative items where precision is less critical.

Completing the Process

Final Cleaning

After stripping, thorough cleaning of the part is critical to remove chemical residues. Rinse the item under running water, using a soft brush or cloth to remove debris. For intricate parts, ultrasonic cleaning is recommended. In trials with aluminum components, ultrasonic cleaning with distilled water ensured all residues were eliminated, leaving the surface ready for further treatment.

Inspecting the Base Metal

Once cleaned, carefully inspect the base metal for damage, pitting, or imperfections. For minor surface irregularities, buffing or light polishing may be required. In one case, a brass fixture underwent buffing after stripping to ensure a smooth surface before replating, significantly improving the final result. This step ensures that subsequent treatments, such as replating, adhere properly and yield a high-quality finish.

Preparing for Replating (if necessary)

Before replating, confirm that all nickel traces have been fully removed. Residual nickel can interfere with the adhesion of new plating materials, such as chrome or gold. In controlled tests, a brass sample underwent additional chemical treatment to ensure no nickel remained, resulting in a flawless subsequent plating. Employ proper cleaning protocols and verify the surface’s readiness for new applications.

Safety Precautions

Safety remains paramount throughout the stripping process. Always wear gloves, goggles, and aprons when handling chemicals. Ensure adequate ventilation, as fumes from muriatic acid or sulfuric acid can be hazardous. For waste disposal, neutralize acidic solutions with baking soda before disposing of them according to local environmental regulations. For example, a workshop neutralized its waste with a 10% sodium bicarbonate solution before safe disposal, minimizing environmental impact. Proper precautions protect both the user and the environment.

Cleaning and Buffing the Surface After Nickel Plating Removal

Once the nickel plating has been successfully removed, cleaning and buffing the surface are essential steps to ensure the item is ready for further treatment, such as replating or final use. Proper cleaning removes any remaining residues from the stripping process, while buffing restores a smooth and polished surface, enhancing both the appearance and functionality of the metal.

Cleaning the Surface

  1. Rinse Thoroughly: After the stripping process, immediately rinse the item under running water to remove any residual chemicals. Warm water (around 100–110°F or 38–43°C) is preferred, as it helps dissolve any remaining residues more effectively. Rinse for at least 2–3 minutes, ensuring all surfaces are thoroughly washed.

  2. Use a Mild Detergent: For stubborn residues or slight tarnish left over from the plating removal process, mix a mild detergent with warm water. Gently scrub the surface using a soft cloth, sponge, or non-abrasive brush. Be cautious if the base metal is delicate, as rough scrubbing can cause scratches. For more effective cleaning, try using a solution of dishwashing detergent or a non-acidic, non-abrasive cleaner designed for metal surfaces.

  3. Ultrasonic Cleaning: For items with intricate designs or hard-to-reach areas, ultrasonic cleaning can be especially effective. Fill an ultrasonic cleaner with distilled water and a mild cleaning solution (such as a non-abrasive metal cleaner). Ultrasonic waves will agitate the solution, reaching areas that might be missed with manual cleaning. This method can help eliminate any remaining chemical traces, dirt, or other contaminants, ensuring the item is completely clean.

  4. Inspect for Residues: Once the cleaning process is complete, carefully inspect the surface for any remaining debris, chemical residues, or discoloration. If any residue is found, repeat the cleaning process to ensure the surface is thoroughly prepared for the next stage. A lint-free cloth dampened with isopropyl alcohol can be used for a final wipe to remove any last traces of contaminants or oils.

Buffing the Surface

  1. Choose the Right Buffing Tool: The type of buffing tool you select should be appropriate for the base metal of your item. For softer metals like brass or aluminum, use a buffing wheel or pad made from a softer material to avoid scratching. For harder metals, a slightly firmer buffing pad may be used. Be sure to choose a tool that fits the size and contours of your item to ensure even polishing.

  2. Apply Buffing Compound: Select the appropriate polishing compound for the material. Common compounds include:

    • Tripoli compound: Ideal for the initial polishing of most metals, including brass, copper, and aluminum. It helps remove fine scratches and smooth the surface.
    • Rouge compound: Used for achieving a high-gloss finish on metals like silver and stainless steel. It is typically used after the initial polishing step.
    • Diamond paste: For hard metals like stainless steel or to achieve an extremely fine, mirror-like finish.

    Apply a small amount of compound onto the buffing wheel or pad. For best results, ensure the compound is evenly spread to prevent uneven polishing.

  3. Buff in Circular Motions: Using the buffing tool, work the surface in small, circular motions. This technique helps to evenly distribute the compound across the surface and avoid leaving marks. Start with a gentle pressure and gradually increase as needed. Buffing in a circular pattern also helps to minimize any fine scratches that might have been left from the stripping process.

  4. Polish the Surface: After buffing, use a clean, soft cloth to polish the surface and remove any excess buffing compound. This final polishing step enhances the metal’s shine and smooths out any remaining imperfections. Use a lint-free cloth or microfiber towel for this task to avoid leaving fibers on the surface.

Additional Tips

  • Handle with Care: Always handle the cleaned and buffed item with gloves to prevent oils and dirt from your hands from transferring onto the surface. This is especially important before any additional treatments, like replating.

  • Protect the Metal: Once cleaned and buffed, store the item in a dry, dust-free environment. If further plating or treatment is not immediately needed, consider applying a protective coating (such as a metal polish or protective wax) to guard against tarnishing or oxidation.

  • Prepare for Replating: If replating is planned, ensure the surface is completely clean, smooth, and free of any residues or oils. A final wipe with isopropyl alcohol on a lint-free cloth can help remove any last traces of oils or dust, ensuring optimal adhesion for the new plating.

Frequently Asked Questions

Below are answers to some frequently asked questions:
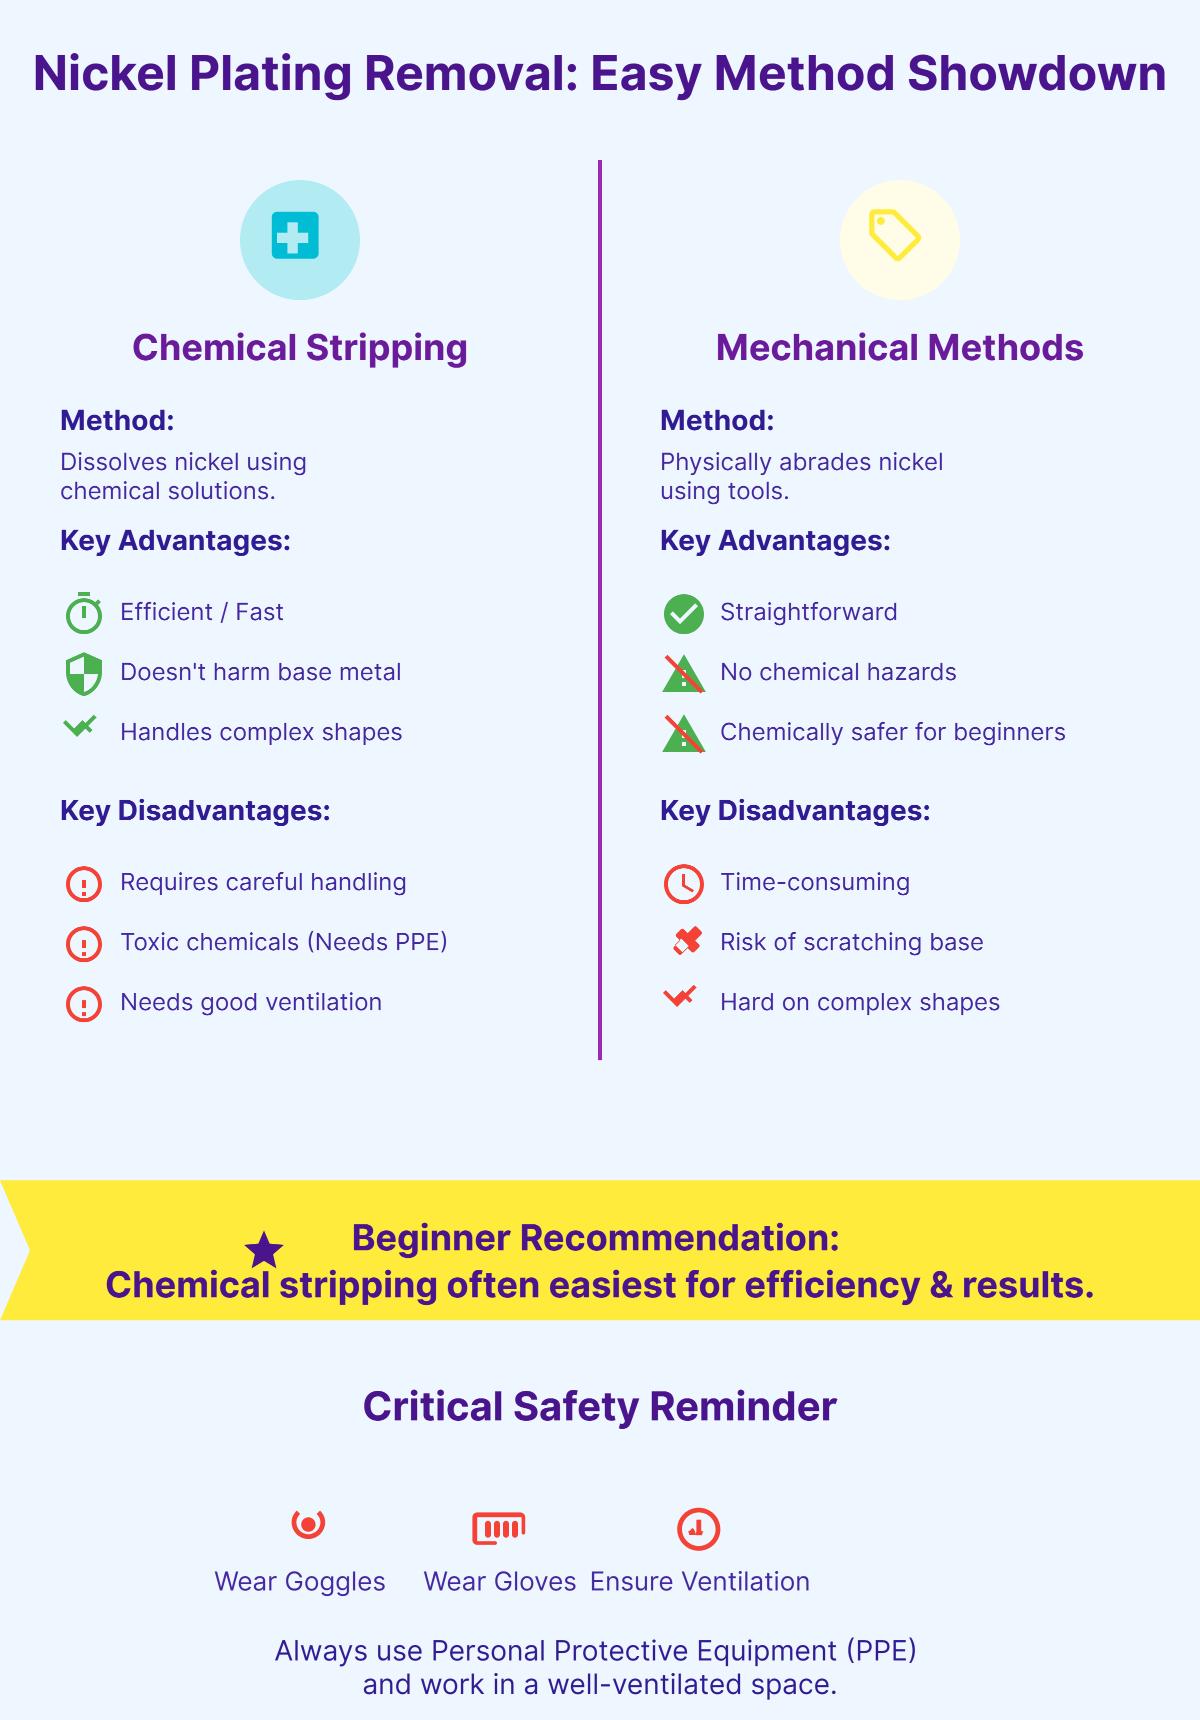
What safety precautions should I take when removing nickel plating?

When removing nickel plating, it is important to take several safety precautions to protect yourself, the environment, and the underlying materials. First, wear appropriate personal protective equipment (PPE) such as gloves, safety glasses, and protective clothing. Depending on the method and chemicals used, a full-body suit might be necessary. Steel-toed footwear and high-visibility gear are recommended when working in areas with heavy machinery.

If you’re using chemical solutions, be cautious with corrosive acids, strong alkalis, and toxic solvents. Always wear the necessary PPE to avoid skin and eye contact with these substances. It is advisable to avoid using highly hazardous chemicals like nitric acid or cyanide-based strippers, opting instead for safer, more environmentally friendly options when possible.

Ensure that you work in a well-ventilated area to avoid inhaling harmful fumes. Good airflow is essential, and if dust is generated, use dust collection systems. When employing electrochemical methods, follow proper electrical safety protocols, such as adhering to recommended voltage and current density to prevent accidents.

Proper waste disposal is also critical. Dispose of all hazardous chemicals and materials according to environmental regulations to prevent contamination. It is equally important to have first-aid equipment, fire extinguishers, and emergency protocols in place in case of an accident.

Lastly, take care not to damage the underlying surface during the process. Avoid using abrasive methods that may scratch or corrode the base material unless absolutely necessary. By following these precautions, you can ensure a safer and more effective nickel plating removal process.

Can I use household items to remove nickel plating?

Yes, you can use some household items to remove nickel plating, but it requires caution and the right methods. Common household acids like muriatic acid (found in some concrete cleaners) or vinegar can be used for chemical stripping. Muriatic acid is effective when diluted correctly, and vinegar can be combined with salt to create an electrolysis solution. Another option is mechanical methods like sanding or grinding, which don’t involve chemicals. However, these methods may be more labor-intensive. While household acids can work, they must be used carefully, and proper safety precautions, such as wearing gloves and goggles, are essential. Always test a small area first to ensure the method doesn’t damage the base metal.

How long does it take to remove nickel plating using chemical methods?

The time it takes to remove nickel plating using chemical methods can vary widely depending on factors such as the thickness of the nickel layer, the type of chemical used, and the specific conditions of the process. Using commercial strippers like MetalX B-9 can take anywhere from 1 to 7 days. Muriatic acid can strip nickel plating in 20 minutes to a few hours, while sulfuric acid solutions may also take a similar amount of time but require careful handling. Ammonium nitrate-based solutions are known for their efficiency, particularly for electroless nickel coatings, though the exact duration is not always specified. Reverse plating, an electrolytic stripping method, can remove nickel plating in about an hour. Each method has its own advantages and considerations, so the choice of method should be based on the specific requirements and safety of the base metal.

Is electrochemical stripping suitable for all types of metals?

Electrochemical stripping is not universally suitable for all types of metals, particularly for nickel. This method relies on the ability of metal ions to form stable, strippable deposits on the electrode surface, which is not always the case with nickel. Nickel plating typically requires chemical or mechanical methods for removal, as electrochemical stripping may result in incomplete removal or the formation of unwanted compounds. Additionally, using electrochemical methods for nickel often demands specific electrode materials, such as copper or gold, which can introduce further limitations and complications. For practical and effective nickel plating removal, chemical or mechanical approaches are generally more appropriate.

How can I dispose of the chemicals used in nickel plating removal?

When disposing of chemicals used in nickel plating removal, it’s essential to follow safe and regulated procedures to protect both the environment and human health. The disposal method depends on the type of chemicals used and local regulations. For solutions containing nickel, common disposal methods include precipitation (such as nickel hydroxide), electrolytic plate-out to recover nickel, or using catalytic decomposition to break down the chemicals. These methods allow for recycling or safe disposal of the resulting waste.

It’s crucial to check if your waste is classified as hazardous according to EPA guidelines. This includes assessing properties like corrosivity, toxicity, and reactivity. Once the waste is identified, it should be stored in labeled, secure containers and kept in a safe area until disposal. It’s highly recommended to work with a certified hazardous waste disposal facility or recycling partner that complies with environmental standards and local regulations.

For smaller batches, precipitation as nickel carbonate can be a suitable option. The precipitate can be filtered, dried, and stored for later collection by a hazardous waste service. Always consult with local environmental health agencies or waste disposal services to ensure proper disposal of chemicals in your area.

You May Also Like
We picked them just for you. Keep reading and learn more!
Get in touch
Talk To An Expert

Get in touch

Our sales engineers are readily available to answer any of your questions and provide you with a prompt quote tailored to your needs.
© Copyright - MachineMFG. All Rights Reserved.

Get in touch

You will get our reply within 24 hours.