Understanding Welding Joints: Types, Uses, and Preparation
Imagine you’re assembling a crucial structure or repairing a vital piece of machinery. The integrity of your work hinges on…
Imagine discovering a puddle under your sink and realizing that a cracked copper pipe is the culprit. Panic sets in as you wonder how to tackle this plumbing issue without calling a professional. Fear not, for this step-by-step guide is designed to walk you through the process of repairing a cracked copper pipe, even if you’re a complete beginner. From understanding the types of cracks and gathering essential tools to mastering soldering techniques and exploring alternative repair methods like epoxy putty and pipe repair kits, we’ve got you covered. So, roll up your sleeves and let’s dive into the world of DIY copper pipe repair. Could this be easier than you think? Let’s find out!

Copper pipes are crucial components in plumbing systems due to their strength, resistance to corrosion, and ability to handle high pressures. They are widely used in residential, commercial, and industrial applications for water supply lines, heating systems, and refrigerant lines in HVAC systems. The reliability and longevity of copper pipes make them a preferred choice for both new installations and repair work.
Copper pipes come in various types, each suited for specific applications based on their wall thickness and flexibility. Type K copper pipes have the thickest walls, making them the most durable and resistant to corrosion, typically used in high-pressure applications like city water mains and industrial settings. Type L copper pipes have medium-thick walls and are commonly used for water distribution systems in residential and commercial buildings, offering a good balance between durability and cost. Type M copper pipes have the thinnest walls and are the least expensive, typically used for residential plumbing where the water pressure is lower.
DWV copper pipes are used for drains, waste, and vent lines in plumbing systems. They have thinner walls and are not suitable for water supply lines.
Copper pipes are available in two main tempers: hard (rigid) and soft (annealed). Hard copper pipes are rigid and are used in straight sections, joined with fittings. Soft copper pipes are flexible and can be bent, making them ideal for navigating around obstacles, often used in HVAC systems and connections to water heaters.
Copper pipes can crack due to various reasons, including corrosion, freezing, and physical impact. Corrosion cracks result from chemical reactions between the pipe material and substances in the water or environment, weakening the pipe over time. Freeze cracks occur when water inside the pipe freezes and expands, causing the pipe to crack, which is common in cold climates where pipes are not adequately insulated. Physical impact cracks result from accidents or mishandling during installation, such as dropping a heavy object on a pipe or hitting it with a tool. Identifying the type of crack can help determine the cause and the appropriate repair method, ensuring the longevity of your plumbing system.
To repair a cracked copper pipe successfully, having the right tools is essential. Here are the essential tools you will need:
A copper pipe cutter is used to make clean cuts in the damaged section of the pipe. Precise cuts are crucial for ensuring proper fitting of the new pipe section or couplings.
A utility knife helps remove old solder or debris from the pipe ends, while an abrasive cloth cleans the pipe before soldering. These steps ensure a clean surface for new solder or fittings to adhere to.
Solder and a soldering torch join new pipe sections or fittings together. This involves heating the pipe and applying solder to create a secure, leak-free joint.
Wrenches are necessary for tightening compression fittings, which use a threaded connection to secure the pipe and prevent leaks.
Use a marking tool to mark where to cut the pipe. Accurate marking helps in making precise cuts.
A file smooths out the cut edges of the pipe. This prevents burrs from interfering with the fitting process.
Use a deburring tool to remove burrs from the cut ends. This ensures a smooth surface, making it easier to fit new sections or couplings.
In addition to the tools, specific materials are required to complete the repair:
You will need a new copper pipe to replace the damaged section. Ensure you choose the appropriate type and size for your repair.
Couplings connect the new pipe section to the existing pipe. There are different types of couplings available:
Pipe dope, or thread sealant, is applied to the threads of compression fittings to create a tighter seal and prevent leaks.
For temporary fixes or emergency repairs, epoxy putty or pipe repair kits can be used. These materials provide a quick and easy way to seal cracks until a more permanent repair can be made.
For those looking for alternative repair methods, the following tools and fittings can be used:
If using press fittings, a crimping tool is needed to crimp the fittings onto the pipe. This method provides a solderless connection.
Copper press fittings are used with a press tool to create a secure, solderless connection. They are an excellent alternative for those who prefer not to use soldering.
By having the right tools and materials, you can effectively repair a cracked copper pipe and ensure a lasting fix.
Before soldering a cracked copper pipe, it’s essential to follow safety precautions to prevent accidents and ensure a successful repair:
Proper preparation of the pipe is essential for a successful soldering process:
Flux is necessary to prevent oxidation and ensure a smooth soldering process, so evenly apply it around the cleaned ends of the pipe and the fitting. Ensure full coverage to prevent oxidation during heating. Have your soldering wire ready, cutting a manageable length to work with, typically around 6-8 inches.
Heating the pipe correctly is crucial for the solder to bond properly:
Once the pipe is heated, follow these steps to complete the repair:
After the repair is complete, test the joint for leaks by using water pressure. Turn on the water supply and observe the repaired area for any signs of leaking. If the joint holds without leaking, the repair is successful. If there are leaks, you may need to reheat and apply additional solder.
For those who prefer not to solder or need a temporary fix, consider these alternatives:
Epoxy putty is a great option for temporarily fixing leaks in copper pipes, especially minor cracks and pinholes. It provides a quick and easy solution to prevent water damage before a permanent repair can be made. The putty is straightforward to use, does not require special tools, and can be applied even to damp surfaces, making it a versatile choice for emergency plumbing repairs.
Preparation
Cleaning the Area
Kneading the Epoxy Putty
Applying the Epoxy Putty
Allowing the Epoxy to Cure
Testing the Repair
Pipe repair kits are another useful option for quick fixes. These kits typically include everything needed to seal a leak effectively.
Preparation
Applying the Repair Kit
Curing and Testing
Using epoxy putty and pipe repair kits can provide a quick and effective temporary solution to copper pipe leaks. These methods are especially useful for emergencies and can help prevent further water damage until a permanent repair can be arranged.
Soldering is a common technique used to repair cracked copper pipes, involving the application of a fusible metal alloy to create a strong joint. Here’s a step-by-step guide to soldering a cracked copper pipe:
For those who prefer not to solder or when soldering is impractical, several alternative methods are available:
Epoxy putty is a quick and easy solution for temporary repairs on cracked copper pipes. It involves applying the putty to the damaged area, which then hardens to form a seal.
Clean the area around the crack, knead the putty until it’s uniform, and apply it over the crack. Allow it to cure according to the manufacturer’s instructions.
Advantages: Easy to use, no heat required, can be applied to damp surfaces.
Disadvantages: Less durable compared to soldering, may not hold up under high pressure.
Pipe clamps are another alternative for quick fixes. These involve encircling the cracked area with a clamp that tightens to stop the leak.
Position the clamp over the crack and tighten it securely.
Advantages: Simple application, effective for minor leaks.
Disadvantages: May not be suitable for high-pressure systems, not a permanent solution.
Replacing the entire section of the pipe is a permanent solution to fixing cracks.
Cut out the damaged section and replace it with a new piece of pipe, using couplings to secure it.
Advantages: Permanent, reliable fix.
Disadvantages: Labor-intensive, requires more tools and materials, higher cost.
| Method | Ease | Durability | Cost |
|---|---|---|---|
| Soldering | Moderate | High | Low |
| Epoxy Putty | Easy | Medium | Low |
| Pipe Clamps | Easy | Medium | Low |
| Replacement | Hard | High | High |
Each repair method has its own advantages and drawbacks, making it important to choose the right one based on the specific situation and personal preference.
Successfully repairing a cracked copper pipe requires having the right tools and materials. Here’s an overview of the visual aids that will assist you in the process:
A pipe cutter is a specialized tool designed to make clean and straight cuts on copper pipes. This tool ensures precise cuts, which are crucial for fitting new pipe sections or couplings.
A utility knife or deburring tool is used to smooth out the edges of the cut pipe internally and externally. This step is important to prevent any sharp edges from interfering with the fitting process.
Compression couplings use a retainer nut and sleeve to create a leak-proof seal, while slip couplings are simply pushed onto the pipe ends. These fittings ensure a secure connection without soldering.
Flux and solder are materials used in the soldering process to create leak-proof joints. Flux helps the solder flow smoothly and prevents oxidation during heating, while solder forms the actual bond between the pipe sections.
A propane torch provides the necessary heat to melt solder and join pipes. It is essential for ensuring a strong and watertight connection.
An adjustable wrench is used to tighten compression fittings, ensuring a secure and leak-free connection.
A pipe cleaner or emery cloth is used to clean the pipe ends before soldering. This ensures proper adhesion of the solder and helps create a strong bond.
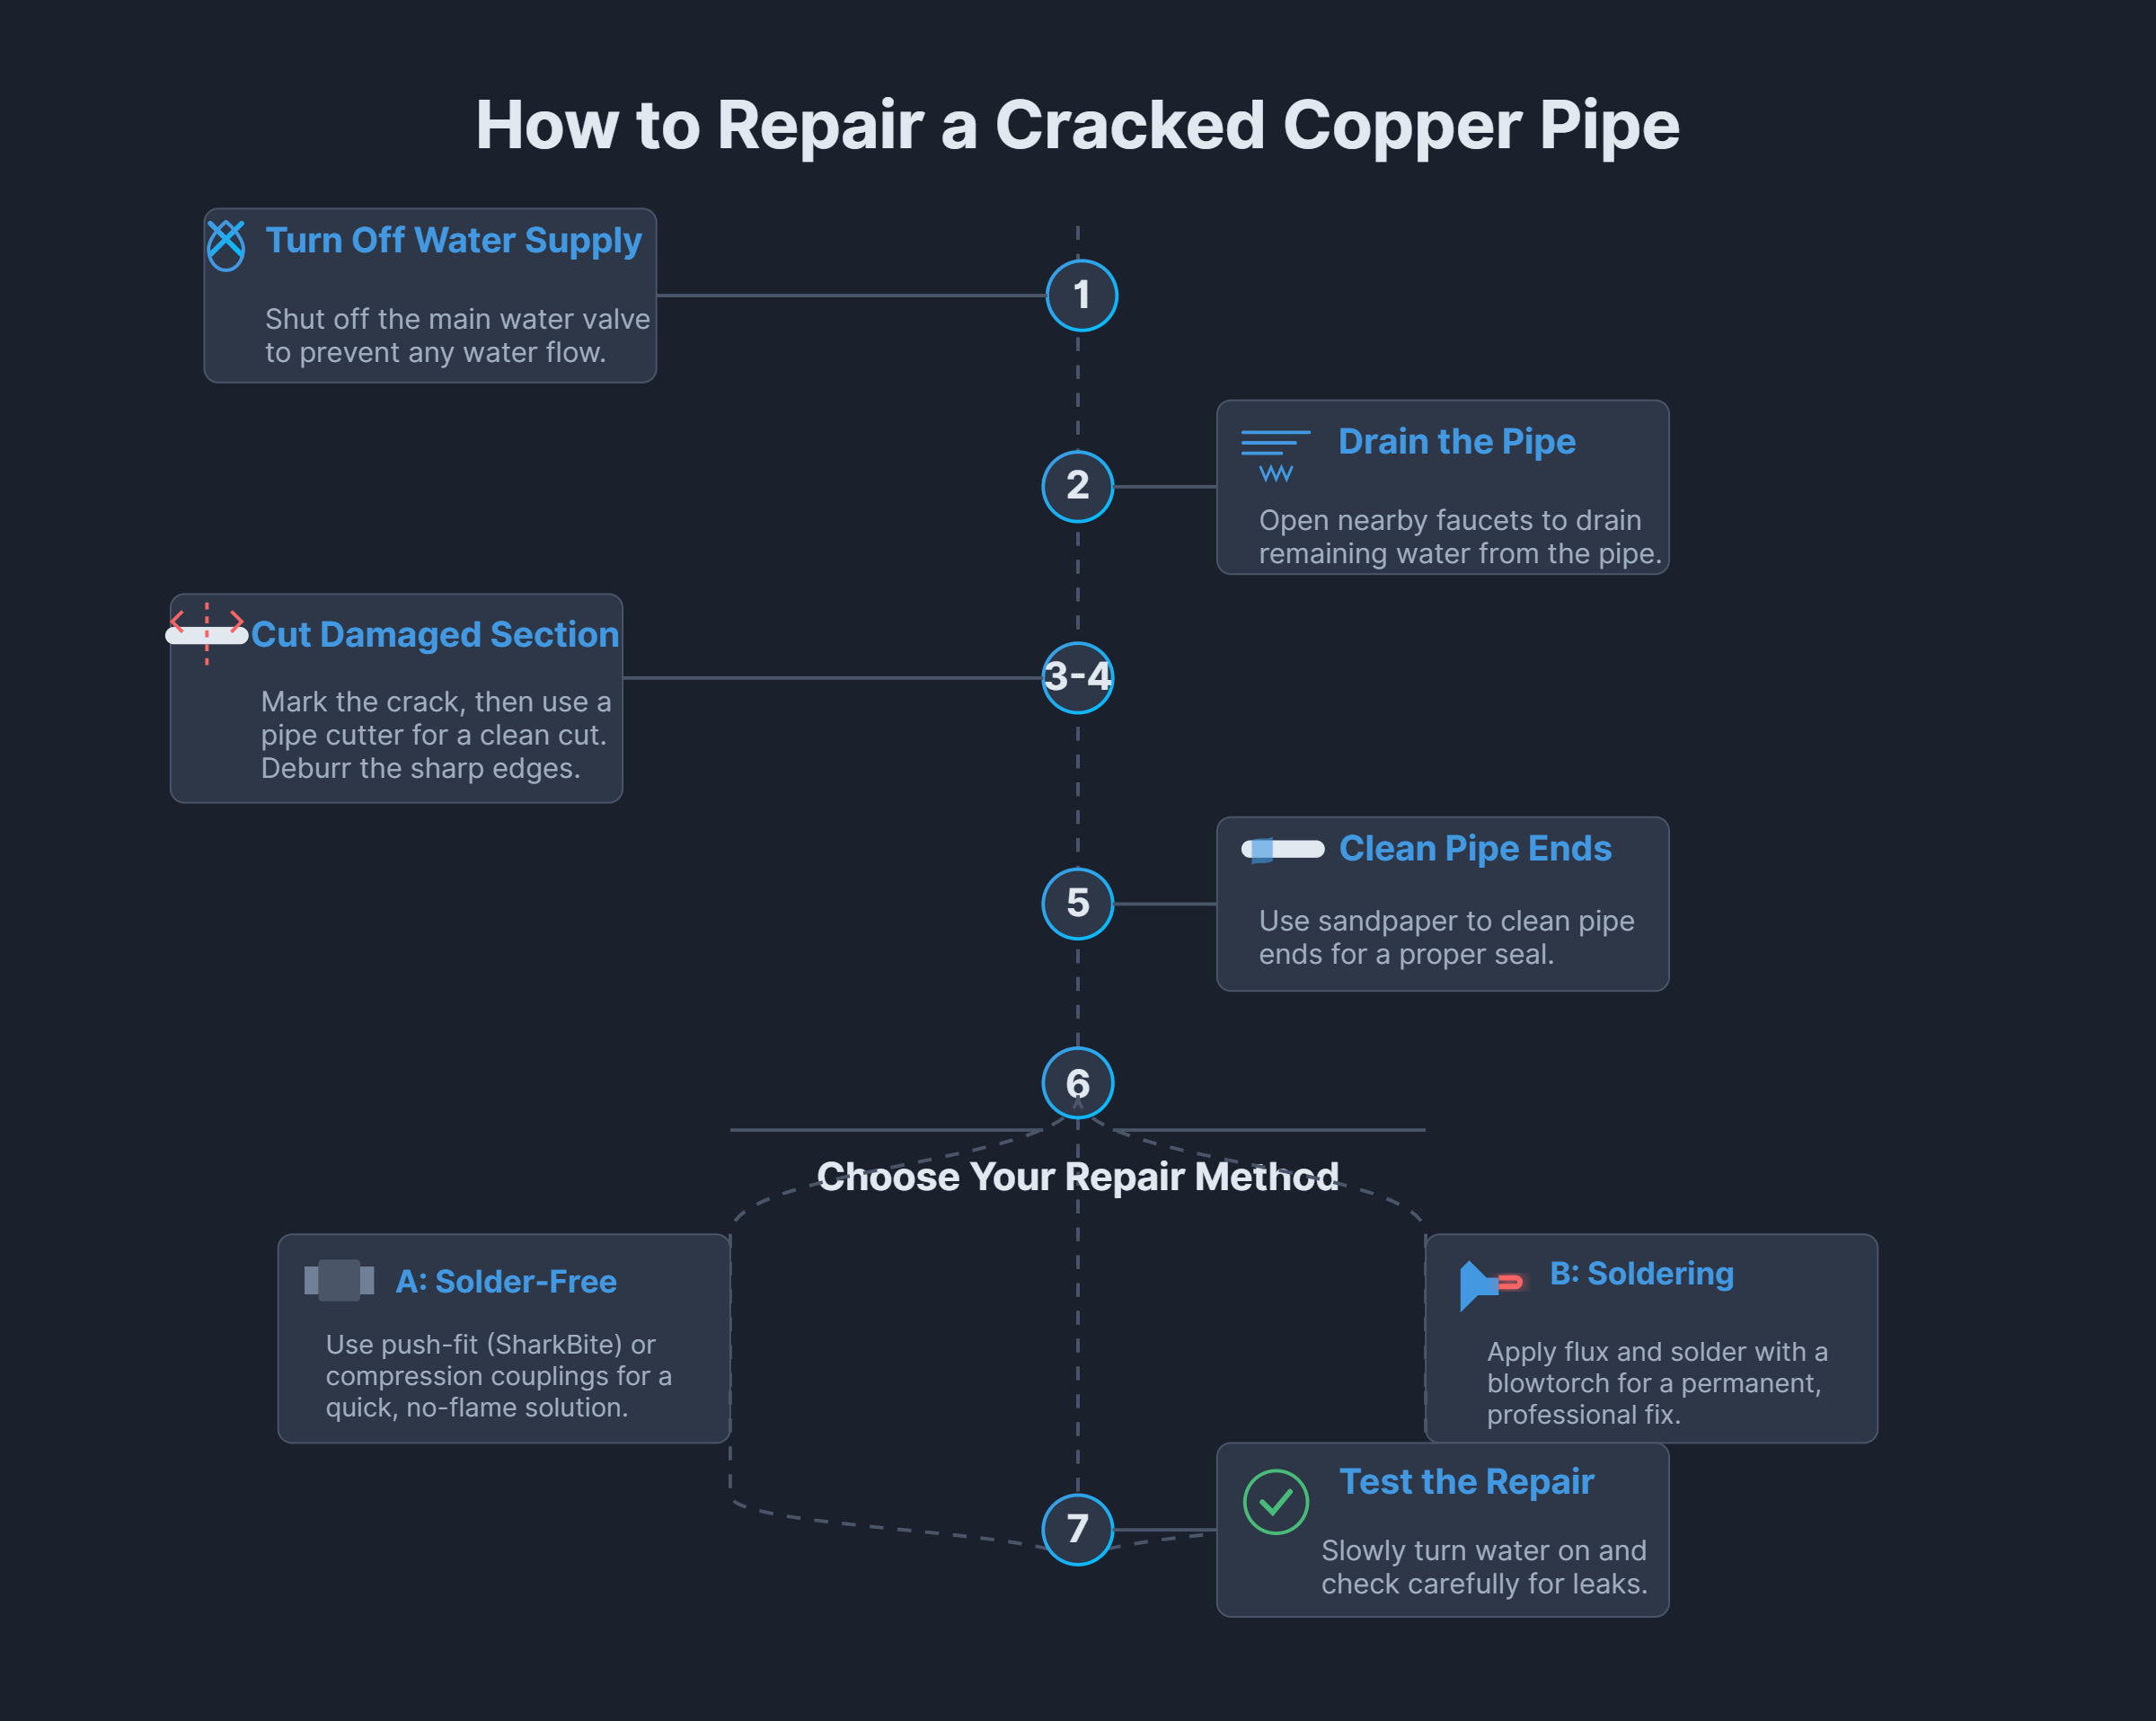
Repairing a cracked copper pipe involves several steps. Here is a simple and easy-to-follow guide:
Before starting the repair, close the main water valve to stop the water flow and prevent leaks during the process.
Use a pipe cutter to remove the cracked or damaged part of the copper pipe. Ensure that the cuts are clean and straight to allow proper fitting of new components.
Clean both ends of the remaining pipe using a pipe cleaner or emery cloth to remove oxidation and dirt. Deburr the inside and outside edges with a utility knife or dedicated reamer to smooth any sharp edges.
Spread flux evenly on the cleaned pipe ends and inside the fittings. Flux helps solder flow smoothly and prevents oxidation during heating.
Place the new copper pipe between two appropriately sized couplings. Slide the couplings onto the pipe ends before joining the new pipe segment.
Heat the joint evenly with a propane torch until the flux bubbles and the pipe turns cherry-red. Apply solder to the joint seam; it should melt and flow evenly around the connection, creating a watertight seal.
Let the joint cool down naturally, then clean off any excess flux and solder residue with a dry cloth to prevent corrosion.
Turn the water supply back on slowly and observe the repaired section for leaks. If you notice any dripping, shut off the water and redo the soldering.
For beginners or quick fixes, there are alternative methods to repair a cracked copper pipe without soldering:
Compression couplings require no soldering and use a retainer nut and sleeve to create a leak-proof seal. Simply cut out the damaged section, slip the compression fitting onto both ends, insert the new pipe, and tighten the nuts.
Sharkbite slip couplings are easy to install without soldering. Mark the pipe for cuts using the fitting, cut and deburr the pipe, then push the fitting onto the pipe ends until fully seated.
Common issues can arise during the repair process. Here are some troubleshooting tips to help you address them:
By following these visual aids and troubleshooting tips, repairing a cracked copper pipe can be a straightforward and manageable task, even for beginners.
Wear gloves to protect your hands from sharp edges and hot surfaces, safety goggles to shield your eyes from debris and splashes, and clothing that covers exposed skin.
Before beginning any pipe repair work, always shut off the water supply to the affected area. After shutting off the water supply, drain the residual water from the pipes by opening nearby faucets. This step helps to dry the repair area, making it safer and easier to work on.
Use tools like pipe cutters, soldering irons, and compression fittings made for plumbing tasks. Using the correct tools is essential to prevent accidents and ensure a successful repair. Incorrect tools can lead to further damage or injury.
If soldering is required during the repair, make sure the work area is well-ventilated. Proper ventilation prevents you from inhaling harmful fumes from the flux and solder. Open windows or use fans to improve air circulation.
Inspect the repair site for any hidden hazards, such as electrical wiring or gas lines. Avoid accidental contact with these elements during the repair process to prevent potential dangers.
Ensure a fire extinguisher and first aid kit are within reach in case of accidents. Being prepared for emergencies ensures that you can respond quickly and effectively if something goes wrong.
Inform household members or coworkers about the repair work to prevent accidental water use or disturbances during the process. Clear communication helps to avoid unnecessary interruptions and ensures a smooth repair operation.
Knowing when to call a professional plumber is crucial to prevent further damage and ensure effective repairs. Here are some key indicators that professional assistance is necessary:
If you discover more than one leak in your copper pipes, this usually indicates a larger issue that needs expert diagnosis and repair. Professional plumbers have the tools and knowledge to identify the root cause and provide a comprehensive solution.
A burst pipe is a plumbing emergency that requires immediate attention; shut off the main water supply to prevent flooding and call a plumber right away. Professionals can quickly assess the situation and perform the necessary repairs to mitigate damage.
Leaks that are not easily visible or are located behind walls can be challenging to detect and repair. If you hear dripping sounds or notice water stains without a clear source, a professional plumber can use specialized equipment to locate and fix the hidden leaks effectively.
Significant water damage or discoloration on copper pipes, such as green or blue stains, often indicates oxidation due to leaks. These signs require professional inspection and repair to prevent further corrosion and potential pipe failure.
While minor clogs can typically be resolved with household tools like plungers or augers, persistent or deep clogs may require professional plumbing tools and expertise. If DIY methods fail to clear the blockage, calling a plumber is advisable.
An unexpected increase in your water bill can signal undetected leaks within your plumbing system. Professional plumbers can thoroughly inspect your system to find and fix hidden leaks, helping reduce your water costs and prevent damage.
Hiring a professional plumber offers several advantages, ensuring your plumbing repairs are conducted safely and efficiently:
Professional plumbers possess extensive experience and specialized equipment to diagnose and resolve complex plumbing issues. Their expertise allows them to handle repairs that may be beyond the scope of DIY efforts.
Plumbers are trained to manage hazardous situations safely, such as handling heavy equipment or dealing with gas lines. They ensure compliance with local regulations and prevent potential safety hazards.
Professionals have access to a wide range of materials and tools, providing permanent solutions to plumbing problems. They can source high-quality replacement parts and employ advanced techniques to ensure lasting repairs.
By recognizing these signs and understanding the benefits of hiring a professional plumber, you can ensure that your copper pipe repairs are done effectively and safely.
Below are answers to some frequently asked questions:
To repair a cracked copper pipe, follow these step-by-step instructions:
This approach is suitable for beginners and can be completed with basic tools, using either soldering for a permanent fix or push-fit fittings like SharkBite for a quicker, solder-free solution.
Soldering is a widely used method for repairing leaking copper pipes because it provides a durable, watertight seal. This process involves cleaning the damaged area, applying flux, and using a torch to melt solder, which bonds the copper pieces together. However, soldering is not the only effective method for repairing copper pipes.
Alternative methods include using epoxy putty or pipe repair kits. Epoxy putty can be applied directly to small leaks, forming a temporary seal, while pipe repair kits offer an easy-to-use solution for various types of damage without requiring heat.
Slip repair couplings, such as SharkBite couplings, and compression couplings are also viable options. These methods involve cutting out the damaged section of the pipe and connecting the new pieces using the respective couplings, which do not require soldering and are relatively simple to install.
Each method has its pros and cons, and the best choice depends on the specific situation, the extent of the damage, and the tools available. For beginners, non-soldering methods might be more accessible and safer to use.
Yes, epoxy putty and pipe repair kits can be used to fix copper pipes. Epoxy putty is a quick and effective solution for minor leaks and cracks in copper pipes. It involves cleaning the damaged area, kneading the putty until it changes color, and then applying it to cover the crack. Once cured, it creates a solid seal that can temporarily stop leaks. Pipe repair kits often contain epoxy putty or wraps, providing various options for quick repairs. However, these methods are typically considered temporary fixes. For a more permanent solution, especially in critical or high-pressure systems, soldering the affected section of the pipe is recommended.
To repair a cracked copper pipe, you’ll need specific tools and materials to ensure a proper fix. For beginners, the essential tools include:
These tools and materials allow you to cut, clean, solder, and seal the pipe properly, making the repair process accessible even for beginners.
To avoid common mistakes during copper pipe repair, ensure you follow these key steps:
By following these steps and using the appropriate tools and materials, you can avoid common mistakes and achieve a successful copper pipe repair.
Yes, there are several high-quality video demonstrations available for copper pipe repair, which are suitable for beginners and DIY enthusiasts. These videos provide step-by-step guidance on various repair methods, such as soldering, using SharkBite fittings, and applying epoxy putty. For example, “Repair Copper Pipe Leaks with SharkBite Fittings” on YouTube by Home Repair Tutor offers a clear tutorial on using push-to-connect fittings without soldering. Another useful resource is “The ULTIMATE Leaky Copper Pipe Fix Guide” by GOT2LEARN, which covers multiple DIY methods, including soldering and temporary fixes. These videos emphasize safety, proper preparation, and the use of appropriate tools, making them an excellent supplement to the written guide.

