Seasonal Sale! Enjoy 10% off on all machines, Request FREE Quote!

How to Solder Mild Steel: A Complete Guide

Preparation

Before beginning any soldering project on mild steel, proper preparation is crucial for achieving a strong, reliable joint. This phase involves cleaning the metal surface, selecting the right tools, and ensuring that the workspace and materials are ready for the soldering process. A well-prepared surface promotes better adhesion, reduces the risk of joint failure, and ensures a durable bond.

Cleaning the Metal Surface

Cleaning the metal surface is a critical step in soldering. A clean surface ensures that the solder can adhere properly to the mild steel, creating a strong and lasting joint. Contaminants such as dirt, grease, and especially oxidation act as barriers that weaken the bond. Without thorough cleaning, solder may not flow or stick effectively, leading to weak joints that can crack or fail under stress.

Oxidation on mild steel can appear in varying degrees, from light rust to heavy, stubborn corrosion. Light rust can often be addressed with simple methods, while heavier rust requires more intensive treatment. Understanding the type of oxidation present is key to choosing the right cleaning approach:

  • Light Rust: Often appears as a faint orange or brown discoloration and can typically be removed with a terry cloth, linen, or mild abrasive like fine-grit sandpaper.
  • Heavy Rust: Appears as a thick, flaky layer and requires more aggressive methods, such as using a belt sander or coarse abrasive materials, to strip away the corrosion completely.

The goal of cleaning is to expose the underlying bare steel, resulting in a smooth, silvery surface. This shiny finish is essential because it allows the solder to flow evenly and bond securely, ensuring a reliable joint. Achieving this level of cleanliness not only improves adhesion but also makes it easier to inspect the solder joint afterward.

Tools for Cleaning

Selecting the right tools for cleaning depends on the severity of oxidation and the size of the project. Here are some commonly used tools and materials, along with their appropriate applications:

  • Terry Cloth or Linen: These are ideal for light cleaning tasks, such as wiping away dust, grease, or mild oxidation. They work well for maintaining clean surfaces but may not be effective against rust or stubborn contaminants.
  • Steel Wool or Fine-Grit Sandpaper (e.g., 220-400 grit): These abrasives are suitable for removing light rust or polishing the surface to achieve a shiny finish. Steel wool can conform to irregular surfaces, making it ideal for intricate areas, while sandpaper is better for flat or easily accessible surfaces.
  • Belt Sander: For heavy rust or large areas, a belt sander provides an efficient way to remove thick layers of oxidation. However, caution is necessary when using this tool. Excessive sanding can damage the steel’s surface or alter its shape. Always use light, controlled passes, and avoid applying too much pressure.
  • Coarse Abrasives (e.g., 80-120 grit sandpaper): These are best for tackling heavy rust but should be followed by finer abrasives to smooth the surface for soldering.

Each tool has its limitations. For example, terry cloth or linen may not suffice for severe rust, while belt sanders require care to prevent unintentional damage. Choosing the right tool based on the condition of the steel ensures optimal results while minimizing risks.

Safety Precautions for Cleaning Tools

When using abrasive tools, particularly power tools like belt sanders, safety precautions are essential. Wear protective gear such as safety goggles and gloves to shield against flying debris or accidental contact with moving parts. Ensure the tool is used in a stable, well-lit workspace, and avoid excessive force to prevent over-sanding or injury. Proper handling of tools ensures both safety and precision during the cleaning process.

Transition to the Next Step

Once the metal surface is clean and smooth, it is ready for the next phase of the soldering process. Proper preparation at this stage sets the foundation for a successful solder joint, ensuring durability and strength in the final product.

Tools and Materials

Choosing the Right Soldering Equipment

Selecting the appropriate soldering equipment is crucial for achieving effective and durable results when soldering mild steel. The choice of tool depends on the type of soldering being performed and the project’s specific requirements.

  • Soldering Iron: A soldering iron is ideal for soft soldering, where lower temperatures (around 400°C) are sufficient. This handheld tool is perfect for small-scale tasks, such as electronic repairs, small metalwork projects, or plumbing. A soldering iron provides precise control, allowing the user to focus on smaller, intricate joints where high heat is not necessary. For example, when attaching wires or components to mild steel sheets, a soldering iron is typically the best tool due to its ability to target small, localized areas without excessive heat transfer.

  • Soldering Torch: A soldering torch is used for silver soldering and larger projects that require higher temperatures (around 600°C or higher). This tool is ideal for structural applications or when working with thicker metal parts. The torch’s flame can quickly heat a larger area of mild steel, making it suitable for projects such as welding or creating strong joints on metal frameworks. A common application might include joining metal tubes or pipes in a plumbing system where higher-strength bonds are necessary.

  • Soldering Station: A soldering station combines a soldering iron with adjustable temperature controls, making it versatile for both soft soldering and silver soldering. It is particularly useful for maintaining consistent temperatures during more complex tasks, such as in the automotive or jewelry-making industries. A soldering station allows the user to control the heat more precisely, which is crucial for delicate work, such as soldering components to thin metal or ensuring that the solder melts evenly without damaging surrounding materials.

Types of Solder

The type of solder selected significantly impacts the strength, durability, and application of the joint. Two common types of solder are used for mild steel: soft solder and silver solder. Both have distinct properties, costs, and applications.

  • Soft Solder:

    • Composition: Typically made from tin-lead or lead-free alloys.
    • Applications: Soft solder is ideal for low-temperature soldering (around 400°C). It is commonly used for light-duty applications such as repairing electrical circuits or joining thin sheets of mild steel.
    • Advantages: Soft soldering requires less heat, reducing the risk of overheating the base material. It is easier to work with, particularly for beginners, and can be used in applications where a moderate-strength joint is sufficient.
    • Disadvantages: The bond formed is not as strong or durable as those made with silver solder. Soft solder joints are more prone to failure under stress or extreme conditions.
    • Safety Considerations: When using traditional tin-lead solder, proper ventilation is essential to avoid inhaling harmful fumes. Lead-free alternatives are available and offer a safer option for most applications.
  • Silver Solder:

    • Composition: Composed of silver combined with copper, zinc, or other metals to create an alloy with higher melting points.
    • Applications: Silver solder is best used for high-temperature soldering (around 600°C). It is commonly used in situations requiring stronger, more durable joints, such as in plumbing, automotive repairs, and metalwork involving heavy loads.
    • Advantages: Silver solder provides a stronger, more durable bond than soft solder. It is highly resistant to corrosion and can withstand higher stresses and temperatures.
    • Disadvantages: Silver soldering requires more skill and precision, as the higher temperatures involved can easily overheat the material. It is also more expensive than soft solder.
    • Safety Considerations: Silver soldering requires protective gear, including gloves and goggles, as the higher temperatures can cause burns or injuries. Proper ventilation is also essential due to the potential for inhaling fumes from the flux or heated metals.

Selecting the Correct Flux

Flux is crucial for preparing the metal surface during soldering by preventing oxidation and ensuring proper adhesion of the solder. Different fluxes are designed for specific soldering tasks and affect the bonding process in different ways.

  • White Brazing Flux: This flux is ideal for high-temperature applications, such as silver soldering. It prevents oxidation at elevated temperatures, which ensures that the solder flows properly and bonds effectively to the steel. White brazing flux is typically used when working with silver solder or other high-melting-point solders.
  • Rosin-Based Flux: Commonly used with soft solder, rosin-based flux works well at lower temperatures (around 400°C). It is effective for electronics and other fine work where precise control is necessary. However, it may not be as effective at higher temperatures required for silver soldering.
  • General-Purpose Flux: This type of flux is versatile and works with a variety of solder types. It is commonly used for general-purpose soldering tasks, but for specialized applications, such as silver soldering or welding, it may not provide optimal performance.

Choosing the right flux depends on the type of solder and the specific demands of the project. A good flux will help the solder flow properly and prevent oxidation, ensuring a clean and strong joint.

Additional Tools for Successful Soldering

In addition to the primary soldering equipment, several supplementary tools can enhance precision and efficiency during the soldering process.

  • Solder Wire Holder: This tool helps keep the solder wire organized and easily accessible, preventing tangling and ensuring smooth application of solder.
  • Heat-Resistant Mat or Pad: A heat-resistant mat protects the workspace from the high temperatures involved in soldering, preventing damage to surfaces and offering a safe working area.
  • Cleaning Sponge or Brass Wool: A cleaning sponge or brass wool is used to clean the soldering iron tip between uses, ensuring consistent heat transfer and preventing contamination of the solder. A clean tip is crucial for effective soldering, as dirt or oxidation can interfere with the flow of the solder.
  • Wire Brush or Abrasive Pads: These tools are essential for preparing the steel surface before soldering. Wire brushes and abrasive pads remove contaminants such as rust, oil, or dirt, ensuring that the flux adheres properly and the solder bonds effectively to the steel.
  • Clamps or Vices: These tools are used to secure the workpiece during soldering. Properly clamping the steel ensures stability and prevents movement during the process, which can lead to inaccurate or weak joints.

Material Compatibility

When working with mild steel, it is essential to ensure that the tools and materials selected are compatible with its properties. Preparing the steel surface properly before soldering is crucial for achieving strong, durable joints.

  • Surface Preparation: Mild steel surfaces should be cleaned thoroughly before soldering. Methods such as wire brushing, abrasive pads, or chemical cleaners can be used to remove rust, oil, or other contaminants. A clean surface ensures proper adhesion of the flux and solder.
  • Soft Soldering: For soft soldering, mild steel surfaces must be free of oxidation and debris to ensure a strong bond. Flux should be applied after cleaning to help prevent further oxidation during the heating process.
  • Silver Soldering: Silver soldering requires higher temperatures and, therefore, the steel must be able to withstand the heat without warping or melting. In addition to cleaning, the proper flux is essential to prevent oxidation at these elevated temperatures and ensure the solder flows evenly across the steel surface.

Soldering Process

Overview

Soldering is a critical technique for joining metals in a variety of applications, ranging from electronics to jewelry-making. A successful soldering process depends on proper preparation, precise heating, and careful application of solder and flux. Each step plays a vital role in ensuring a strong and durable joint.

Applying Flux

Flux is essential for achieving a clean and strong solder joint. It removes oxidation from metal surfaces, prevents new oxidation during heating, and helps the solder flow effectively.

  1. Select the Correct Flux:

    • Rosin-Based Flux: Commonly used in electronics for soft soldering, offering excellent performance with copper and its alloys.
    • Water-Soluble Flux: Ideal for situations requiring easy post-soldering cleanup, though it can be corrosive if not removed properly.
    • White Brazing Flux: Best suited for silver soldering, as it withstands the higher temperatures required for the process.
    • Example: Use rosin-based flux for soldering circuit boards, and white brazing flux for repairing silver jewelry.
  2. Clean the Surface:

    • Use fine sandpaper or a cleaning solution to remove oxidation, oil, and debris from the metal surface. A clean surface ensures maximum adhesion.
  3. Apply a Thin Layer:

    • Using a small brush or applicator, coat the joint area with a thin, even layer of flux. Ensure all areas to be joined are covered.
  4. Minimize Excess:

    • Avoid overapplying flux, as excess can create residue that may interfere with the joint or require additional cleaning.

Heating the Metal

Uniform heating is critical for proper solder flow and a strong joint. Uneven heating can lead to weak bonds or solder that does not fully adhere to the metal.

  1. Choose the Appropriate Heat Source:

    • Soldering Iron: Suitable for delicate electronics or small-scale projects requiring precise heat.
    • Soldering Torch: Best for larger projects like silver soldering or plumbing, where higher temperatures are needed.
  2. Position the Heat Source:

    • Place the soldering iron tip or torch flame at the joint to heat both pieces of metal evenly.
  3. Monitor the Temperature:

    • Heat gradually to avoid thermal damage. Overheating can cause the solder to burn off essential components, weakening the joint.
  4. Observe the Flux:

    • Watch for the flux to bubble and turn clear, signaling that the metal has reached the right temperature for soldering.
  5. Example:

    • Use a soldering iron for assembling a small circuit board, and a torch for joining copper pipes in plumbing.

Applying the Solder

Proper solder application ensures a complete and secure bond. Follow these steps to achieve consistent and even solder flow:

  1. Position the Solder:

    • Hold the solder close to the joint, but do not touch it directly to the heat source. Allow the heated metal to melt the solder.
  2. Let the Solder Flow:

    • When the metal reaches the correct temperature, touch the solder to the joint. It should flow naturally into the gap, filling it completely.
  3. Work the Joint:

    • For larger or longer joints, guide the solder along the seam while maintaining even heating to ensure complete coverage.
  4. Avoid Overheating:

    • Remove the heat source as soon as the solder has filled the joint. Overheating can cause the solder to lose its integrity or damage the metal, leading to a brittle or compromised joint.
  5. Example:

    • When soldering copper pipes, ensure the solder flows evenly around the entire circumference of the joint.

Inspecting the Joint

A thorough inspection ensures that the joint is strong and reliable.

  1. Check for Full Coverage:

    • The solder should completely cover the joint, with no gaps or voids.
  2. Look for a Smooth Surface:

    • A well-soldered joint will appear smooth and shiny. A dull or uneven surface indicates insufficient heating or poor application.
  3. Troubleshooting:

    • If gaps or dull spots are visible, reheat the joint gently and apply additional solder as needed.
    • For excess solder or residue, clean with a soldering wick or flux remover.
  4. Safety Note:

    • Always allow the joint to cool before handling, and work in a ventilated area to avoid inhaling fumes.

Additional Tips

  • Safety Precautions: Wear protective gloves and safety glasses, and ensure adequate ventilation to protect against heat and fumes.
  • Troubleshooting Common Issues: For uneven solder flow, ensure the metal is heated uniformly and that the surface is clean and well-fluxed. Excess flux can be cleaned with isopropyl alcohol or specialized cleaners after soldering.

By following these steps, you can achieve strong, professional-quality solder joints suitable for various applications.

Post-Soldering

Cooling the Joint

Proper cooling of the soldered joint is essential to ensure its structural integrity. Rapid cooling or improper handling during this phase can lead to defects such as warping, cracking, or weakened bonds.

  1. Natural Cooling:

    • Allow the soldered joint to cool naturally at room temperature. Rapid cooling, such as quenching with water, can cause thermal shock. This occurs because different parts of the joint cool at different rates, leading to internal stresses that can cause cracking or warping. The metal expands when heated and contracts when cooled, but if the cooling happens too quickly, the outer layers of the joint contract faster than the inner layers, creating tension. This tension can fracture the solder or the surrounding material.
    • For applications where joint strength is critical, natural cooling ensures a gradual temperature reduction, preserving the integrity of the joint. It also allows the material to return to a stable state without introducing unnecessary stress or deformation.
  2. Avoid Disturbing the Joint:

    • Do not move or apply stress to the joint while it is cooling. Movement during the cooling phase can lead to fractures or misalignment, particularly for precision work.
    • For larger structures or intricate joints, use clamps or supports to maintain stability during cooling.
  3. Special Considerations for Silver Soldering:

    • Silver soldering involves higher temperatures, which can lead to more significant risks if cooling is rushed. Incorrect temperature control during the soldering process or the cooling phase can result in brittle joints, as silver-based solders tend to be more sensitive to thermal shock than soft solders.
    • A gradual cooling process is even more critical for silver soldered joints. Rapid cooling can cause the joint to become brittle or uneven, reducing its mechanical strength. Allowing silver soldered joints to cool slowly in ambient conditions ensures the solder’s crystalline structure forms properly and maintains the strength needed for durable connections.

Cleaning Residual Flux

Residual flux, if left on the surface, can lead to corrosion or weaken the soldered joint over time. Proper cleaning ensures a durable and aesthetically pleasing result.

  1. Inspect the Joint:

    • Before cleaning, visually inspect the soldered joint to identify areas with excess flux. Look for white residue (common with rosin-based flux) or hard, glass-like deposits (from white brazing flux).
  2. Use Appropriate Cleaning Methods:

    • Soap and Water: For soft soldering projects, a mild detergent mixed with warm water is often sufficient to remove flux residues. Use a brush or soft cloth to gently clean the surface.
    • Flux Removers or Solvents: For tougher residues, particularly from high-temperature soldering like silver soldering, use specialized flux removers. Isopropyl alcohol can also be effective for cleaning rosin-based flux.
    • Pickle Solution: For silver soldering, immerse the joint in a pickle solution (such as a mixture of sulfuric acid or citric acid and water) to dissolve stubborn flux residues and oxidation. Rinse thoroughly with water after cleaning.
  3. Common Mistakes to Avoid:

    • Avoid using overly abrasive tools, such as steel wool or harsh scrubbing pads, as they can damage the soldered joint or underlying material. These tools can scratch the surface, weaken the bond, or create small cracks.
    • Do not attempt to clean the joint too soon after soldering. If the joint is not fully cooled, cleaning can cause distortion or damage to the joint. Wait until the joint has returned to room temperature to prevent any negative effects on the integrity of the bond.
  4. Polish the Surface (if needed):

    • Use a polishing pad, steel wool, or a fine abrasive to remove any remaining discoloration or debris. This is especially important for joints that need to be visually appealing, such as in jewelry or decorative metalwork.
  5. Avoid Over-Cleaning:

    • Be cautious not to use abrasive methods excessively, as this can damage the underlying metal or alter the soldered joint’s integrity.

Inspecting the Soldered Joint

Inspection ensures the soldered joint meets both functional and aesthetic standards.

  1. Check for Uniform Coverage:

    • A well-soldered joint should have smooth, even solder coverage. Gaps, voids, or uneven solder flow may indicate insufficient heat or improper solder application.
    • Inspect both sides of the joint, especially for larger projects, to ensure solder has penetrated fully and bonded both surfaces.
  2. Assess Bond Strength:

    • Lightly test the joint’s strength by applying pressure or attempting a minor pull (only after it has completely cooled). Weak or brittle joints may require re-soldering. Visual inspection is a useful first step—check for any visible signs of failure, such as cracks or voids. A magnifying glass or a micrograph can help you examine the joint at a finer level to ensure the bond is solid.
    • Environmental factors, such as temperature and humidity, can influence the strength of a soldered joint over time. Joints exposed to extreme conditions may weaken faster, so inspect them periodically, especially in critical applications.
  3. Testing Joint Quality:

    • For high-stakes projects or industrial applications, more advanced techniques can be used to test the bond quality. Methods like ultrasonic testing or X-ray inspection are commonly employed for non-destructive testing (NDT) to assess the integrity of a soldered joint. These methods can detect internal flaws, such as voids or cracks, that might not be visible to the naked eye.
  4. Address Excess Solder:

    • If there is excess solder, use a desoldering wick, solder sucker, or fine file to remove it. Excess solder can interfere with the functionality or appearance of the joint.
  5. Evaluate Aesthetic Quality:

    • For projects requiring a polished appearance, ensure that the soldered area is clean, smooth, and free of visible flux residue or discoloration.

Preventing Corrosion

Corrosion can compromise the strength and longevity of the soldered joint. Taking preventive measures ensures durability.

  1. Apply a Protective Coating:

    • For outdoor applications or environments prone to moisture, apply a protective coating such as clear enamel, lacquer, or anti-corrosion paint to the joint. Acrylic coatings are often used for indoor applications due to their smooth finish, while polyurethane or epoxy coatings are better for high-durability outdoor use. These coatings help protect the joint from rust, oxidation, and other environmental factors.
  2. Use Corrosion-Resistant Materials:

    • When soldering, consider using corrosion-resistant materials for enhanced durability. Metals such as stainless steel, brass, or copper-coated alloys are resistant to rust and oxidation. These materials are ideal for long-term applications, particularly in harsh environments. Choosing the right material for the specific application helps ensure that the soldered joint remains strong and free from corrosion.
  3. Regular Maintenance:

    • Periodically inspect the soldered joint for signs of corrosion, especially in high-humidity or corrosive environments. Electronics, automotive, and marine industries rely heavily on regular maintenance to prevent damage from environmental exposure. For example, automotive systems often require periodic checks of soldered joints to prevent electrical failures caused by corrosion. Clean and reapply protective coatings as necessary to maintain joint integrity over time.

Key Considerations for Choosing Between Soft Soldering and Silver Soldering

Temperature Requirements

Soft soldering operates at lower temperatures, typically around 400°C, which reduces the risk of warping thin materials like mild steel. This makes it ideal for delicate applications. In contrast, silver soldering requires higher temperatures, often exceeding 600°C. While this enables the formation of stronger bonds, prolonged exposure to such heat can lead to crystallization or compromised mechanical properties in the base metal. Careful heat management is essential to avoid weakening the structure or causing thermal damage to surrounding areas.

Joint Strength

Soft soldering creates joints with moderate strength, suitable for light-duty applications like electronics and small repairs. However, these joints may fail under high stress or elevated temperatures. Silver soldering produces significantly stronger joints, capable of withstanding mechanical loads and harsh conditions. For instance, a silver-soldered joint can endure the mechanical stress in automotive or structural applications, making it a preferred choice for load-bearing repairs.

Corrosion Resistance

Soft soldering can be prone to corrosion, especially if residual flux is not properly cleaned. Resin-based fluxes used in soft soldering improve resistance but may still be vulnerable in high-humidity environments. Silver soldering, on the other hand, employs alloys like silver brazing rods that are inherently more resistant to corrosion. This makes silver soldering particularly advantageous in environments with harsh conditions, such as marine settings, where saltwater corrosion is a significant concern.

Avoiding Overheating During Silver Soldering

Gradual heating is crucial to minimize thermal shock, which refers to cracking or material weakening caused by uneven temperature changes. Preheat the joint area evenly before applying intense heat. Use heat-resistant barriers like thermal blocks to protect nearby components from excessive heat. Control the flame size and temperature of the torch based on the material’s thickness; smaller flames are better for precision work, while larger flames suit broader surfaces.

Choosing the Appropriate Tools and Materials

Flux plays a critical role in both soldering processes by preventing oxidation and enabling smooth solder flow. For soft soldering, resin-based flux is commonly used, whereas white brazing flux is preferred for silver soldering due to its ability to withstand higher temperatures. When selecting solder, lead-free alloys are recommended for environmental safety in soft soldering. For silver soldering, silver brazing rods with varying silver content can be chosen depending on the required joint strength and application.

The choice of tools is equally important. Small butane torches are ideal for delicate soldering tasks, while larger oxy-acetylene torches are necessary for heavy-duty applications. For soft soldering, a temperature-controlled soldering iron is suitable for precise work.

Application-Specific Insights

Plumbing Applications

Silver soldering is widely used in plumbing for joining copper or mild steel pipes, ensuring durable, leak-proof joints. Even application of flux is critical to prevent voids that could compromise the seal. Pressure testing the joint post-soldering ensures the connection is secure and free from leaks.

Automotive Repairs

In automotive settings, silver soldering is preferred for repairing mild steel components like exhaust pipes or structural elements due to its superior strength and resistance to thermal and mechanical stress. Careful heat control is vital to prevent damage to surrounding areas or the base material.

Electronics and Precision Work

Soft soldering is the preferred method for electronics due to its lower melting temperature, which prevents heat damage to sensitive components. Rosin-based flux is commonly used for its effectiveness in reducing oxidation and ensuring clean joints without promoting corrosion.

Environmental and Safety Considerations

Proper ventilation is essential during soldering to avoid inhaling harmful fumes from flux or solder, especially when working with lead-containing alloys. Fume extraction systems or masks with activated carbon filters are highly recommended. Personal protective equipment, such as heat-resistant gloves and safety goggles, should always be worn, and protective clothing is advisable for high-temperature silver soldering.

Prompt cleaning of flux residue is critical to maintaining joint integrity. Isopropyl alcohol is effective for soft soldering cleanup, while pickling solutions are suitable for removing flux residues after silver soldering. In moisture-prone environments, applying protective coatings to the finished joint can further enhance corrosion resistance.

By carefully selecting materials and tools, understanding application-specific requirements, and adhering to safety measures, the soldering process can be optimized for reliable and durable results tailored to the intended application.

Frequently Asked Questions

Below are answers to some frequently asked questions:
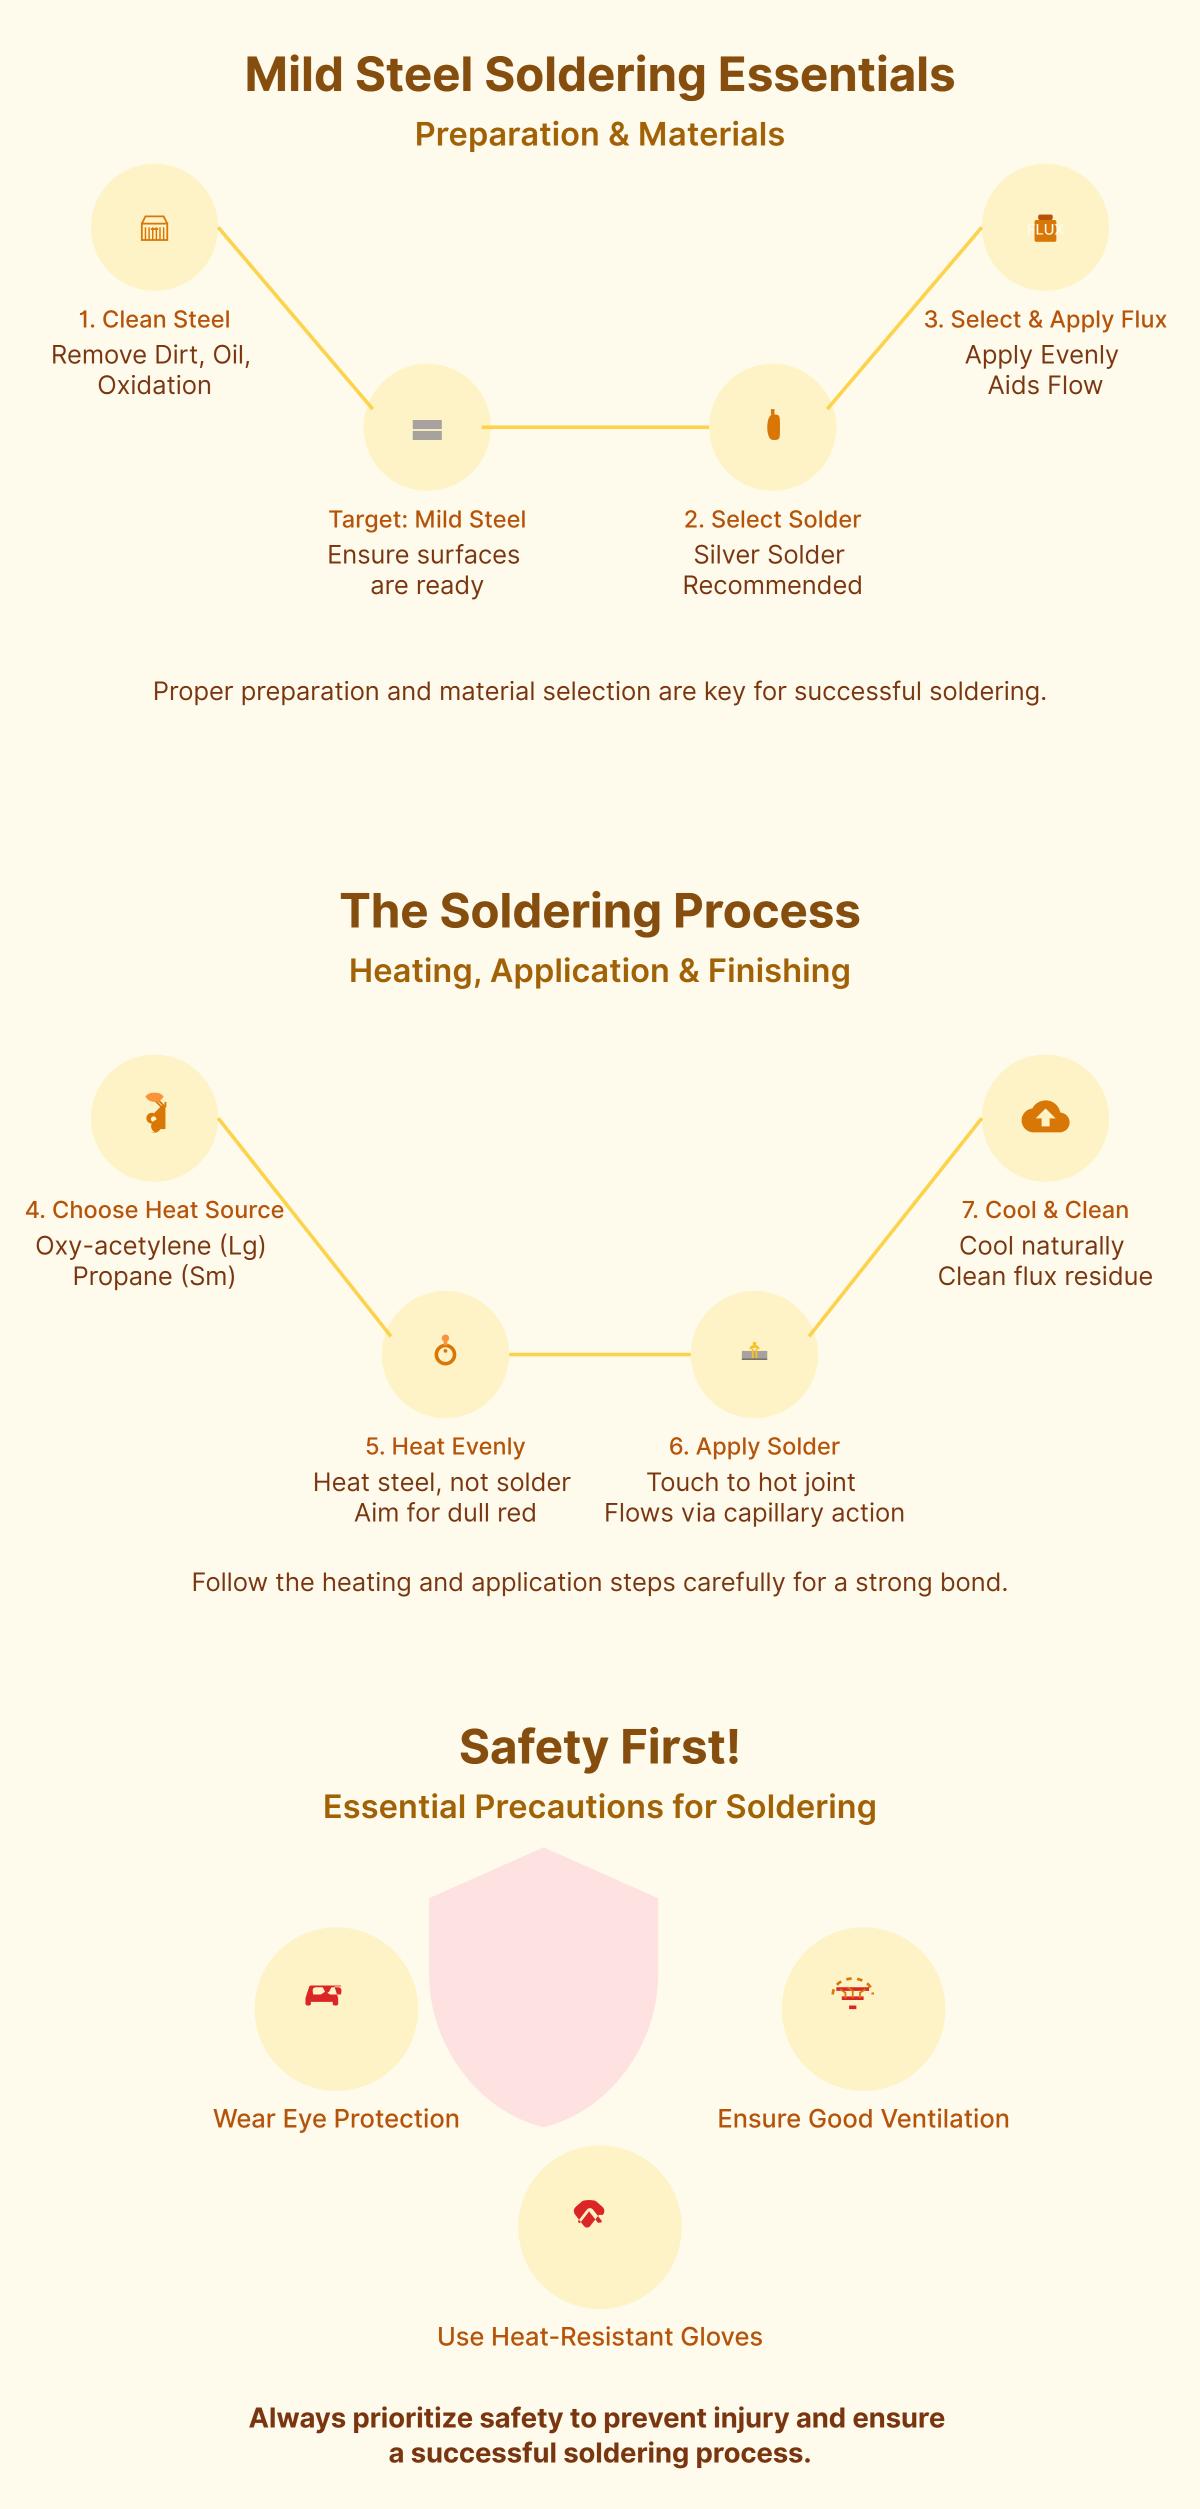
What is the best solder for mild steel?

The best solder for mild steel is silver solder, particularly those with a higher silver content, such as 40% or 55%. Silver solder provides a strong bond and works better with steel than soft solder, which tends to have poor adhesion to the metal. Silver soldering requires the use of flux to clean the steel and promote bonding. It also necessitates a heat source like an oxy-acetylene or oxy-propane torch to reach the necessary temperatures, typically around 650-720°C. Proper joint preparation, including cleaning the steel thoroughly, is crucial for achieving a reliable and strong connection. Silver solders with higher silver content are recommended for their fluidity, which helps in creating stronger joints, especially in thin materials.

Why is flux necessary when soldering mild steel?

Flux is necessary when soldering mild steel because it plays several critical roles in ensuring a strong and reliable joint. First, flux removes oxidation and other impurities from the steel surface, which can interfere with the bonding of the solder. Steel tends to form a layer of oxide when exposed to air, and this oxide layer prevents the solder from adhering properly. Flux helps to clean the surface and create an environment where the solder can bond effectively.

Additionally, flux prevents reoxidation during the soldering process. When steel is heated, it is prone to form new oxide layers due to exposure to air. Flux acts as a barrier to oxygen, ensuring that the steel surface remains clean and that the solder can flow and bond uniformly.

Flux also improves the wettability of the molten solder, reducing its surface tension and allowing it to spread more easily over the steel surface. This leads to a better mechanical and electrical joint. Furthermore, using flux ensures that the solder joint will be stronger and more durable, which is particularly important for both electrical conductivity and mechanical strength.

In the case of mild steel, the right type of flux is crucial. Inorganic acid fluxes are often recommended because they are more effective at removing the tough oxides that form on steel surfaces. However, it is important to clean the flux residues after soldering to avoid potential corrosion, as leftover flux can lead to rusting and deterioration of the steel over time.

In summary, flux is essential for cleaning the surface, preventing reoxidation, improving solder flow, and ensuring a strong and durable joint when soldering mild steel.

How do I clean mild steel before soldering?

To clean mild steel before soldering, it is essential to remove dirt, grease, oxides, and other contaminants that could interfere with the process. Begin by using fine steel wool, high-grit sandpaper (400–1000 grit), or a Scotch-Brite pad to gently abrade the surface, effectively removing oxides and residues while creating a texture that allows the flux to adhere better. For chemical cleaning, use a cloth soaked in methylated spirits to remove grease or marker residues, taking care to handle the material with clean hands to avoid reintroducing oils. If stubborn contaminants remain, a gentle application of a wire brush can help without excessively scratching the surface. After cleaning, ensure the surface is completely dry and free from any residue. Apply a small amount of flux to the cleaned area to aid the soldering process. Always handle the steel by its edges after cleaning to prevent recontamination. Following these steps will ensure the mild steel is well-prepared for successful soldering.

Can I use a regular soldering iron for silver soldering?

A regular soldering iron is not suitable for silver soldering due to the significant difference in temperature requirements. Silver solder typically melts at temperatures between 800°C (1472°F) and 1100°C (2012°F), while a standard soldering iron, commonly used for electronics, only reaches temperatures of around 300°C (572°F) to 500°C (932°F). This makes it impossible for a regular soldering iron to generate enough heat to melt silver solder effectively. For silver soldering, it is recommended to use a torch or other high-temperature heat sources capable of reaching the necessary temperatures. While some specialized low-melting soldering products exist, they are exceptions and may not be suitable for all silver soldering applications.

How can I prevent overheating when soldering mild steel?

To prevent overheating when soldering mild steel, it’s essential to control the heat application and use the right materials. Begin by ensuring the steel surfaces are clean, removing mill scale and contaminants through grinding or sanding. This promotes a strong bond and ensures the flux works effectively. When choosing solder, opt for silver solder (hard solder) with a high melting point, between 745 and 778°C, as it’s suitable for steel. Use a flux designed for silver soldering, as it can withstand the necessary high temperatures without degrading.

For the heating process, preheat the steel evenly to avoid localized overheating, especially for larger parts where multiple heat sources may be required. Heat the metal gradually and avoid sudden, excessive heat. Apply flux right before heating reaches the soldering temperature, and ensure the entire area is uniformly heated to a bright red before applying the solder.

To avoid overheating, monitor the flux carefully; if it turns black, the area has likely been overheated. Use a smaller torch tip for smaller pieces to prevent overconcentration of heat. For larger sections, a larger or multiple torch tips can help distribute heat more evenly.

Lastly, be mindful of the cooling process; let the joint cool naturally to room temperature, and remove any excess flux or oxidation after soldering with fine sandpaper to achieve a clean finish.

You May Also Like
We picked them just for you. Keep reading and learn more!
Get in touch
Talk To An Expert

Get in touch

Our sales engineers are readily available to answer any of your questions and provide you with a prompt quote tailored to your needs.
© Copyright - MachineMFG. All Rights Reserved.

Get in touch

You will get our reply within 24 hours.