How to Weld Nickel-Plated Steel: A Complete Guide
Welding nickel plated steel can be a daunting task, but with the right guidance, it becomes a manageable and rewarding…
Ever wondered how to weld with a nickel rod but felt overwhelmed by the technical jargon? Fear not! This guide is designed just for beginners like you, breaking down the process into easy-to-follow steps. Welding with a nickel rod opens up a world of possibilities, whether you’re repairing metal, fabricating new structures, or joining cast iron and stainless steel.
In this comprehensive guide, you’ll discover everything from essential safety gear and tools to preparing your base material and setting up your welding machine. We’ll walk you through the entire welding process, from striking an arc to post-weld treatments, all while highlighting crucial safety precautions. Ready to dive into the world of nickel rod welding? Let’s get started and ensure your first weld is a successful one!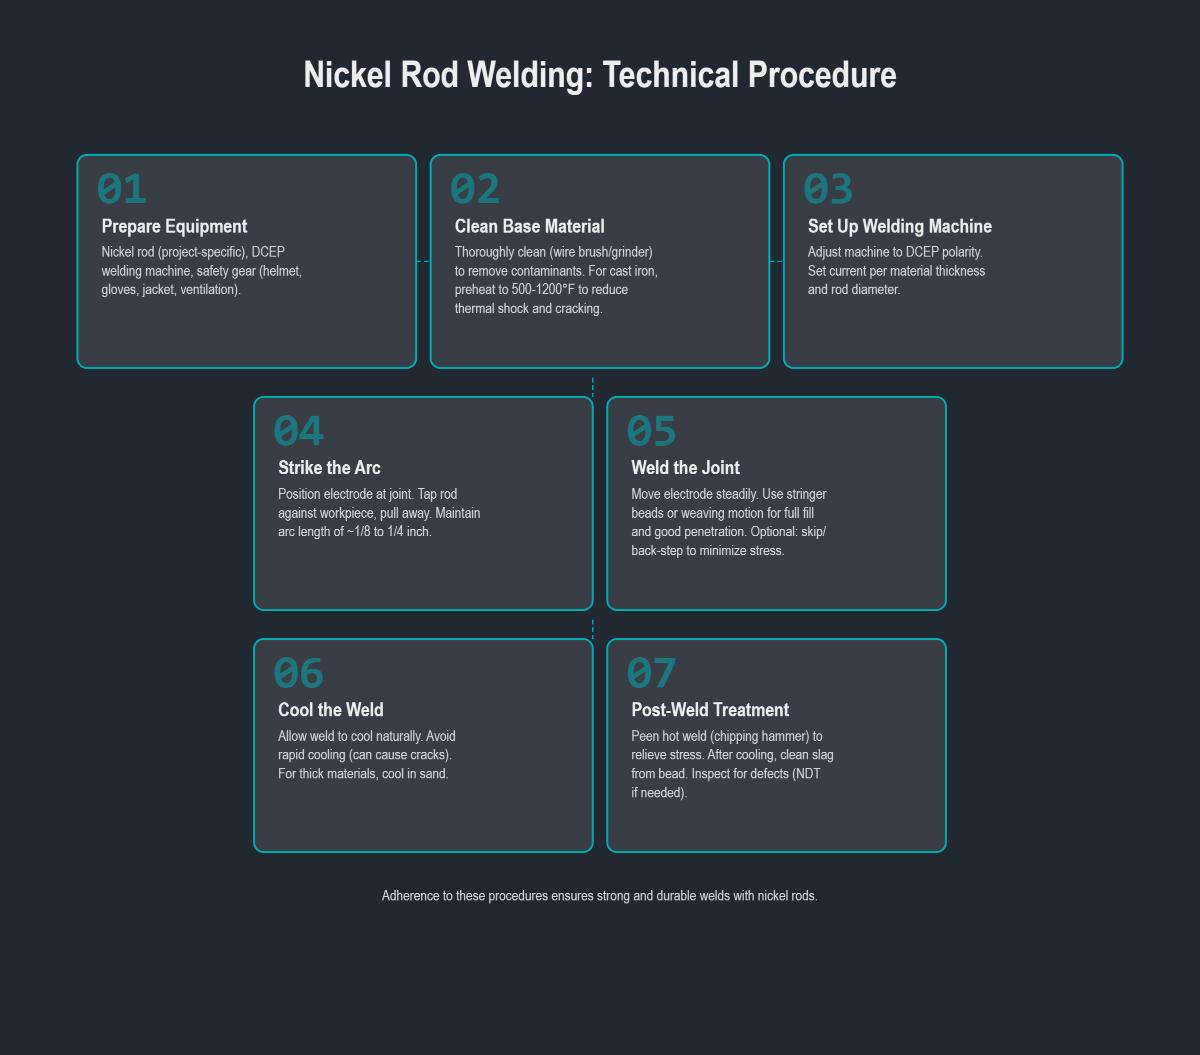
A nickel welding rod is a specialized electrode used primarily in welding processes, containing nickel as its main component. These rods are designed to create strong, durable welds, especially when working with metals that require high ductility and resistance to corrosion.
Nickel rod welding is often used to repair damaged metal parts, such as fixing cracks in cast iron engine blocks or repairing stainless steel structures that have experienced wear and tear.
In metal fabrication, nickel rods are essential for joining different metal pieces together, creating complex structures that can withstand harsh environments, such as those found in chemical and food processing industries.
A key application is joining cast iron and stainless steel. These two metals have different properties, and nickel rods can create a strong bond between them, ensuring the integrity of the joint.
When preparing for nickel rod welding, having the right tools is critical for achieving high – quality welds. Here’s a comprehensive list of essential tools you’ll need:
Safety is paramount when welding with nickel rods. Proper safety gear protects you from hazards such as intense light, heat, and harmful fumes.
Start by thoroughly cleaning the base material to ensure a strong, durable weld. This ensures the removal of contaminants that could weaken the weld.
Inspect the base metal carefully for any defects such as cracks, pits, or inclusions. Address these defects before welding to prevent weld failure.
Proper joint preparation enhances weld penetration and strength.
Preheating is essential for metals like cast iron and certain nickel alloys.
Use tack welds to hold the components in place before starting the full welding process.
To prevent overheating and distortion, manage heat input carefully and allow the weld to cool between passes.
Shielding gas prevents contamination from atmospheric gases, ensuring a clean and strong weld.
After welding, clean the weld area and inspect for defects.
For welding with nickel rods, it’s recommended to use DC Electrode Positive (DCEP) polarity. Think of the arc like a laser beam; it needs to be steady to ensure a strong, effective weld. DCEP generates more heat at the electrode, which helps melt the nickel rod and fuse it well with the base metal.
Nickel rod welding usually requires an amperage between 70 to 120 amps, adjusted according to the rod diameter and base metal thickness. For a 1/8 inch nickel rod, a common amperage setting is 85 – 100 amps. If the base metal is thicker, you may need to increase the amperage slightly. However, be cautious not to set it too high, as excessive amperage can lead to overheating and a poor-quality weld.
Maintain an arc length of 1/8 to 1/4 inch (3 – 6 mm) for optimal results. A short and steady arc is crucial to avoid overheating and burning the material. Keep a close eye on the arc while welding and adjust your hand position to maintain the correct length.
Once you’ve set the current type to DCEP, adjusted the amperage according to your rod and base metal, and determined the appropriate arc length, double-check all the settings. Ensure everything is secure and that the machine is functioning properly before you start welding. This step guarantees a stable and reliable welding environment.
Start by cleaning the metal surface with a wire brush, angle grinder, or sandblaster to remove rust, oil, dirt, and other contaminants that could weaken the weld. For stubborn impurities, use chemical cleaning like pickling (acid treatment) and then wipe with acetone to remove any residual oils.
If working with cast iron or thick materials that are prone to cracking, preheat the base metal. The preheating temperature typically ranges from 350°F to 1200°F, depending on the thickness and alloy of the material. This helps reduce thermal shock and minimize cracking during welding.
Inspect the material for cracks or defects. Tack weld the components to maintain proper alignment before proceeding with full welding. This ensures that the parts stay in place and makes the welding process smoother.
Choose a nickel rod that is compatible with the base metal and the specific application. Various nickel alloys are available, each suited to different metals such as cast iron, stainless steel, or other nickel alloys.
Set your welding machine to DC Electrode Positive (DCEP) for stable arcs and good penetration. Adjust the amperage according to the rod diameter and the thickness of the material. A short arc length of 1/8 to 1/4 inch is usually optimal for effective welding.
Ensure you wear appropriate safety gear, including a welding helmet with the correct shading, gloves, a jacket, and safety glasses. Proper ventilation or a fume extractor is also necessary to avoid inhaling toxic fumes generated during nickel welding.
Secure the nickel rod in the electrode holder (also known as the stinger).
Strike the arc by briefly tapping the electrode against the workpiece and then pulling it away to maintain a consistent arc length of about 3-6 mm.
Move the electrode steadily along the joint, keeping a controlled pattern. For thicker materials, use a slight weaving or overlapping motion to distribute the weld metal evenly and ensure full penetration. Employ techniques such as stringer beads or skip/back-step welding to minimize stress and prevent cracking.
Immediately after each weld pass, use a chipping hammer to peen the weld bead while the metal is still hot. This process helps relieve stress and reduces the risk of cracking by allowing the weld to stretch as it cools.
Allow the weld to cool naturally. Avoid rapid cooling methods like quenching with water or compressed air, as these can cause cracks. For thick castings, burying them in dry sand or wrapping them with insulating blankets can help slow the cooling rate and ensure uniform contraction.
Once the weld has cooled, remove slag and impurities using a wire brush or chipping hammer. This ensures a clean weld bead.
Examine the weld for any defects such as cracks, porosity, or lack of fusion. Use non-destructive testing methods like ultrasonic testing, magnetic particle inspection, or dye penetrant inspection for quality assurance.
If multiple passes are required, clean oxide layers between passes using an angle grinder. Avoid using compressed air to prevent moisture contamination, which can introduce hydrogen and cause cracking.
Preheating and slow cooling are crucial when welding cast iron to avoid thermal shock and cracking.
For thin nickel alloys, TIG welding is recommended due to better control and aesthetics, although stick welding with nickel rods is common for repairs and thicker sections.
Ensure that electrodes and base metals are clean and free from other metal contaminants to prevent weld defects.
Once the welding is finished, it’s important to let the joint cool gradually and naturally. Rapid cooling methods, like quenching with water or compressed air, can cause thermal shock and lead to cracking in both the weld and the base material, especially in materials like cast iron or thick castings. Consider using insulating methods in these cases. Wrapping the welded piece in a blanket or burying it in dry sand can help maintain a steady cooling rate and prevent sudden temperature changes that could weaken the weld integrity.
Nickel welds often develop residual stresses as they cool, which can make them brittle or cause cracks. To mitigate these stresses, stress-relieving heat treatments or annealing should be applied after welding. This process involves heating the welded assembly to a controlled temperature below its melting point, holding it at that temperature for a specified period, and then allowing it to cool slowly. This treatment helps enhance the durability and toughness of the weld, making it more suitable for high-stress or high-temperature applications.
Peening helps relieve stresses formed during welding by lightly hammering the weld bead with a chipping hammer after each run. This technique plastically deforms the weld bead surface, counteracting the tensile stresses that can lead to cracking during solidification and cooling. This method is particularly effective in minimizing the risk of cracks in the weld.
Once the weld has cooled, it is essential to clean the weld area thoroughly. Use a wire brush or chipping hammer to remove slag and other impurities that can hide defects. Inspect the weld closely for any signs of cracks, porosity, or incomplete fusion. For critical applications, use non-destructive testing methods like ultrasonic testing, magnetic particle inspection, or dye penetrant inspection to verify weld quality. Regular maintenance and inspection ensure long-term weld integrity.
Depending on the application, further machining or finishing may be necessary after welding to achieve the desired shape or surface finish. When performing post-weld machining, it is important to proceed carefully to avoid introducing new stresses or damaging the weld zone. Proper finishing ensures that the welded component meets the required specifications and is ready for its intended use.
Slag inclusion often results from contaminated or aged flux on the rod. To address this issue, first test the rod on clean steel. If the problem persists, clean the rods with a Scotch – Brite pad. As an alternative, consider switching to TIG welding.
Using the wrong type of rod, such as a mild – steel rod, can increase the carbon content and make the weld brittle, especially when working with cast iron. Nickel – based rods prevent graphite pickup and maintain weld flexibility and ductility.
Nickel alloys have low thermal conductivity, which causes heat to build up rapidly during welding. Limit the heat input by allowing the weld to cool between beads or passes. For example, wait for about 1 – 2 minutes between passes to let the weld cool sufficiently.
Below are answers to some frequently asked questions:
To weld with a nickel rod, follow these steps:
By following these steps, you can achieve strong, durable welds when working with nickel rods.
To prepare the base metal before welding with a nickel rod, follow these essential steps to ensure a strong and durable weld:
First, thoroughly clean the base metal to remove contaminants like rust, dirt, grease, oil, paint, and oxides. Use a wire brush, angle grinder, sandblaster, or abrasive cloth for mechanical cleaning. For stubborn contaminants, consider chemical cleaning methods such as pickling (acid treatment). After cleaning, wipe the surface with a cloth soaked in acetone or a similar solvent to ensure it’s free from residual oils.
Next, inspect the base metal for any defects such as cracks, fatigued areas, or spongy spots. Repair or cut out any defective areas to prevent weld failure.
For thicker materials, grind beveled edges to improve weld penetration and strength. Securely tack weld the pieces to maintain alignment during welding.
Preheating is particularly important for cast iron. Heat the base metal to a temperature between 500°F and 1200°F (260°C to 650°C) to reduce thermal shock and minimize cracking. Follow specific preheat guidelines for other nickel-base alloys.
Ensure the surface is free from oxidized skin and oil residues before starting the weld. Creating a slightly rough surface can improve weld bead adhesion and penetration.
When welding with nickel rods, it’s essential to use proper safety equipment and take necessary precautions. Safety equipment includes a welding helmet with the right shade to protect eyes from the arc, safety glasses under the helmet for spark protection, insulated welding gloves to prevent burns, a flame – resistant welding jacket, and NIOSH – approved respirators if exposure limits are exceeded. Precautions involve ensuring proper ventilation to remove toxic fumes, keeping the area clear of flammable materials for fire safety, avoiding skin contact with nickel particles, and having a first – aid plan. Also, keep the work area clean, stay hydrated, take breaks, and check equipment before starting.
To prevent cracking when welding with nickel rods, follow these essential steps:
By adhering to these steps, you can significantly reduce the risk of cracking when welding with nickel rods, ensuring strong and durable welds.
After welding with a nickel rod, proper post-weld treatments and inspections are crucial. For treatments, start by cooling the weld properly. Then, remove slag and other impurities. Post-weld heat treatments can also be done: stress relieving by heating below the critical range to reduce welding stresses, solution annealing to improve corrosion resistance, and for precipitation hardening alloys, a full solution heat treatment followed by artificial aging. For inspections, conduct a visual check for visible defects, use radiographic testing to detect internal flaws, ultrasonic testing for subsurface issues in thick sections, and chemical analysis to ensure no harmful element contamination.
For interactive checklists and downloadable resources related to welding with a nickel rod, you can visit the MFG Shop website. This site offers comprehensive guides that cover everything from base material preparation to post-weld treatments. Additionally, the Arc Machines website provides a downloadable daily inspection checklist for welding equipment, ensuring your tools are in optimal condition for safe and effective welding operations. These resources are designed to be beginner-friendly and provide detailed, step-by-step instructions to help you achieve high-quality welds with nickel rods.

