Have you ever found yourself staring at a shelf full of nails, completely confused by the array of sizes, types, and cryptic labels? Whether you’re tackling a DIY project or simply hanging a picture frame, understanding nail sizes can make all the difference in achieving a sturdy and professional result. But where do you start? In this beginner-friendly guide, we will unravel the mystery of nail sizes, explain what penny size means, and walk you through the different types of nails available. You’ll learn how to measure nail size accurately, avoid common mistakes, and select the right nail for your needs. Ready to transform your knowledge and tackle your next project with confidence? Let’s dive in!
Understanding Nail Size Charts
What is a Nail Size Chart?
A nail size chart is a reference tool that helps you determine the appropriate size of nails to use for various applications. These charts offer standardized measurements, making it easier to choose the right nail size for your project or personal use.
Importance of Using a Nail Size Chart
Using a nail size chart is crucial for several reasons, including ensuring you select the correct nail size for both functionality and aesthetics. It also helps maintain uniformity in your nail applications, whether for construction, crafting, or beauty purposes, and saves time and effort by providing quick reference points to the sizes you need.
Understanding Nail Size Measurements
Nail sizes are usually measured in millimeters (mm) and numbered for easy reference. The standard nail size chart includes sizes from #0 (the largest) to #9 (the smallest). Here’s a general guide to these measurements:
- #0: 17-18 mm
- #1: 16 mm
- #2: 15 mm
- #3: 14 mm
- #4: 13 mm
- #5: 12 mm
- #6: 11 mm
- #7: 10 mm
- #8: 9 mm
- #9: 8 mm
How to Use a Nail Size Chart
Follow these steps to effectively use a nail size chart:
- Identify the Measurement: Measure the width of your natural nail or the area where the nail will be applied.
- Match the Size: Compare the measurement to the sizes listed on the chart to find the closest match.
- Select the Nail: Choose the nail size that corresponds to your measurement for a perfect fit.
Standard Sizing Options
Some brands offer pre-determined standard sizes that correspond to specific nail size combinations for each finger. These are often labeled as XS, S, M, L, and XL. For example:
- XS (Extra Small): Thumb #3, Pointer #6, Middle #5, Ring #7, Pinky #9
- S (Small): Thumb #2, Pointer #5, Middle #4, Ring #6, Pinky #9
- M (Medium): Thumb #1, Pointer #5, Middle #4, Ring #6, Pinky #8
- L (Large): Thumb #0, Pointer #4, Middle #3, Ring #5, Pinky #7
- XL (Extra Large): Thumb #0, Pointer #3, Middle #2, Ring #4, Pinky #6
Custom Sizing
If your measurements do not match the standard options, many suppliers offer custom sizing. This allows you to specify your exact measurements for each finger to ensure a perfect fit.
Using nail size charts can greatly improve your nail applications by ensuring accuracy, consistency, and efficiency. Whether you’re working on a construction project or selecting press-on nails, having the right information at your fingertips can make all the difference.
How to Measure Your Nail Size
Getting the perfect fit for your press-on nails starts with measuring your nails accurately. Here’s a step-by-step guide to help you measure your nails effectively:
Tools You Will Need
- Flexible Measuring Tape or Ruler: For direct measurements.
- Pen or Sharpie: To mark the edges of your nail on tape.
- Clear Tape: For the tape and paper method.
- Paper: To record measurements.
Measuring Techniques
Method 1: Tailor’s Tape Method
- Wrap a flexible measuring tape around the widest part of each nail, making sure it lies flat, and note down the measurements in millimeters.
- Compare your measurements with standard size charts provided by nail suppliers.
Method 2: Tape and Paper Method
- Place clear tape over each nail and press it into the gap between the nail and skin.
- Mark the edges of your nail on the tape with a pen.
- Remove the tape, stick it on a piece of paper, and measure the distance between the marks with a ruler. Record the measurements.
- Compare your measurements with size charts.
Common Mistakes to Avoid
- Ensure the tape or measuring tool lies flat and isn’t twisted or wrinkled.
- Measure each nail on both hands, as sizes may vary.
- Use fine-tipped pens for precise markings to avoid inaccuracies.
Tips for Accurate Measurement
- Measure each nail on both hands since sizes may differ.
- Use fine markings: Ensure the pen or sharpie used for marking is fine-tipped for precise lines.
- Consider nail shape: Different shapes may require slightly different fits.
- Recheck measurements: Double-check your measurements to ensure accuracy.
What is Penny Size in Nails?
Definition and History of Penny Size
Penny size (abbreviated as “d”) is a traditional way to measure nails, dating back to 15th-century England. Initially, “penny” indicated the price of 100 nails, but it eventually came to represent the length of nails. Today, penny size is crucial for determining nail length, making it essential for anyone working with nails.
How Penny Size Relates to Nail Size
Penny size directly corresponds to the length of a nail. For instance, a 2d nail is 1 inch long, and each subsequent increase in penny size generally adds about 1/4 inch to the length of the nail up to a 10d nail. Beyond the 10d size, the length increments vary, but the penny size continues to serve as a standardized way to describe nail length. Here’s a simplified chart to illustrate common penny sizes and their corresponding lengths:
| Penny Size |
Length |
| 2d |
1″ |
| 3d |
1.25″ |
| 4d |
1.5″ |
| 5d |
1.75″ |
| 6d |
2″ |
| 7d |
2.25″ |
| 8d |
2.5″ |
| 9d |
2.75″ |
| 10d |
3″ |
| 16d |
3.5″ |
| 20d |
4″ |
| 30d |
4.5″ |
| 40d |
5″ |
| 60d |
6″ |
Practical Applications of Penny Size
Knowing the penny size helps you choose the right nails for different projects. Here’s how it applies practically:
Construction and Carpentry
In construction, the right penny size ensures nails are long enough to secure materials without causing damage. For instance, framing a house usually requires 16d nails (3.5 inches long) for strong support.
Home Improvement and DIY Projects
For home improvement projects, such as installing trim or molding, selecting the appropriate penny size ensures that nails are discreet yet strong enough to hold the materials in place. 6d nails, which are 2 inches long, are commonly used for such tasks.
Crafting and Decorative Work
When working on crafts or decorative projects, penny size helps in choosing nails that are suitable for delicate materials. Smaller nails, like 2d or 3d, are often used to avoid damaging the project while still providing necessary support.
Factors Influencing Nail Selection
Several factors should be considered when choosing nails based on penny size:
- Material Type: Different materials require specific nail gauges and penny sizes for optimal strength and stability. Wood, metal, and concrete each have unique requirements.
- Holding Power: Thicker gauge nails offer better holding power but must be chosen carefully to avoid splitting the material.
- Compatibility: Ensure that the selected gauge and penny size are compatible with your nail gun or manual nailer to avoid operational issues.
Different Types of Nails Explained
Overview of Nail Types
Understanding the different types of nails is crucial for selecting the right one for your specific project. Nails are categorized based on their design, intended use, and the materials they are made from.
Construction Nails
Common Nails
- Description: These nails are the most commonly used in general construction.
- Characteristics: They have a thick shank, a wide head, and a diamond-shaped point.
- Use: Ideal for framing and structural work with dimensional lumber.
Framing Nails
- Description: Similar to common nails but with a thinner shank.
- Characteristics: The thinner shank reduces the risk of wood splitting.
- Use: Preferred for framing jobs.
Finish Nails
- Description: Also known as casing nails, they have small, slightly rounded heads.
- Characteristics: Their heads can be easily countersunk for a neat finish.
- Use: Best for installing trim boards and door frames.
Brad Nails
- Description: These are thin nails with small heads.
- Characteristics: They minimize wood splitting and are often used with nail guns.
- Use: Suitable for light woodworking projects.
Roofing Nails
- Description: Short nails with wide, flat heads.
- Characteristics: Available in smooth or ringed shanks for better pull-out resistance.
- Use: Ideal for fastening shingles and roofing materials.
Duplex Head Nails
- Description: Feature two heads, allowing for easy removal.
- Characteristics: Useful for temporary structures.
- Use: Commonly used in formwork and scaffolding.
Nail Shanks and Heads
Shank Types
- Smooth Shank: Easy to drive but offers less pull-out resistance.
- Spiral Shank: Rotates during insertion, which helps prevent pull-out, ideal for hardwoods.
- Ring-Shank: Provides a strong hold in softwoods by locking into the wood fibers.
Head Types
- Flat Head: Offers a large striking surface.
- Checkered Head: Prevents hammer slippage during driving.
Beauty and Nail Art Nails
Nail Shapes
- Square: Provides a bold appearance.
- Round: Offers a classic, simple look.
- Oval: Soft and elegant.
- Almond: Popular for its elegance and versatility.
- Stiletto: Long and pointed, ideal for dramatic styles.
- Coffin: Edgy and often used with acrylic or gel nails.
Nail Lengths
- Short: Practical for daily activities.
- Medium: Balances style with practicality.
- Long: Usually combined with gel or acrylic for added strength.
Nail Materials
- Acrylic: Durable, long-lasting, and versatile.
- Gel: Offers flexibility and is less damaging than acrylics.
- Polygel: Combines the durability of acrylics with the flexibility of gels.
Choosing the right type of nail, whether for construction or beauty purposes, depends on the specific requirements of your project, including durability, style, and ease of use.
Personalized Nail Recommendations
Factors to Consider for Personalized Nail Recommendations
Nail Length and Shape
Selecting the ideal nail length and shape is essential for comfort and style. Consider your daily activities and personal preferences:
- Lifestyle: For an active lifestyle or frequent hand use, shorter, sturdier nails like square or oval shapes are more practical.
- Occasions: For special events, dramatic shapes like stiletto or coffin nails add elegance and boldness but require more upkeep, making them ideal for those willing to invest in nail care.
- Maintenance: Longer nails, such as almond or stiletto shapes, often require more upkeep and are better suited for those willing to invest time in nail care.
Nail Material
Different materials offer unique benefits and cater to various needs:
- Acrylic Nails: These are durable and long-lasting, making them ideal for those who prefer minimal maintenance. They are also great for those who want to experiment with intricate designs.
- Gel Nails: Gel nails provide a natural look and feel, offering flexibility and less damage to the natural nail. They are perfect for those who prefer a more natural appearance.
- Polygel Nails: Combining the benefits of acrylic and gel, polygel nails are lightweight yet strong, making them suitable for beginners who want the best of both worlds.
Custom Sizing and Fit
Achieving the perfect fit for your nails ensures comfort and durability:
- Measure Each Nail Individually: Since nail sizes can vary between fingers, measuring each nail ensures a precise fit.
- Use Sizing Kits: Many brands offer sizing kits to help you find the perfect fit before committing to a full set.
- Consider Adhesive Type: Different adhesives can affect the fit and comfort of the nails. Thicker adhesives may require slightly larger nail sizes.
Personalized Design Choices
Your nail design should reflect your personality and preferences:
- Color Preferences: Choose colors that complement your skin tone and wardrobe. Classic colors like nude, red, and pink are versatile, while bold colors like blue, green, and black make a statement.
- Art and Decorations: Choose simple or intricate designs that match your style, including seasonal themes, holiday motifs, or personalized elements like initials or favorite symbols.
- Texture and Finish: Matte, glossy, and glitter finishes each offer a unique look. Choose a texture that matches your aesthetic and the occasion.
Maintenance and Care
Proper maintenance extends the life of your nails and keeps them looking their best:
- Regular Upkeep: Schedule regular touch-ups and refills, especially for longer or more intricate designs, to maintain their appearance and prevent damage.
- Moisturize and Protect: Regularly apply cuticle oil and hand cream to keep nails and skin hydrated, and wear gloves for tasks that might damage your nails.
- Avoid Harsh Chemicals: Limit exposure to harsh chemicals and acetone, which can weaken your nails. Opt for acetone-free nail polish removers and gentle cleaning products.
Detailed Nail Care Advice
Essential Nail Care Practices
Maintaining healthy nails involves several daily and weekly routines that ensure your nails stay strong and look their best.
Daily Nail Care Routine
- Keep Nails Clean and Dry: Wash your hands and nails regularly to keep them free from dirt and bacteria. Dry them thoroughly, especially after washing hands or taking a bath.
- Moisturize: Use mild soap and acetone-free nail polish removers, and apply hand cream and cuticle oil daily to keep your nails and surrounding skin hydrated.
Weekly Nail Care Routine
- Trim Regularly: Trim your nails straight across every week or two with sharp scissors or clippers to prevent snags and breakage.
- File Nails: Smooth out any rough edges with a fine-grit nail file, shaping them to your desired style. Always file in one direction to avoid weakening the nails.
- Buff Nails: Use a nail buffer to gently polish the surface of your nails. This can help to remove ridges and add a natural shine.
Protecting Your Nails
Avoid Harsh Chemicals
- Gloves: Protect your nails by wearing gloves during household chores or gardening to shield them from harsh chemicals and physical damage.
- Nail Polish: Limit the use of nail polish and avoid peeling it off, which can damage the nail surface.
Avoid Nail Biting
- Keep Nails Short: Short nails are less tempting to bite.
- Apply Bitter Polish: Use a bitter-tasting nail polish specifically designed to deter nail biting.
Strengthening Your Nails
Nutrition and Supplements
- Healthy Diet: Make sure your diet includes essential vitamins and minerals like biotin, vitamin E, and omega-3 fatty acids, and consider biotin supplements if your nails are weak or brittle.
Protective Treatments
- Nail Hardeners: Apply nail hardeners or strengtheners to provide an extra layer of protection and prevent breakage.
- Avoid Acrylics and Gels: Give your nails a break from acrylics and gels every few months to allow them to recover and strengthen naturally.
Dealing with Common Nail Issues
Yellow Nails
- Hydrogen Peroxide: Soak your nails in a mixture of hydrogen peroxide and water to lighten yellow stains.
- Lemon Juice: Rub lemon juice on your nails, as it has natural bleaching properties that can help remove discoloration.
Brittle Nails
- Moisturize More: Increase the frequency of applying moisturizers and cuticle oils.
- Avoid Water Exposure: Reduce prolonged exposure to water, as it can make nails more brittle.
Professional Nail Care
Regular Manicures
- Visit a Professional: Schedule regular manicures to keep your nails in top shape. A professional can also identify and address any nail health issues.
- Sanitation: Ensure that the salon follows proper sanitation practices to avoid infections.
Nail Treatments
- Paraffin Wax Treatments: These can help moisturize and soften your nails and cuticles.
- Nail Strengthening Treatments: Opt for professional treatments designed to strengthen and protect your nails.
Step-by-Step Guide to Nail Care
Daily Nail Care Routine
Regularly wash your hands and nails to remove dirt and bacteria. Ensure you dry them thoroughly after washing to prevent moisture from weakening your nails.
Apply hand cream and cuticle oil daily to keep your nails and surrounding skin moisturized, preventing dryness and promoting healthy nail growth.
Weekly Nail Care Routine
A weekly routine helps maintain the shape and health of your nails.
Trim your nails straight across every week or two to prevent snags and reduce breakage. Smooth any rough edges with a fine-grit nail file, shaping your nails as desired by filing in one direction to avoid weakening them.
Use a nail buffer to gently polish the surface of your nails. Buffing removes ridges and adds a natural shine, promoting a smooth appearance.
Protecting Your Nails
Taking steps to protect your nails from damage is crucial for maintaining their health.
Protect your nails from harsh chemicals and damage by wearing gloves during household chores and gardening. Limit the use of nail polish and avoid peeling it off, as this can damage the nail surface.
Keep your nails short to reduce the temptation to bite them. Apply a bitter-tasting nail polish designed to deter nail biting.
Strengthening Your Nails
Strengthening your nails involves both dietary considerations and protective treatments.
Include essential vitamins and minerals like biotin, vitamin E, and omega-3 fatty acids in your diet. If your nails are weak or brittle, consider taking biotin supplements.
Apply nail hardeners or strengtheners to provide an extra layer of protection and prevent breakage. Give your nails a break from acrylics and gels every few months to allow them to recover and strengthen naturally.
Dealing with Common Nail Issues
Addressing common nail issues promptly can help maintain their health and appearance.
Soak your nails in a mixture of hydrogen peroxide and water to lighten yellow stains. Alternatively, rub lemon juice on your nails, as it has natural bleaching properties that can help remove discoloration.
Increase the frequency of applying moisturizers and cuticle oils to keep your nails hydrated. Reduce prolonged exposure to water, as it can make nails more brittle.
Professional Nail Care
Regular professional care can help maintain the health and appearance of your nails.
Schedule regular manicures to keep your nails in top shape. A professional can also identify and address any nail health issues.
Consider professional treatments such as paraffin wax treatments to moisturize and soften your nails and cuticles. Nail strengthening treatments provided by professionals can also help reinforce your nails.
Frequently Asked Questions
Below are answers to some frequently asked questions:
How do I measure my nail size?
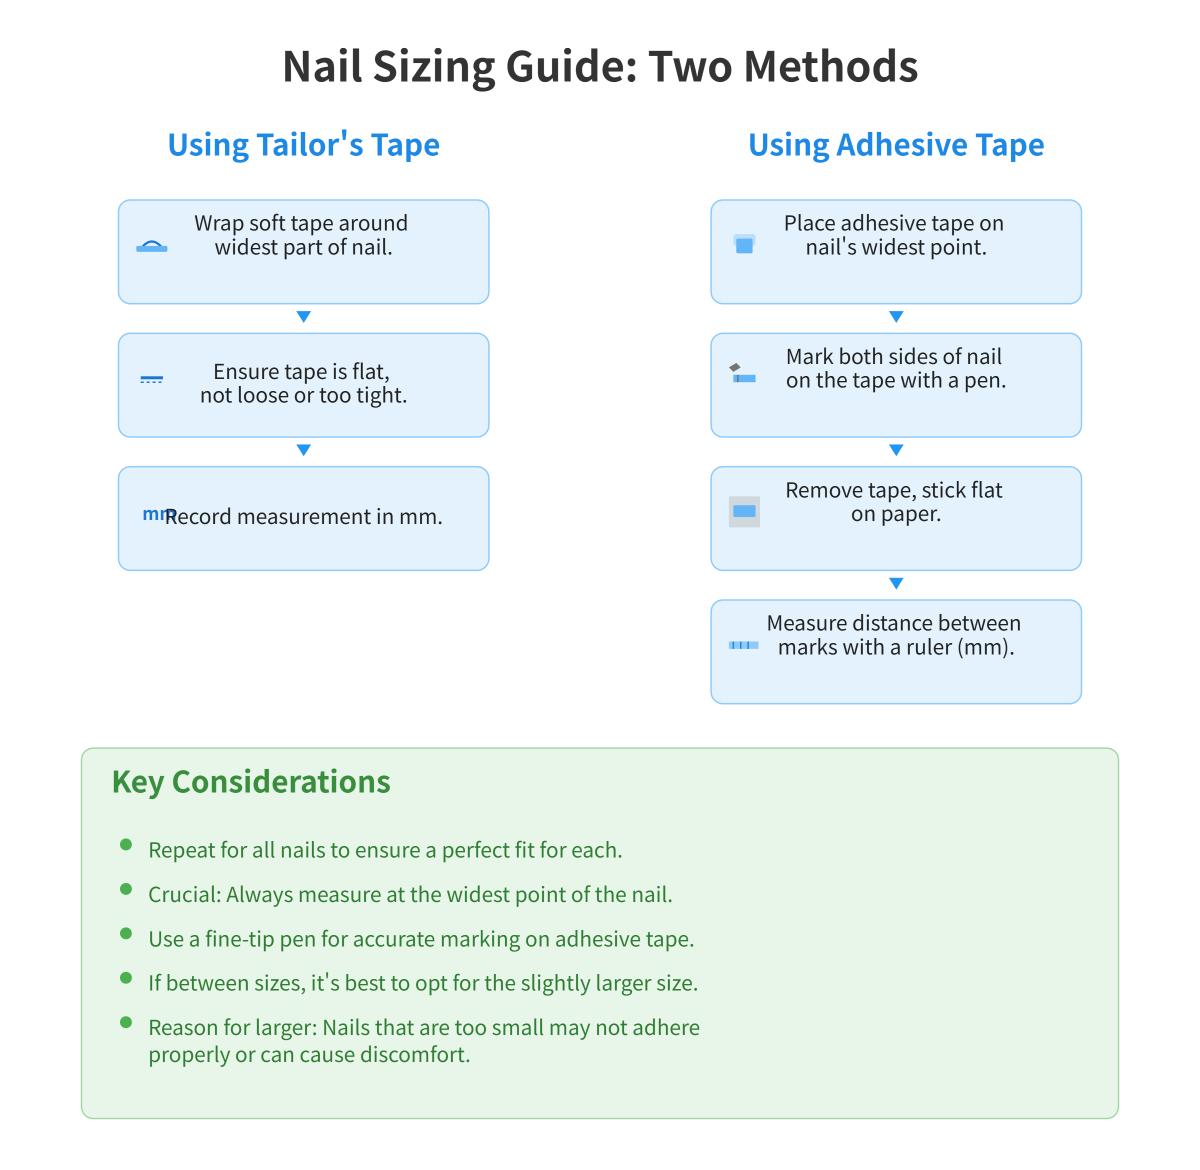
To measure your nail size, you can use either a tailor’s tape or adhesive tape method. For the tailor’s tape method, wrap a soft measuring tape around the widest part of each nail, ensuring it lies flat, and record the measurements in millimeters. For the adhesive tape method, place a piece of tape across the nail at its widest point, mark both sides with a pen, remove the tape, stick it onto paper, and measure the distance between the marks with a ruler in millimeters. Repeat for all nails. It’s important to identify the widest point of each nail and use a fine-tip pen for accuracy. If your measurements fall between sizes, opt for the slightly larger size, as smaller nails may not adhere well.
What are the different types of nails available?
Nails come in various types, each designed for specific applications. Common nails are used for general construction and framing due to their strength. Finish or casing nails are ideal for fine carpentry and cabinetry, as they can be easily countersunk for a smooth finish. Brad nails have thin shanks and small heads, making them suitable for delicate woodworking projects. Roofing nails have a short shank and wide head, perfect for securing shingles. Framing nails are similar to common nails but specifically for framing tasks. Box nails are used in heavy-duty framing, while duplex nails, with their double heads, are used for temporary structures. Pole barn nails have ring shanks for increased holding strength in pole barn construction. Connector nails are designed for attaching structural hardware, and cap nails, with a plastic cap, are used to secure insulation materials. Trim nails are used for exterior trim work, and pin nails, with no head, are ideal for securing thin veneers. Each type serves a unique purpose, ensuring the right nail is available for every project.
What does penny size refer to in nail context?
In the context of nails, penny size, abbreviated as “d,” is a traditional measurement indicating the length of a nail. This system originated in 15th-century England, where the cost of nails was determined by their length. Although the pricing aspect is now obsolete, the term “penny size” remains a standard way to express nail length.
The penny size system works as follows:
- A 2d nail is 1 inch long.
- A 4d nail is 1.5 inches long.
- A 6d nail is 2 inches long.
- A 10d nail is 3 inches long.
- A 16d nail is 3.5 inches long.
Up to 10d, each increase in penny size adds about 1/4 inch to the nail’s length. Beyond 10d, the increment pattern changes, but generally, larger penny sizes correspond to longer nails. Understanding penny size helps in selecting the appropriate nail length for your project.
How do I choose the right nail for my project?
To choose the right nail for your project, consider the following key factors:
- Nail Type: Different projects require different types of nails. For example, brad nails are ideal for lightweight trim and small moldings, finish nails are suitable for heavier tasks like cabinetry, and pin nails are perfect for delicate work where minimal visibility is desired.
- Gauge and Size: The gauge of a nail indicates its thickness. Lower gauges mean thicker nails, which provide more holding power but can be more visible. Higher gauges are thinner and less noticeable but may not hold as strongly. Also, consider the length and diameter of the nail for the specific material and project requirements.
- Material: Choose nails made from materials that suit your project’s environment. Stainless steel nails are resistant to corrosion and ideal for outdoor projects, while copper nails are good for projects requiring a decorative finish.
- Project Requirements: Match the nail’s strength and visibility to your project’s needs. For example, use stronger nails for structural applications and smaller, less visible nails for finishing touches.
By considering these factors, you can select the right nail to ensure the success and durability of your project.
What tools are essential for nail care?
For effective nail care, having the right tools is essential. The key tools include:
- Nail Clippers: Used to trim nails to the desired length, preventing splits and cracks. They come in both straight-edged and curved designs to suit different nail shapes.
- Nail Files and Buffers: Nail files shape the nails, while buffers smooth the nail surface, creating a perfect base for polish. Multi-grit files offer versatility, and buffers come in various grits for different smoothing levels.
- Cuticle Pushers and Nippers: Cuticle pushers clean the nail bed, and nippers trim excess skin. Stainless steel versions are preferred for durability and hygiene.
- Nail Polish Remover: Removes old polish safely without damaging the nail. Opt for gentle, environmentally friendly formulas.
- Base and Top Coats: Base coats protect and prepare the nail for polish, while top coats seal and add shine. Quick-drying or gel-like formulas are convenient options.
- Nail Art Tools: Tools like dotting tools, striping tape, and fine brushes are used for creating nail designs.
- Nail Moisturizer and Cuticle Oil: These products keep nails and cuticles hydrated, promoting healthy growth. Regular application yields the best results.
These tools help maintain healthy, well-groomed nails and support professional-looking manicures at home.
What are common mistakes to avoid in nail care?
Common mistakes to avoid in nail care include over-trimming nails, which can expose the nail bed to injury or infection. It’s advisable to leave a small white edge for protection. Neglecting cuticle care is another mistake; gently push back cuticles and moisturize them to prevent infections. Using low-quality tools, such as metal nail files, can cause nails to split, so opt for high-quality tools like glass nail files. Additionally, failing to moisturize nails can lead to brittleness and breakage, so regularly apply cuticle oil and hand creams rich in vitamins. For gel nails, avoid using coarse grit for prepping and overusing prep products, which can dehydrate nails. Properly clean and prepare the nail surface before applying press-on nails to ensure adhesion and correct sizing.

