Tapped Hole vs. Threaded Hole – The Definitive Comparison
When it comes to securing components in engineering and manufacturing, the choice between tapped and threaded holes can significantly impact…
If you’ve ever faced the frustration of loose threads or struggled to tap holes perfectly straight, you’re not alone. These common issues can turn a seemingly simple task into a daunting challenge, even for experienced DIY enthusiasts and professionals alike. Tapping threaded holes with precision is essential for ensuring strong and reliable connections, but achieving that perfect tap requires more than just basic knowledge. In this article, we’ll dive deep into advanced tap alignment techniques, the importance of selecting the right drill bit size, and the proper use of tapping fluids. We’ll also explore how to choose the correct tap and handle for your specific material, and provide tips to prevent common problems like crooked threads and broken taps. Ready to master the art of tapping threaded holes? Let’s get started.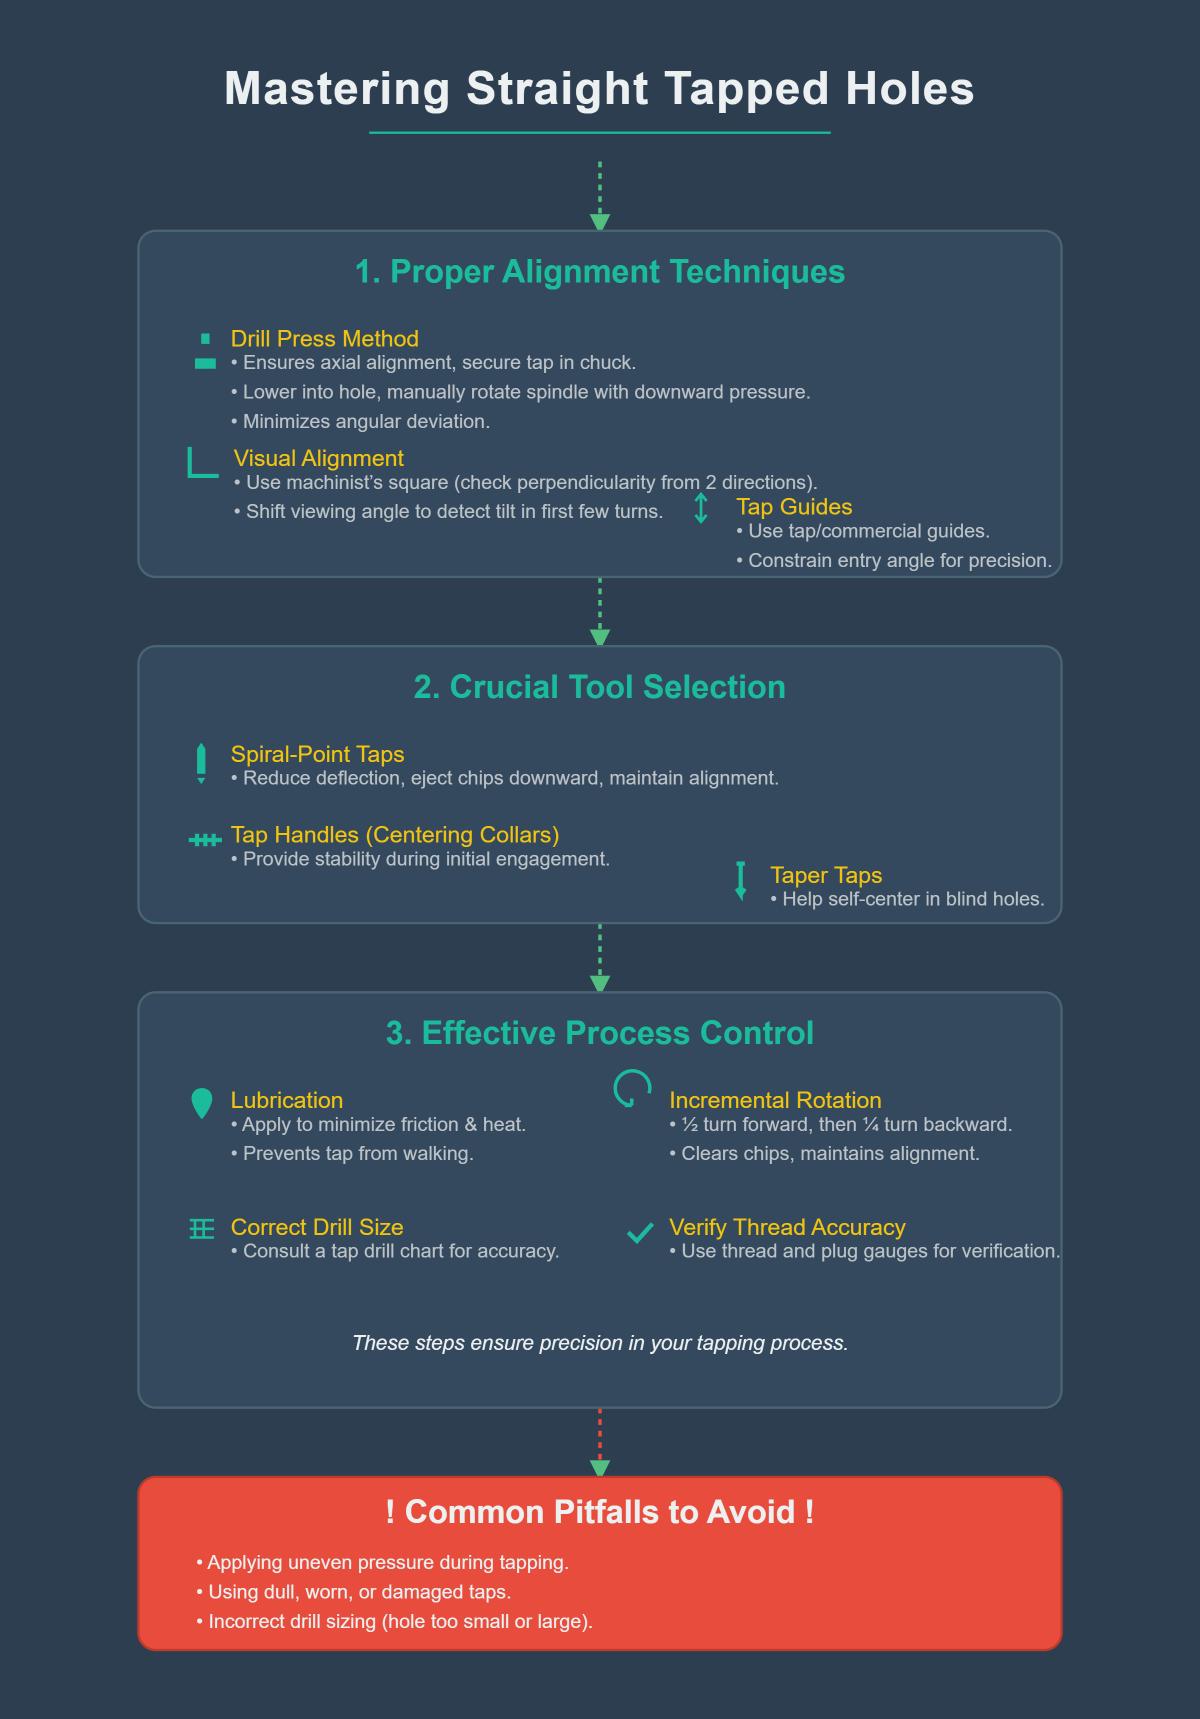
Drill bit sizing for tapping is crucial to ensure that the threads formed are accurate and durable. Proper sizing prevents tap breakage, thread stripping, and ensures optimal thread engagement. The process involves selecting a drill bit that creates a hole with the correct minor diameter, which is essential for forming strong internal threads.
A tap drill chart is a valuable tool that provides the correct drill bit size for different tap sizes and thread percentages. The thread percentage indicates how much of the full thread height is engaged. Common thread percentages are 75%, 85%, and 90%. While 75% is standard for general use, 85% and 90% are preferred for fine threads and high-strength applications.
Selecting the right drill bit involves knowing the major diameter of the tap and the desired thread engagement. The “rule of thumb” method suggests using 85% of the major diameter for coarse threads and 90% for fine threads. Additionally, for metric threads, subtracting the pitch from the major diameter gives the appropriate drill size.
Different materials require specific adjustments to the drill bit size to ensure optimal thread formation and tool longevity.
For softer materials, choose drill sizes at the lower end of the minor diameter range to ensure strong thread engagement and prevent stripping under load.
For harder materials, use drill sizes at the upper end of the minor diameter range to reduce tap wear and breakage.
The standard thread engagement depth is 75%, balancing strength and ease of tapping. For high-strength applications, reducing the engagement to 60–65% can help avoid tap breakage without significantly compromising thread strength.
Threads like Spiralock require larger minor diameters than conventional threads. It’s crucial to refer to manufacturer-provided charts for non-standard threads to ensure accuracy.
Selecting the right tap handle is essential for achieving accurate and efficient tapping. Each type of handle offers specific benefits, depending on the application and material.
The T-handle tap wrench is the most commonly used tap handle, which offers excellent control and leverage. It is ideal for manual tapping, allowing precise alignment and consistent pressure. This handle is especially effective for smaller taps and is available in fixed and adjustable versions to accommodate different tap sizes.
A ratcheting tap wrench offers the advantage of continuous motion without the need to reposition the handle, which makes the tapping process smoother and more efficient. This type of wrench is particularly useful in confined spaces where full rotation of a standard T-handle is impractical. The ratcheting mechanism can be set to rotate in one direction, making the tapping process smoother and more efficient.
Adjustable tap handles are versatile tools that can securely grip taps of various sizes. These handles have adjustable jaws to fit different tap shanks, making them suitable for a wide range of tapping tasks. They are beneficial when working with taps that have non-standard shank sizes or when multiple tap sizes are required for a project.
Understanding the different types of taps is crucial for selecting the right one for your application.
Taper taps have a gradual cutting edge, making them ideal for starting threads in through-holes. They are designed to ease into the material, reducing the risk of tap breakage and ensuring smooth initial threading. Taper taps are often used in the beginning stages of tapping, especially for blind holes.
Plug taps have fewer tapering threads than taper taps and are used after the initial threads are cut. They are suitable for both through and blind holes and provide a good balance between ease of use and thread depth. Plug taps are versatile and commonly used in general tapping applications.
Bottoming taps are designed to cut threads to the bottom of a blind hole. They have very little taper, allowing them to finish threads fully to the hole bottom. These taps are used after taper or plug taps to complete the threading process in blind holes.
Using the correct tap handle technique is vital for achieving high-quality threads.
When using a T-handle tap wrench, ensure the tap is aligned vertically with the hole. Apply steady, even pressure while keeping the wrench straight. Rotate the tap clockwise to cut the threads and periodically reverse it to clear chips and prevent binding.
For increased accuracy, secure the tap in a T-handle wrench and align it vertically using a drill press spindle. This method ensures the tap remains perfectly perpendicular for the first few threads, improving thread quality and reducing the risk of tap breakage.
A taper tap should be used at the beginning of the tapping process, especially for through-holes and blind holes. Its gradual cutting edge reduces the risk of breakage and helps in establishing the initial threads. Taper taps are particularly useful when tapping hard materials or when precise thread alignment is critical.
Choosing the appropriate tap for the material being tapped is essential for optimal performance and tool longevity.
For soft materials, use taps with a larger flute area to ensure efficient chip evacuation. Spiral flute taps are ideal as they help remove chips from the hole, which prevents clogging and reduces the risk of tap breakage.
For hard materials, select taps made from high-speed steel (HSS) or carbide. These materials provide the necessary hardness and wear resistance to cut threads in tough materials. Additionally, using tapping fluid can help reduce friction and extend the life of the tap.
Different tap handle types offer unique advantages depending on the application.
Using a taper tap has several advantages:
Selecting the right tap and handle, combined with proper technique and material considerations, ensures perfectly tapped threaded holes that meet strength and accuracy requirements efficiently.
Tapping fluid is essential in the tapping process, offering lubrication and cooling that improve thread quality and extend tap life. Here are some key benefits:
Choosing the right tapping fluid for your application is crucial for optimal results. Here are some common types:
Proper application of tapping fluid maximizes its benefits. Here are some techniques:
For optimal results, apply tapping fluid under pressure directly into the hole. This ensures that the fluid reaches the cutting lands and the chamfered portion of the tap, crucial areas for lubrication and cooling. Pressure-forced delivery maintains consistent lubrication throughout the tapping process.
Positioning multiple nozzles close to the workpiece and angled near the tap’s axis greatly improves fluid application. This setup ensures the fluid flushes chips efficiently from the flutes and maintains lubrication on all cutting edges. For horizontal tapping operations, using two fluid streams on opposite sides of the tap is recommended.
For automatic fluid application, ensure the fluid starts flowing before the tap engages the material. This pre-lubrication prevents dry cutting conditions that can cause tap failure. Ensure the fluid continues to flow during the entire tapping process and stops only after the tap has been fully retracted.
Maintain continuous contact between the tapping fluid and the cutting lands throughout the tapping process. Intermittent or surface-only lubrication can lead to overheating, poor chip evacuation, and potential tap damage. Consistent lubrication helps achieve superior thread quality and prolongs tap life.
Selecting the appropriate tapping fluid based on the material being tapped is essential for optimal performance:
By following these guidelines and techniques, you can ensure the proper use of tapping fluid, leading to improved thread quality, reduced tool wear, and enhanced productivity in your tapping operations.
Thread pitch is the distance between two consecutive threads, making it a critical factor in threading operations. Accurate thread pitch is essential for achieving the correct fit and function of threaded components.
Thread standards established by organizations like ANSI and ISO ensure compatibility and interchangeability. These standards define thread dimensions, tolerances, and fit classes to achieve different levels of tightness or looseness in thread engagement. For example, ANSI B1.1 covers Unified Inch Screw Threads, including UNC (Unified National Coarse) and UNF (Unified National Fine) threads, while ISO 68-1 specifies the basic profile for metric screw threads, including coarse and fine thread series.
Thread fit refers to the tolerance or allowable deviation in the dimensions of the internal and external threads. Fit classes are designated to achieve different levels of tightness or looseness in thread engagement:
Metric threads use fit grades like 6H/6g, where ‘H’ is for internal threads and ‘g’ is for external threads.
Achieving the correct thread engagement and fit involves several critical steps:
Select a tap that has the correct thread pitch and fit class for your application. Ensure the tap is suitable for the material being tapped to avoid excessive wear or breakage.
The pilot hole diameter must be precise to ensure proper thread formation. Use a tap drill chart to select the correct drill bit size based on the thread pitch and desired thread percentage. For instance, a 1/2-13 UNC tap requires a 27/64″ drill bit to achieve approximately 75% thread engagement.
Make sure the tap is straight to avoid misaligned threads. Apply steady pressure and use tapping fluid to reduce friction and clear away chips. Rotate the tap clockwise to cut threads, periodically reversing to break and remove chips.
After tapping, inspect the threads using a thread gauge to ensure they meet the required standards. Check for smooth engagement by threading a matching bolt or screw into the tapped hole. Any resistance or binding may indicate misalignment or incorrect thread pitch.
The hardness of the material significantly impacts the tapping process. For hard materials like hardened steel or those with a hardness above 38 HRC, durable taps such as carbide or high-speed steel taps with cobalt or powdered metal are recommended for their increased wear resistance.
Using the correct drill bit size is essential for proper thread formation. Refer to a tap drill chart to select the appropriate drill bit, ensuring the drilled hole accommodates the tap correctly.
Using cutting fluid or tapping lubricant reduces friction, prevents tap breakage, and ensures smooth tapping, extending the tap’s life.
Always use safety glasses and gloves to protect against metal shavings and other hazards during the tapping process.
Clean and inspect the hole for debris and burrs before tapping. A clean hole ensures smooth tap entry and reduces the risk of misalignment or tap damage.
Maintain accurate alignment, apply gentle pressure, and regularly reverse the tap to clear chips. This technique ensures consistent thread quality and prevents tap binding or breakage.
When tapping plastics, consider using heat-set inserts for better thread retention and durability. This method provides a more secure thread compared to direct tapping.
For materials with hardness above 55 HRC, thread milling may be a more suitable alternative to tapping due to the high torque and heat involved in the process. Thread milling provides greater control and reduces the risk of tap breakage.
Implementing these techniques and tips will help you effectively tap threaded holes in various materials, ensuring quality and consistency in your work.
Precision tapping requires understanding the key differences between metric and imperial threads, as these impact tapping techniques, tool selection, and thread quality.
Metric Threads:
Imperial Threads:
Selecting the right tools for metric and imperial threads is crucial for achieving precise and durable threads.
Metric Taps:
Imperial Taps:
Achieving perfect threads requires careful hole preparation, thread engagement, and compatibility solutions.
Metric:
Imperial:
General Rule:
Adapters:
Thread Repair:
To ensure the accuracy and durability of threads, several critical considerations must be addressed.
Thread Gauges:
Material Hardness:
Breadboard Alignment:
Despite careful preparation, tapping issues can still occur. Here are some common problems and solutions:
Thread Stripping:
Chip Clogging:
Dimensional Errors:
Understanding the differences between metric and imperial threads, selecting appropriate tools, and following best practices ensure high-quality, precise threads in various applications.
Crooked threads in deep holes can compromise the integrity and functionality of threaded connections. To prevent this, ensure precise alignment and consistent tapping techniques.
Broken taps can obstruct the hole and damage the workpiece. Removing them requires careful techniques to avoid further damage.
Loose threads can lead to weak connections and potential failure. Identifying and addressing the root causes is essential for maintaining thread integrity.
Tap breakage is a common issue that can halt operations and damage the workpiece. Preventing breakage involves proper tool selection, lubrication, and technique.
Repairing damaged threads can restore functionality and extend the lifespan of components. Various methods are available depending on the extent of the damage.
Below are answers to some frequently asked questions:
To tap holes perfectly straight, focus on proper alignment techniques, tool selection, and process control. Begin by using a drill press method to ensure axial alignment. Secure the tap in the drill chuck, lower it into the pre-drilled hole, and manually rotate the spindle while applying downward pressure. This method minimizes angular deviation common with handheld tapping.
For visual alignment, use a machinist’s square to check the tap’s perpendicularity from two orthogonal directions during the first few turns. Shifting your viewing angle helps detect any tilt. Additionally, using tap guides or commercial guides can constrain the tap’s entry angle, providing extra precision.
Choosing the right tools is crucial. Spiral-point taps reduce deflection by ejecting chips downward, maintaining alignment, while taper taps help self-center in blind holes. Tap handles with centering collars provide stability during initial engagement.
During the tapping process, apply lubrication to minimize friction and heat, preventing the tap from walking. Use incremental rotation, advancing ½ turn forward and ¼ turn backward to clear chips and maintain alignment. Finally, ensure the correct drill size by consulting a tap drill chart, and verify thread accuracy with thread and plug gauges.
Common pitfalls to avoid include applying uneven pressure, using dull taps, and incorrect drill sizing. By following these techniques and tips, you can achieve perfectly straight tapped holes.
For tapping a 1/2-13 UNC thread, the recommended drill bit size is 27/64 inch (approximately 0.4219 inches). This size is ideal for achieving the correct thread engagement, ensuring strong and clean threads when using a 1/2″-13 tap. The 1/2-13 designation refers to a nominal diameter of 1/2 inch with 13 threads per inch (TPI), which is a standard Unified National Coarse (UNC) thread.
Using a 27/64″ drill bit before tapping minimizes the risk of excessive torque or thread stripping by leaving the appropriate amount of material for the tap to cut into. This provides about 75% thread engagement, which balances strength with ease of tapping. For best results, ensure the tap is aligned perpendicularly to the workpiece, use cutting fluid to reduce friction and heat, and periodically back off the tap to clear chips. This process will help in producing high-quality, durable internal threads.
Loose tapped threads are often caused by a few critical factors that need attention to achieve perfectly threaded holes. One primary issue is misalignment between the drilled hole and the spindle, which can result in unevenly cut threads that do not fit properly. Ensuring proper alignment during tapping can prevent this issue.
Another significant factor is using the incorrect feed rate. Overfeeding or underfeeding the tap can damage the threads, leading to oversized holes and loose fits. Adjusting the feed rate to match the tap’s thread lead closely is essential.
Lack of or incorrect lubrication can also cause loose threads due to increased friction, which leads to uneven cutting. Applying the correct type and amount of lubricant for the material being tapped helps reduce friction and prevent thread damage.
Using a dull or incorrect tap can result in poor thread quality. Regularly sharpening or replacing the tap, and ensuring it is suitable for the material, can improve thread integrity.
Lastly, using an incorrect drill size can cause the tap to bind or produce poor threads. Ensuring the drill bit creates a hole slightly larger than the tap’s minor diameter allows for smoother tapping.
By addressing these factors—alignment, feed rate, lubrication, tap condition, and drill size—you can significantly improve the quality and fit of your tapped threads.
For tapping aluminum, it is best to use forming taps due to their ability to create threads without producing chips, which is particularly beneficial for softer aluminum alloys. This method extends tool life and reduces costs per hole. When using cut taps, select spiral flute taps for blind holes to pull chips upward, and spiral point taps for through holes to push chips forward. High-speed steel (HSS) taps are standard, but cobalt-coated variants offer better heat resistance.
Operate forming taps at higher speeds compared to cut taps. For cut taps, use moderate speeds and reverse the tap every 2-3 turns during manual tapping to break chips. Apply dedicated aluminum tapping fluid or heavy-duty synthetic coolant to minimize galling and heat, and always lubricate both the tap and the hole before operation. Use tapping guides or CNC rigid holders to maintain perpendicularity, and ensure alignment by starting with light turns and verifying before continuing. Regular inspection of threads with GO/NO-GO gauges post-tapping ensures thread quality.
Using tapping fluid offers several benefits that enhance the precision and efficiency of creating threaded holes. Firstly, it significantly reduces friction between the tap and the workpiece, preventing tool binding and minimizing the risk of tap breakage or thread distortion. This friction reduction also aids in heat dissipation, preserving the hardness of the tap and extending its lifespan.
Additionally, tapping fluid improves chip evacuation by flushing metal debris from the hole, ensuring smoother thread surfaces and tighter tolerances. It also allows for higher tapping speeds without compromising thread quality, thereby increasing operational efficiency and reducing cycle times.
Moreover, tapping fluids are formulated to suit specific materials, with high-pressure lubricants recommended for hard metals and lighter oils for softer materials like aluminum. Proper application, including pre-tapping preparation and reapplication during deep hole tapping, is essential for optimal results.
To repair damaged threads effectively, several professional techniques can be utilized depending on the severity and type of thread damage. For minor damage to male threads (e.g., bolts), using a thread file or a split die can help restore the threads by carefully aligning the tool with undamaged sections and filing away the imperfections. For female threads (e.g., in engine blocks), thread inserts are the preferred method.
Thread inserts, such as Heli-Coil or TIME-SERT, offer a reliable solution. The Heli-Coil process involves drilling out the damaged threads, tapping new threads, and installing a wire-coil insert. This method is cost-effective and restores the thread’s strength. Alternatively, TIME-SERT inserts provide a more robust repair by using a solid sleeve that is pressed into an oversized hole, offering higher torque resistance and a permanent fix.
Proper tapping techniques are crucial. Ensure the drill bit is the correct size for the tap’s minor diameter, lubricate with cutting oil, and use a guide to maintain alignment. Rotate the tap forward 1-2 turns and back ½ turn to clear chips, ensuring clean and precise threads.
By selecting the appropriate repair method and following precise tapping practices, damaged threads can be restored effectively, maintaining or exceeding the original thread strength.

