Flat Washer vs Split Lock Washer: What’s the Difference?
In the intricate world of fastening, washers may seem like minor components, but their role is anything but trivial. These…
Imagine a tiny component that plays a crucial role in keeping your assemblies secure and intact—a split lock washer. Whether you’re a DIY enthusiast or just stepping into the world of hardware, understanding how to use split lock washers effectively can save you from many headaches down the line. In this comprehensive guide, we’ll walk you through everything you need to know about split lock washers, from their basic function and benefits to detailed installation steps and best practices. You’ll also learn how to combine them with other types of washers for optimal results. Ready to master the art of split lock washers and ensure your projects are rock-solid? Let’s dive in!
Split lock washers, also known as spring lock washers, are a type of washer designed to prevent loosening of fasteners such as bolts, screws, and nuts. These washers have a helical shape with a gap, allowing them to compress under load. This unique design helps in maintaining tension and resisting rotational forces, which is essential in preventing the fastener from loosening due to vibrations or dynamic loads.
Split lock washers are essential for keeping mechanical assemblies secure and reliable. They are widely used in various industries, including automotive, construction, and industrial machinery, where maintaining the tightness of fasteners is critical. By keeping fasteners tight, split lock washers help ensure the safety and performance of the equipment and structures they secure.
A split lock washer’s helical shape with a gap lets it act like a spring when compressed. When a fastener is tightened, the washer exerts a spring-like force, increasing friction between the threads of the fastener and the mating surface. This friction helps in resisting any movement that could cause the fastener to come loose.
There are several variations of split lock washers, each suited for different applications:
Split lock washers are versatile and can be used in numerous fastening applications:
Split lock washers are manufactured from various materials to meet specific performance and environmental needs:
Split lock washers can be reused if they remain undamaged and retain their original shape. It is crucial to inspect them before reuse to ensure optimal performance. Regular inspection and maintenance of these washers help in maintaining the integrity and reliability of the fastening systems they are part of.
One of the main benefits of split lock washers is their ability to resist vibrations. This feature is particularly useful in automotive assemblies, light industrial machinery, and other applications where vibrations are common. The helical design of the washer acts like a spring, maintaining tension and preventing the fastener from loosening due to vibrations.
Split lock washers are simple to install and remove, making them ideal for applications requiring frequent adjustments or disassembly, and they are generally more cost-effective compared to other locking mechanisms such as lock nuts. This cost efficiency is a significant advantage for both manufacturers and end-users.
The simple design of split lock washers makes them easy to use. They are effective on softer materials where the edges of the washer can dig into the surface, providing additional grip. This simplicity ensures that even beginners can install them correctly with minimal training.
Split lock washers can be less effective when subjected to high dynamic loads. When exposed to extreme forces, the washer may flatten out, losing its ability to maintain tension. This limitation means they may not be suitable for all applications, especially those involving high stress or heavy loads.
The edges of split lock washers can dig into the surfaces they are installed on. While this can provide additional grip, it can also cause damage to the surfaces, particularly if they are softer materials. This potential for damage needs to be considered when choosing to use split lock washers.
In situations where lubrication is required, split lock washers may not perform effectively. Lubricants can reduce the friction that the washer relies on to maintain tension, leading to a loss of its locking ability. This makes them unsuitable for applications where lubricants are necessary.
Split lock washers lose some effectiveness after being compressed, making reuse unreliable. Reusing them after they have been compressed can compromise their ability to maintain tension, leading to potential failures in the fastening system. It is generally recommended to use a new washer each time to ensure optimal performance.
For split lock washers to work effectively, they must fit correctly within the assembly. A proper fit guarantees that the washer will maintain tension and prevent the fastener from loosening.
Ensure the split lock washer dimensions match the fastener’s specifications, fitting snugly around the bolt or screw without excessive play. The correct size helps maintain necessary friction and tension.
Ensure the mating surfaces are clean and free from debris or lubrication, as contaminants can reduce the friction necessary for the washer to function correctly. For softer materials, consider using a flat washer underneath the split lock washer to prevent surface damage.
Mistakes during installation can compromise the effectiveness of split lock washers. Here are some common pitfalls to avoid:
Avoid placing the split lock washer directly on soft materials without a flat washer, as this can damage the surface and reduce effectiveness. Always place the split lock washer between the fastener head and a flat washer if necessary.
Excessive tightening can flatten the split lock washer, reducing its ability to maintain tension. Tighten the fastener to the recommended torque specifications to ensure the washer retains its spring-like properties.
Inspect split lock washers before reuse. If the washer is deformed or shows signs of wear, replace it with a new one. Reusing damaged washers can lead to failure in maintaining tension and securing the fastener.
Safety is paramount when working with any hardware, including split lock washers. Follow these precautions to ensure a safe and effective assembly:
Always wear appropriate protective gear, such as gloves and safety glasses, to protect yourself from potential injuries while handling fasteners and tools.
Use the right tools to avoid damaging fasteners and washers. A torque wrench ensures the fastener is tightened to the correct specification.
Adhere to the manufacturer’s installation guidelines and torque specifications. These guidelines are designed to ensure the optimal performance of the split lock washers and the By following these assembly tips, you can ensure that split lock washers are installed correctly, providing reliable and long-lasting fastening solutions.
Before starting the installation process, gather all the tools and materials you need for a smooth and efficient installation.
Proper preparation is essential for a successful installation. Follow these steps to prepare the surface and components:
Proper placement and tightening of the split lock washers are crucial for their effectiveness. Follow these steps for correct installation:
Once the assembly is complete, perform a final check to ensure everything is secure:
Regular maintenance is essential to ensure the long-term effectiveness of split lock washers:
Proper use of split lock washers keeps fasteners secure and prevents them from loosening due to vibrations or movement.
Choosing the right split lock washer is crucial for your application. Consider the following factors:
Follow these steps to properly use split lock washers:
Regular maintenance and inspection are vital for ensuring the long-term effectiveness of split lock washers:
Split lock washers can be used in combination with other types of washers to enhance their effectiveness:
Use split lock washers with flat washers for softer materials or when extra load distribution is needed to prevent damage. This combination provides additional surface protection and load distribution.
By following these steps and best practices, split lock washers can be used effectively to secure fasteners in various applications, ensuring stability and resistance to loosening.
When combining split lock washers with flat washers, it’s essential to understand the correct placement and purpose of each. Flat washers help spread the load of the fastener, offering a smooth surface and protecting the material underneath. Split lock washers, on the other hand, prevent loosening due to vibrations.
Combining split lock washers with flat washers is beneficial in scenarios where:
In addition to split lock washers, other locking mechanisms can be used to prevent fasteners from loosening:
Thread lockers are adhesives applied to bolt and screw threads to keep them locked in place, especially useful in high-vibration environments.
Lock nuts have internal mechanisms, such as nylon inserts or deformed threads, that provide additional resistance to loosening. They are commonly used in conjunction with split lock washers for enhanced security.
Similar to split lock washers, spring washers are designed to maintain tension and prevent loosening. They come in various designs, including wave washers and Belleville washers, each suited for different applications.
When selecting the appropriate locking mechanism, consider the following:
By understanding the proper use and combination of split lock washers with other hardware, you can ensure a secure and reliable fastening solution for various applications.
Below are answers to some frequently asked questions:
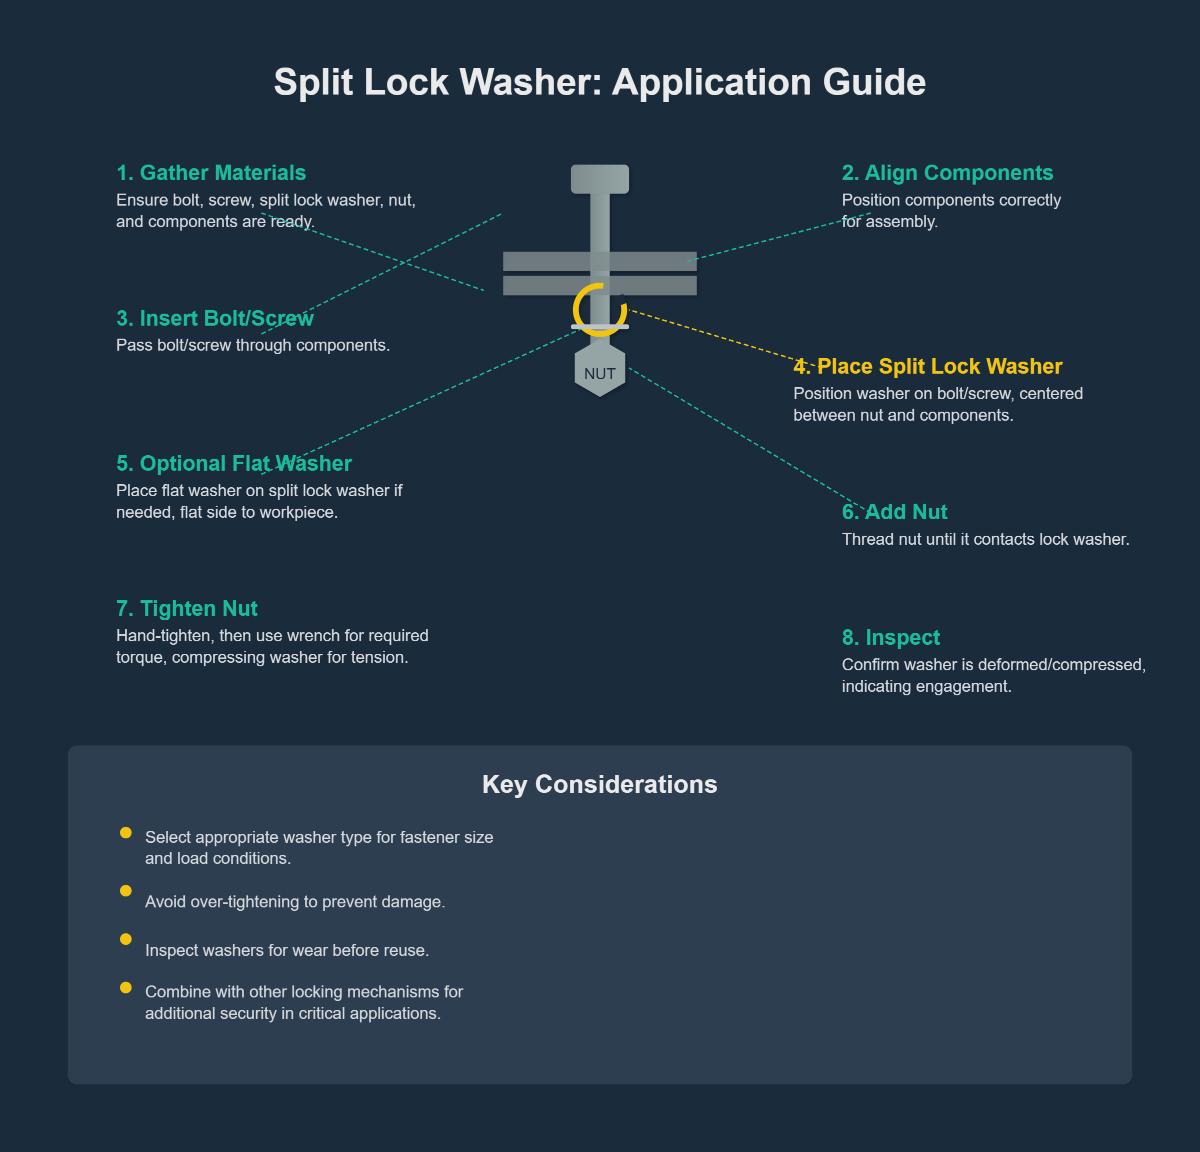
To use split lock washers effectively, follow these steps:
For effective use, select the appropriate type of split lock washer for your fastener size and load conditions, avoid over-tightening to prevent damage, and inspect washers for wear before reuse. Combining with other locking mechanisms can provide additional security for critical applications.
Split lock washers offer several benefits and drawbacks that should be considered when deciding to use them.
Benefits:
Drawbacks:
Understanding these pros and cons will help you decide whether split lock washers are suitable for your specific application.
Yes, you can combine split lock washers with other types of washers. A common practice is to use a flat washer in conjunction with a split lock washer. The flat washer is placed between the split lock washer and the surface to prevent damage and distribute the load more evenly. This combination can enhance both load distribution and vibration resistance. However, combining split lock washers with other locking mechanisms, like toothed or serrated lock washers, may not always be necessary and could sometimes complicate the assembly. It is important to evaluate the specific requirements of your application to determine the most effective combination.
To install split lock washers effectively, you’ll need the following tools and materials:
Ensure you align all components properly, insert the bolt or screw, add the flat washer if using, place the split lock washer, thread the nut, hand-tighten, and then use the wrench or socket wrench to apply the specified torque. This process will ensure the lock washer is properly compressed and the components are securely fastened.
Split lock washers are not recommended in several specific situations. Firstly, they are ineffective in applications with high dynamic loads because their locking mechanism may not maintain joint integrity under such conditions. Secondly, in lubricated joints, the presence of lubrication can reduce the washer’s ability to prevent sliding and rotation, diminishing its effectiveness. Additionally, for safety-critical applications, such as aerospace or high-risk machinery, split lock washers may not provide the necessary reliability and could fail under extreme conditions. They are also unsuitable for highly corrosive environments, as they may not withstand the conditions despite corrosion-resistant coatings. Lastly, in high-precision applications that require precise control over fastener movement and load distribution, split lock washers may not offer the needed precision.
Split lock washers should be inspected regularly to ensure their effectiveness in preventing loosening due to vibrations or external forces. For general applications, it’s advisable to inspect them periodically as part of routine maintenance or whenever the assembly is disassembled. In environments with significant vibrations or dynamic forces, more frequent inspections may be necessary.
For safety-critical applications, such as automotive brake systems or industrial machinery, inspections should be more frequent, ideally after each major service or any component replacement. During inspection, check for any deformation, wear, or corrosion. If any damage is detected, replace the washer to maintain optimal performance and safety. Regular inspections help ensure the reliability and integrity of the assembly, preventing potential failures.

